

A guide on how to download and install mods in Portal 2 on PC. We cover all of the common routes: the Steam Workshop (both from Steam and from inside the game), standalone Source mods that appear in your library as separate games, and Vortex for the handful of mods hosted on Nexus Mods.
This guide is focused on Windows, but Portal 2 has a native Linux build and everything here works there too - we've noted the path differences where they matter.
Portal 2 is unusual. Valve built a level editor into the game, wired it directly into the Steam Workshop, and then let it run for over a decade. The result is over a million community test chambers, all one click away, and none of them requiring you to touch a single game file.
That's the main event here. Alongside it there's a smaller scene of full standalone mods that install into a sourcemods folder and show up in your Steam library as separate games, and a very small Nexus Mods presence.
For the Workshop example we'll install Enigma Protocol | Chapter 1 by Night Melon, one of the highest-rated maps on the Workshop.
Requirements
- A PC copy of Portal 2 on Steam. The Workshop is Steam-only.
- A Steam account you're signed into, for subscribing.
- 7-Zip or any other archive extraction software (only for standalone mods).
- A free Nexus Mods account (only for Nexus mods).
- A basic understanding of copying folders around (again, only for standalone mods).
The Three Kinds Of Portal 2 Mod
Working out which kind you're dealing with tells you exactly how to install it.
- Workshop maps. Custom test chambers and small campaigns, subscribed through Steam. They install outside your game folder, update themselves, and appear in a menu inside the game. This is the overwhelming majority of Portal 2 content and it's about as safe as modding gets.
- Standalone Source mods. Full total conversions with their own campaigns, menus and sometimes their own assets. These go in Steam's
sourcemodsfolder and appear in your library as separate entries. Portal Stories: Mel, Portal Reloaded and similar. - Loose file mods. Things like ReShade, texture replacements and configuration tweaks, which drop files into the game folder. A small category, and the only one where Vortex is genuinely useful.
Installing Workshop Maps From Steam
Finding The Workshop
Open Portal 2's Steam community hub, from the Workshop tab on the game's library page or directly at steamcommunity.com/app/620/workshop.
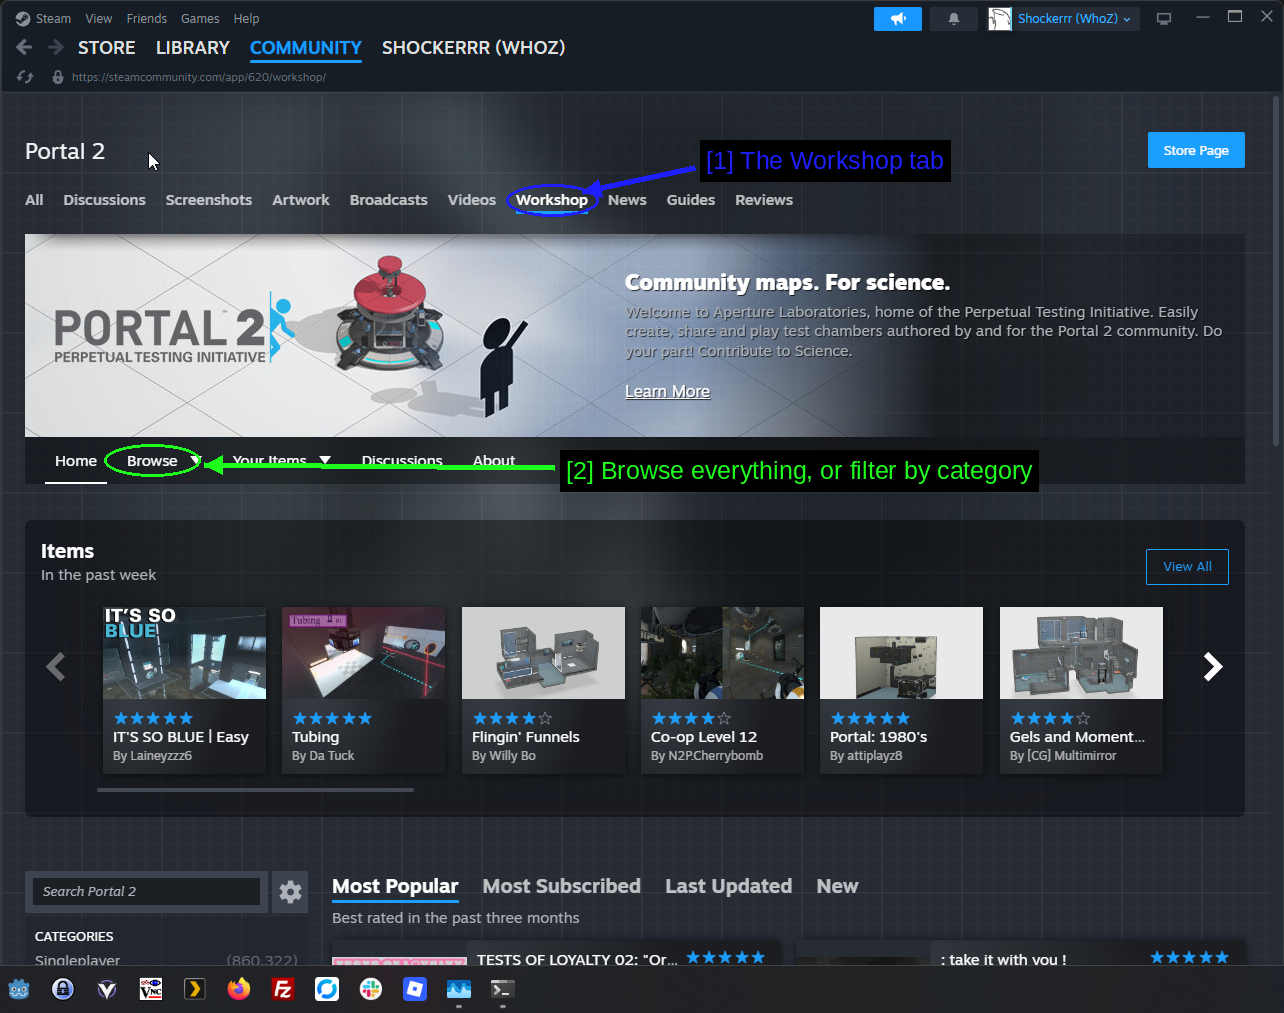
- The Workshop tab: Alongside Discussions, Screenshots, Guides and the rest.
- Browse everything, or filter by category: The Browse drop-down on the Workshop's own nav bar.
The front page shows recently popular items and a few curated rows. Browse is where the real listing lives.
Browsing And Filtering
Over a million items is not something you scroll through, so the filters matter.
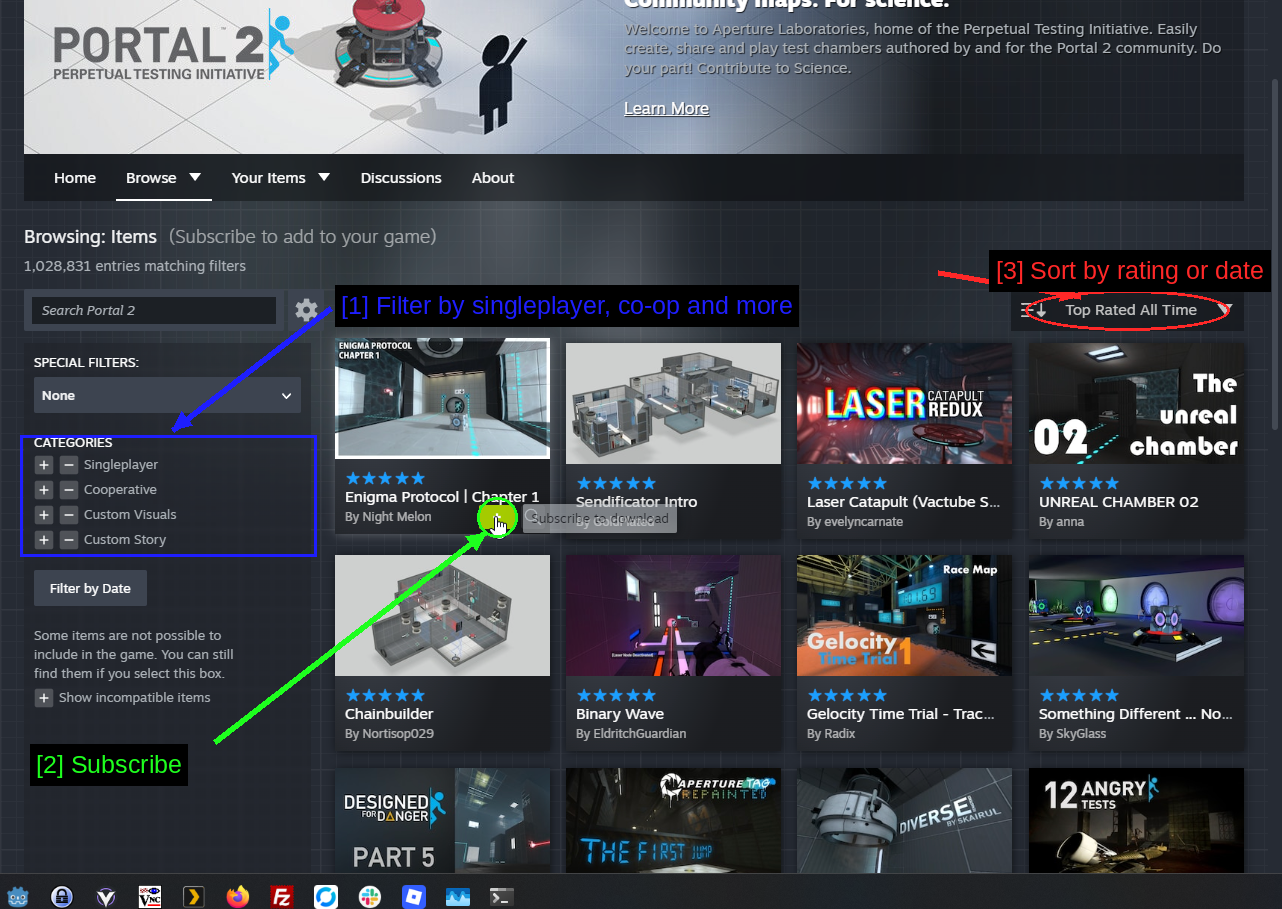
- Filter by singleplayer, co-op and more: CATEGORIES down the left. Singleplayer, Cooperative, Custom Visuals and Custom Story are the useful ones. A map tagged Custom Story is closer to a small campaign than a single chamber.
- Subscribe: The green + button in the corner of each card subscribes without leaving the listing.
- Sort by rating or date: Top Rated All Time is the default and honestly the best filter of the lot when you're starting out.
TIP - Show incompatible items at the bottom of the sidebar is unticked by default, which hides maps that can't be loaded (usually because they were built with an old editor). Leave it unticked.
Subscribing To A Map
Open a map's page and hit the green button.
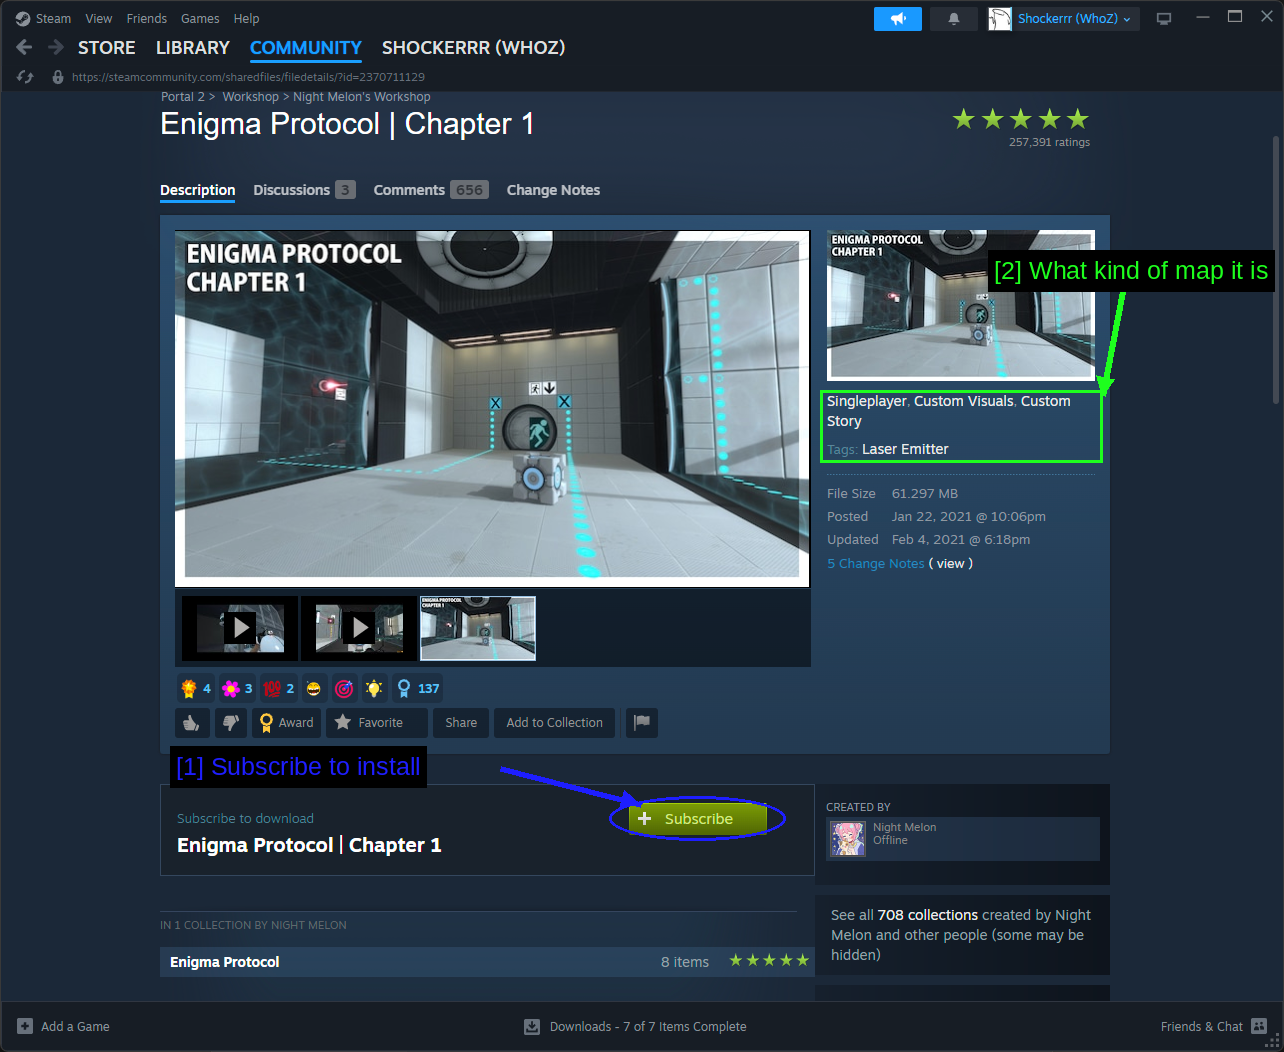
- Subscribe to install: Steam downloads the map in the background - you can watch progress at the bottom of the Steam window.
- What kind of map it is: Singleplayer, Custom Visuals, Custom Story, plus a tag list of the mechanics it uses. Handy for knowing what you're in for before you load it.
That's the whole installation. Next time you launch Portal 2 the map will be waiting in your queue.
NOTE - Workshop maps don't touch your game files, don't need a mod manager, don't break on game updates, and can't corrupt your save. If you only ever use the Workshop, nothing in this guide can go wrong.
Installing Workshop Maps From Inside The Game
You don't have to leave the game to do any of this. Most people don't.
Community Test Chambers
Launch Portal 2 and look at the main menu.
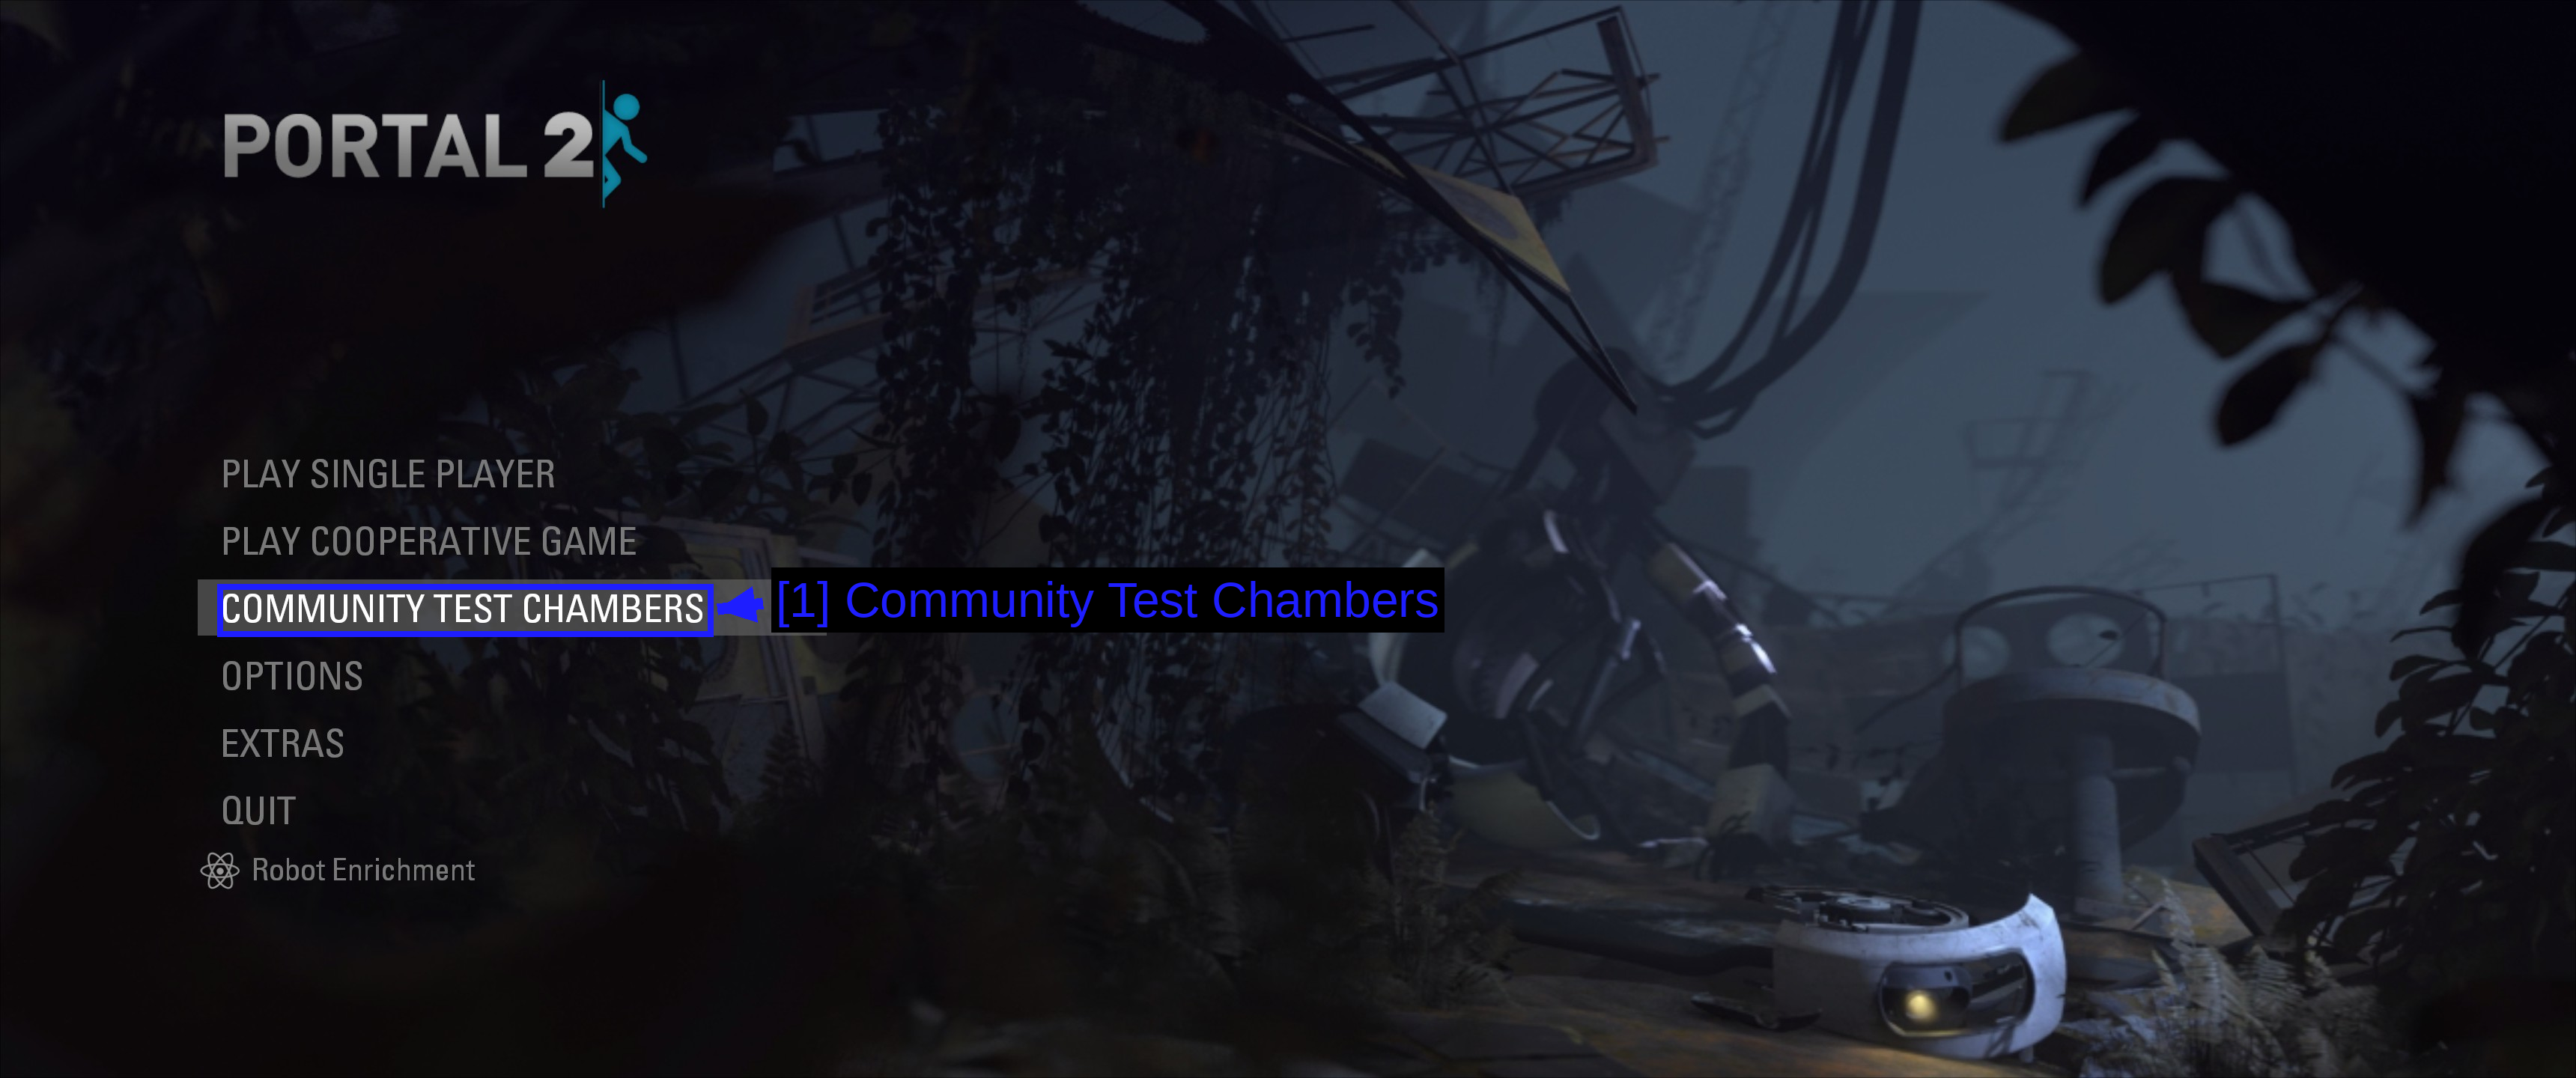
- Community Test Chambers: This is the whole Workshop, from the main menu.
That takes you to the Perpetual Testing Initiative hub.
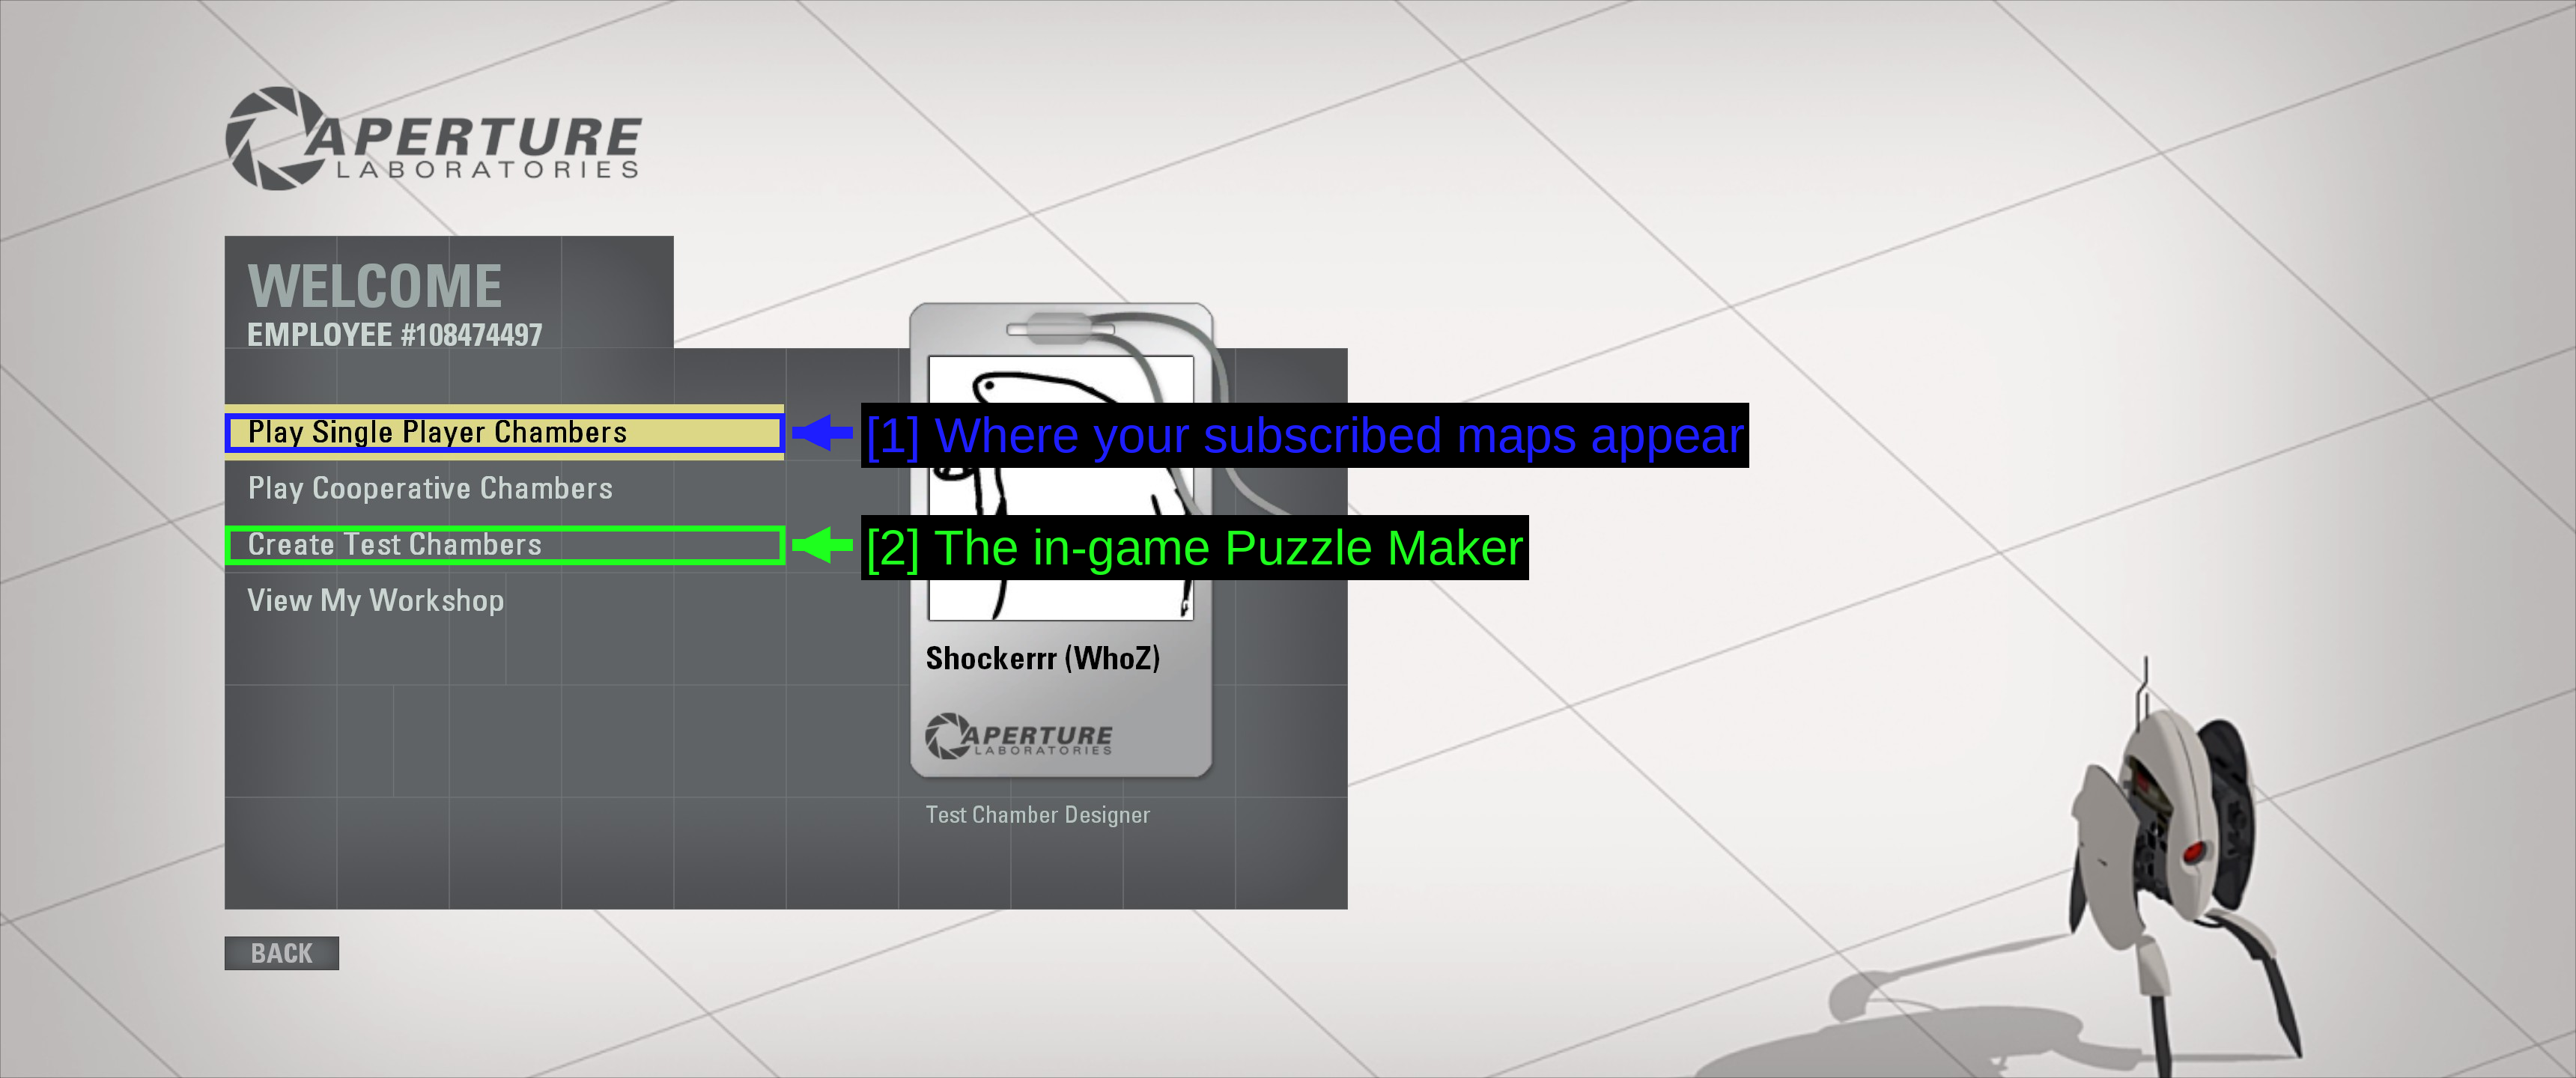
- Where your subscribed maps appear: Play Single Player Chambers. There's a Play Cooperative Chambers option right below it for co-op maps.
- The in-game Puzzle Maker: Create Test Chambers opens Valve's built-in level editor. More on that below.
View My Workshop takes you to the maps you've published yourself.
Playing A Subscribed Map
Pick Play Single Player Chambers and your subscriptions are listed under My Queue.
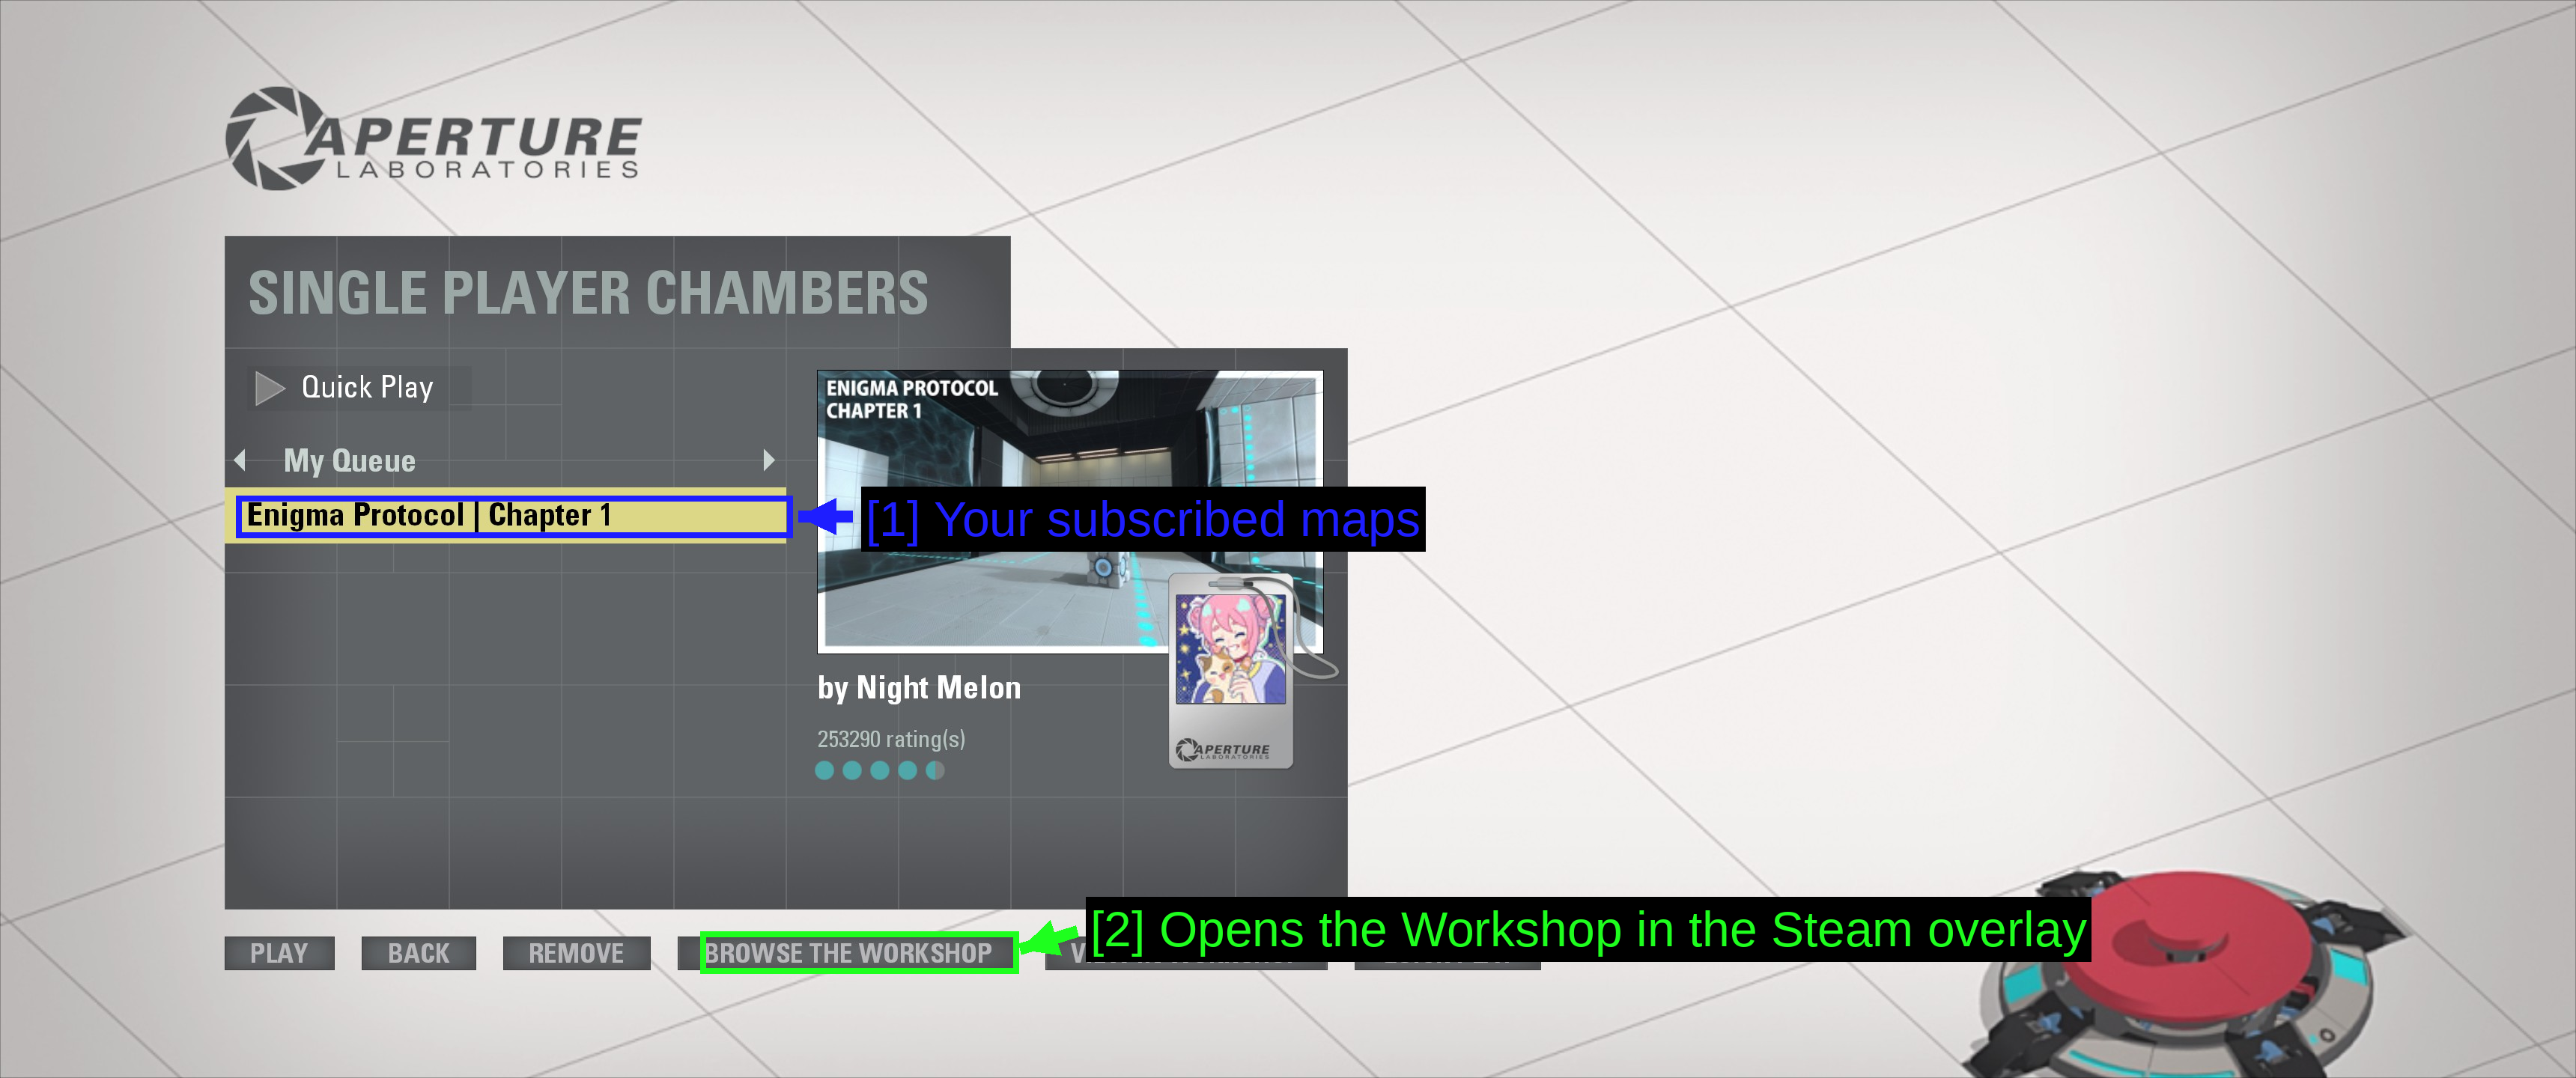
- Your subscribed maps: Enigma Protocol | Chapter 1, with its thumbnail, author and rating on the right.
- Opens the Workshop in the Steam overlay: BROWSE THE WORKSHOP pulls up the Workshop inside the game, so you can subscribe to something new without alt-tabbing.
PLAY loads the map. REMOVE takes it out of your queue without unsubscribing, and QUICK PLAY throws a random well-rated map at you, which is a genuinely good way to spend an evening.
TIP - The Steam overlay has to be enabled for BROWSE THE WORKSHOP to work. If nothing happens when you click it, check Steam → Settings → In Game → Enable the Steam Overlay while in-game.
Managing Your Subscriptions
Subscribe to a few dozen maps and you'll want to prune them. Right-click Portal 2 in your Steam library and open Properties.
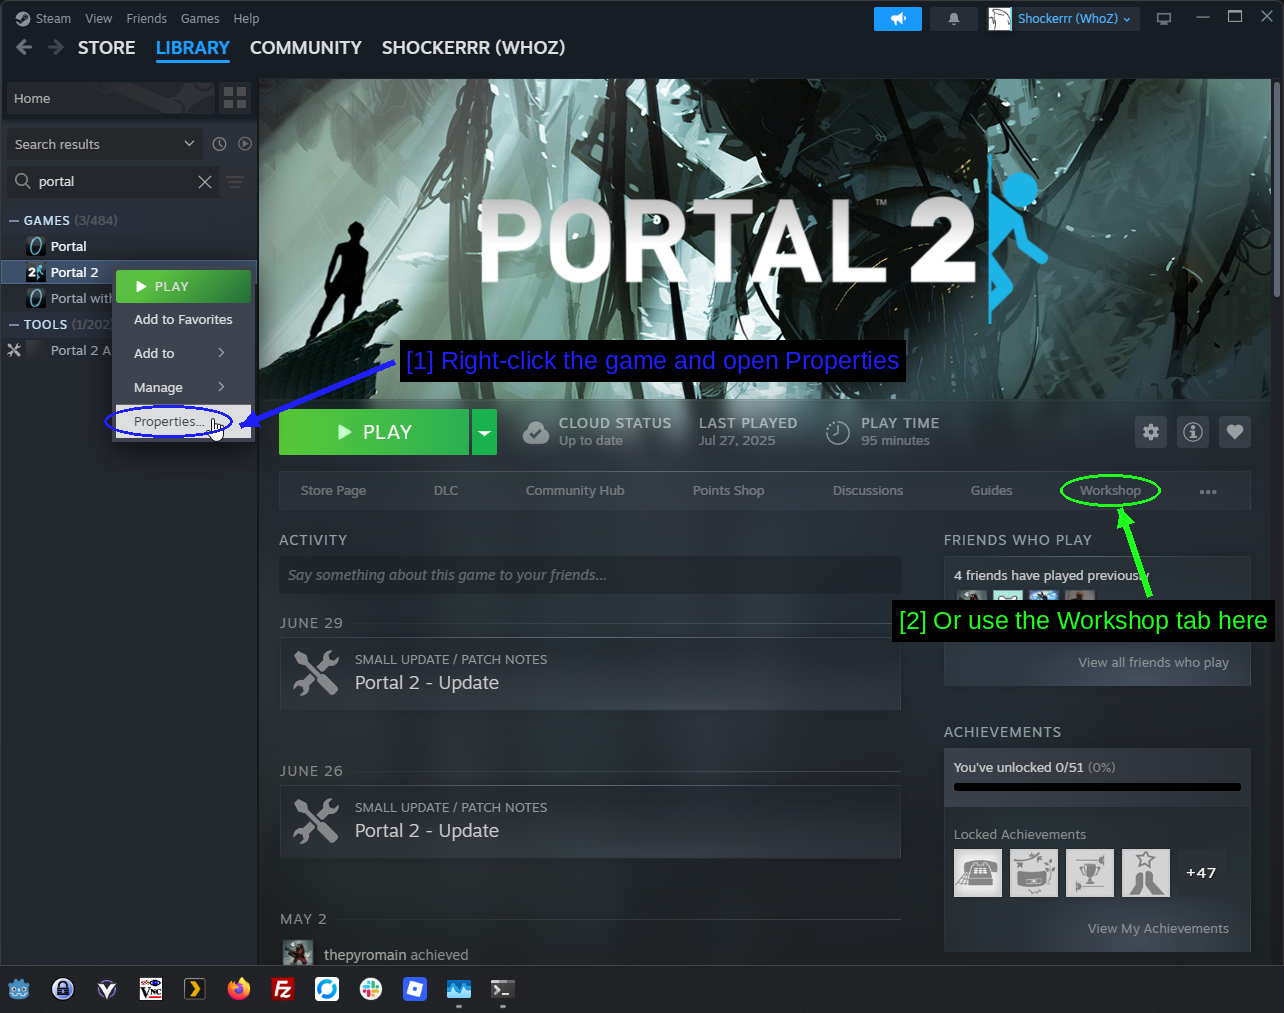
- Right-click the game and open Properties: The Properties entry at the bottom of the context menu.
- Or use the Workshop tab here: The tab on the game's library page does the same thing.
Then pick Workshop in the sidebar.
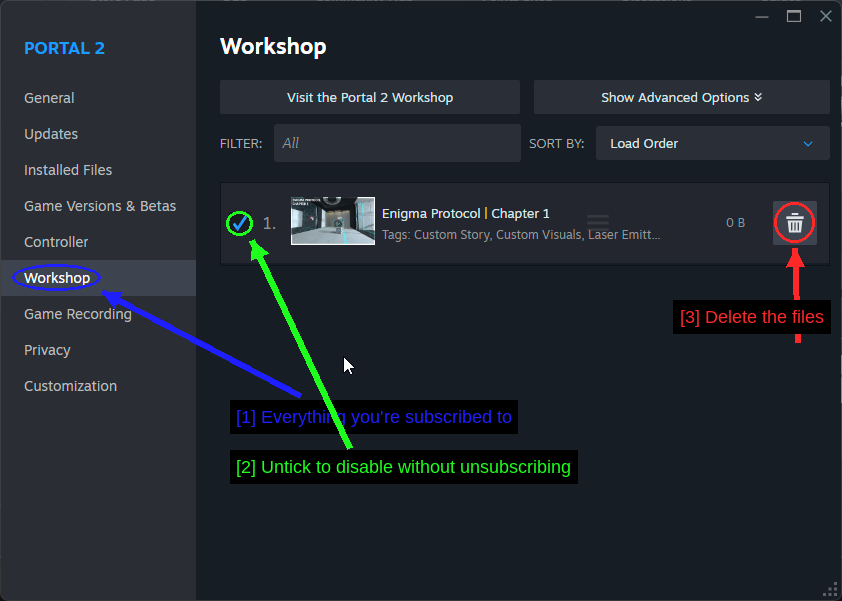
- Everything you're subscribed to: One row per item, with a load order number and a filter box at the top.
- Untick to disable without unsubscribing: Useful when you want to clear out your in-game queue but keep the subscription.
- Delete the files: Clears the downloaded data while keeping the subscription.
To unsubscribe properly, go back to the Workshop page in Steam, hover Browse, pick Subscribed Items, find the map and click Subscribed to toggle it off.
Making Your Own Maps
This is a modding guide rather than a mapping guide, but Portal 2's editor is a big part of why its Workshop is the size it is, so it's worth knowing what's there.
The Puzzle Maker
Create Test Chambers on the Perpetual Testing Initiative hub opens Valve's built-in editor. It's deliberately simple - you drag walls, drop in cubes, buttons and lasers, and hit a button to compile and play. There's no separate download and no setup.
It's also where the overwhelming majority of Workshop maps come from, and you can publish straight to the Workshop from inside it.
BEEmod
The Puzzle Maker is simple by design, which means it leaves a lot of the game's toys out. BEE2.4 is a community tool that reconfigures the Puzzle Maker to add extra items, alternative visual styles (including the old Aperture eras from the single-player campaign) and a load of configuration options.
You download it from the releases page, pick the win32 or win64 zip, and run it alongside the game. It modifies the editor rather than the game itself, so it's low risk and easily undone.
Hammer & The Authoring Tools
For anything beyond what the Puzzle Maker can express, you want Hammer, Valve's actual level editor. It comes with the free Portal 2 Authoring Tools, which appear under Tools in your Steam library once installed.
This is proper Source engine level design - brushes, entities, compiling with VBSP and VRAD - and it's how the larger standalone mods get made. It's a much bigger commitment than the Puzzle Maker.
Installing Standalone Source Mods
Some Portal 2 mods are effectively their own games. They ship their own maps, menus and sometimes their own voice acting, and they install into a special Steam folder instead of into Portal 2 itself.
The sourcemods Folder
The process is the same for every Source mod.
- Download the mod as a
.zip,.7zor.rar, usually from ModDB or the mod's own site. - Extract it with 7-Zip.
- Copy the extracted mod folder into Steam's
sourcemodsfolder.- Windows:
C:\Program Files (x86)\Steam\steamapps\sourcemods\ - Linux:
~/.steam/steam/steamapps/sourcemods/ - Create the folder if it isn't there.
- Windows:
- Fully restart Steam. Not just close the window - quit it from the tray icon and start it again.
- The mod appears in your library as its own entry. Launch it from there.
The folder you copy in should contain a gameinfo.txt at its top level. That file is what tells Steam it's a Source mod, and if the mod doesn't appear in your library after a restart, it's almost always because gameinfo.txt is one folder too deep.
steamapps\sourcemods\<modname>\gameinfo.txt
NOTE - Some standalone mods need Portal 2 installed and launched at least once, because they borrow its assets. Run the base game once before you try them.
WARNING - A few of the bigger Portal 2 mods are now published as free standalone titles on Steam rather than as Source mods. Portal Stories: Mel, Aperture Tag and Portal Reloaded are all Steam entries, not sourcemods folders. Check the store first - if it's there, install it from there.
Mods Worth Knowing About
- Portal 2: Community Edition - an open-source engine branch that fixes long-standing Source bugs and adds features for mod authors. More a platform than a mod.
- Portal Stories: Mel - a full-length prequel campaign, free on Steam.
- Portal Reloaded - adds a third portal that travels through time. Free on Steam.
- Thinking With Time Machine - clone-based time puzzles, free on Steam.
Installing Mods Through Vortex
Portal 2's Nexus Mods presence is small - a few dozen mods, mostly ReShade presets and texture tweaks. Vortex works, but it's the least important of the three routes here. Cover it if you're installing a loose-file mod and want it tracked.
For a full walkthrough of Vortex, see our dedicated How to Use Vortex & The Basics guide.
Managing Portal 2 In Vortex
Portal 2 support in Vortex comes from a community extension rather than being built in, so there's an extra step the first time.
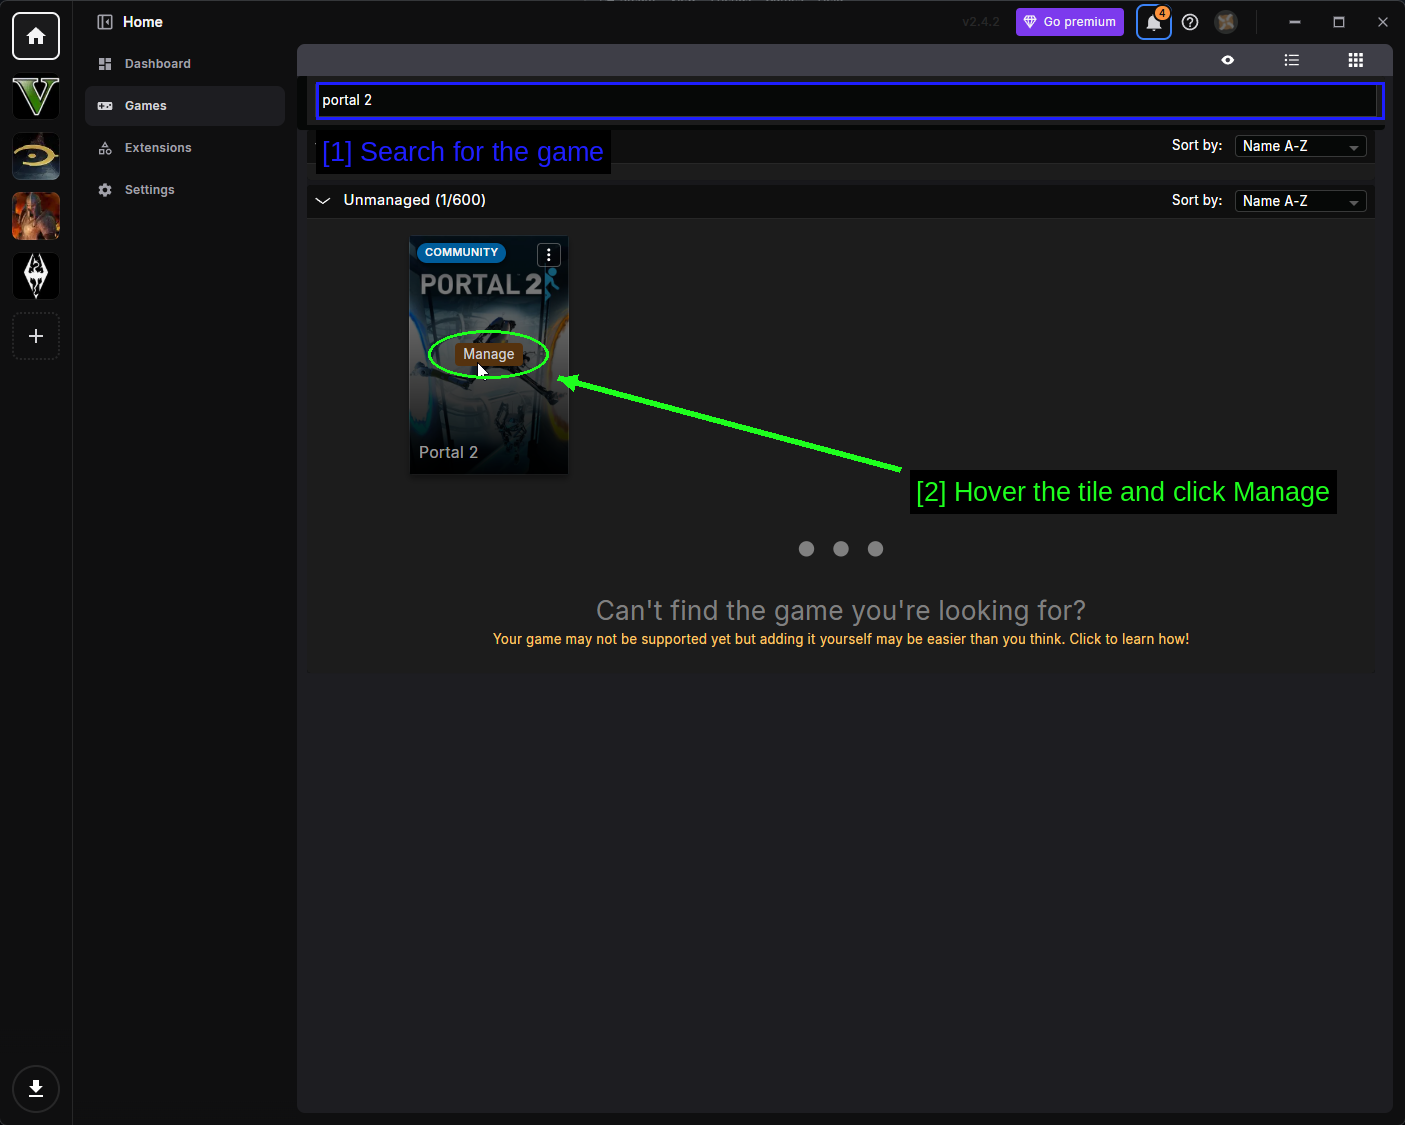
- Search for the game: Open Games in the left sidebar and type
portal 2into the search bar. The tile is marked COMMUNITY. - Hover the tile and click Manage: Vortex then tells you it needs the extension first.
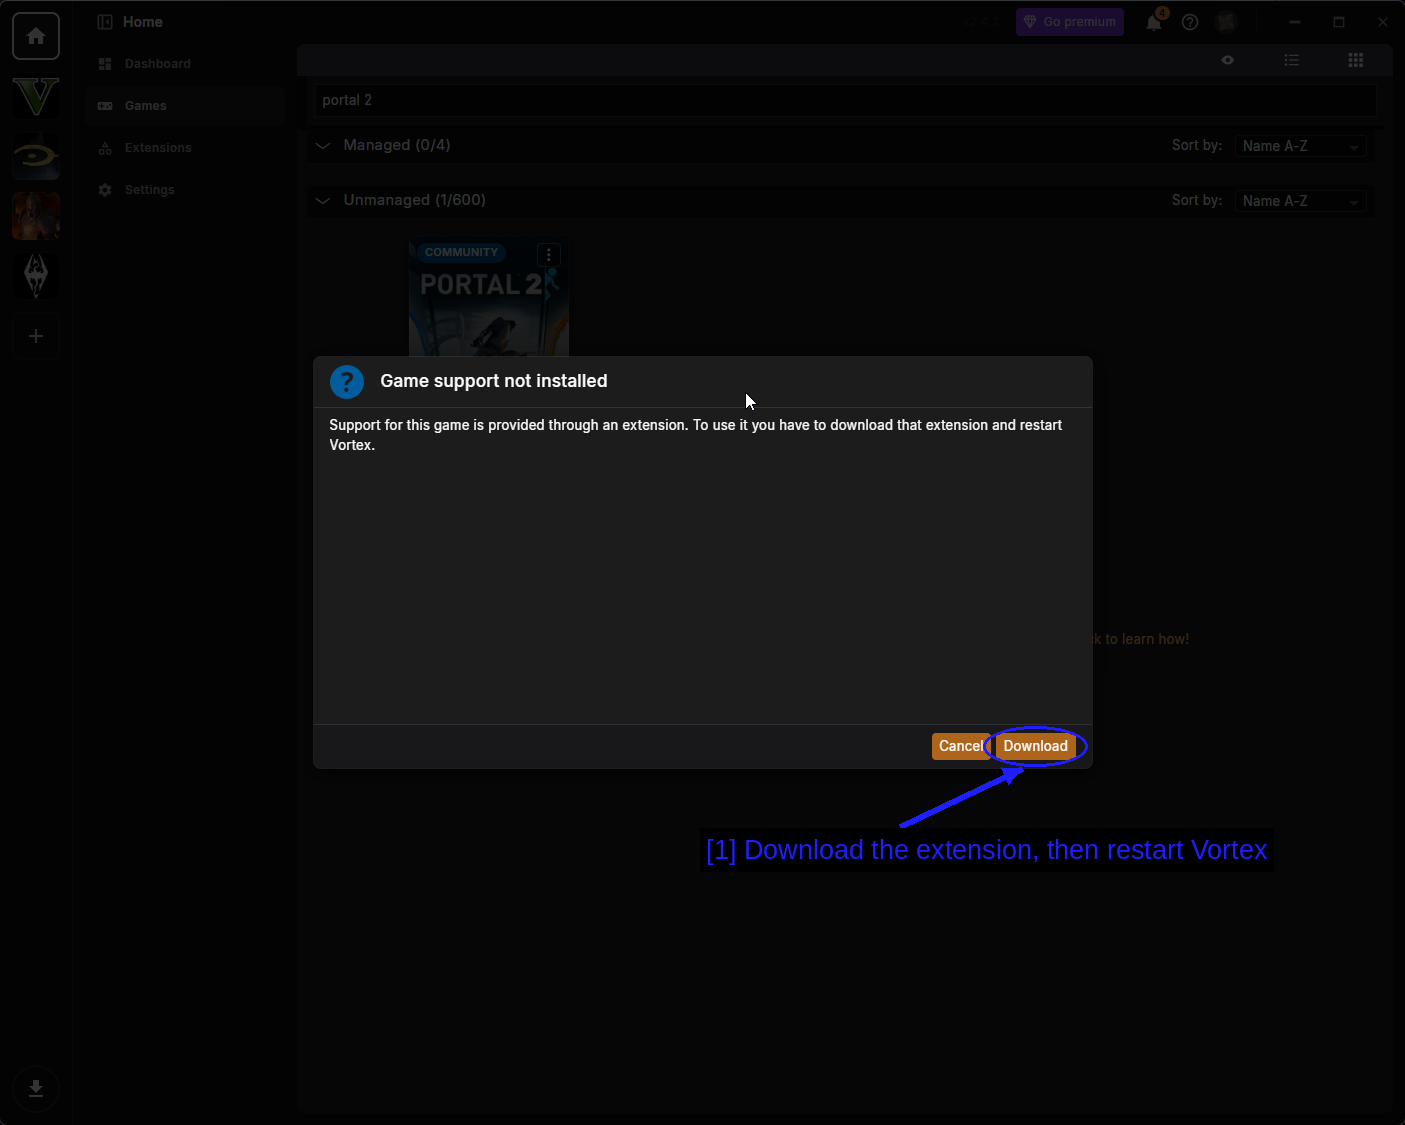
- Download the extension, then restart Vortex: Click Download, close Vortex, and open it again. Then click Manage on the tile a second time and it'll work.
NOTE - Community extensions are maintained by volunteers rather than Nexus Mods. They're generally fine, but they can lag behind Vortex updates, which is another reason the Workshop is the better default for this game.
Downloading A Mod
Head to a mod page on Nexus Mods and use the orange Vortex button. Your browser will ask for permission to open Vortex - accept it, and tick Always allow if you'd rather not be asked every time.
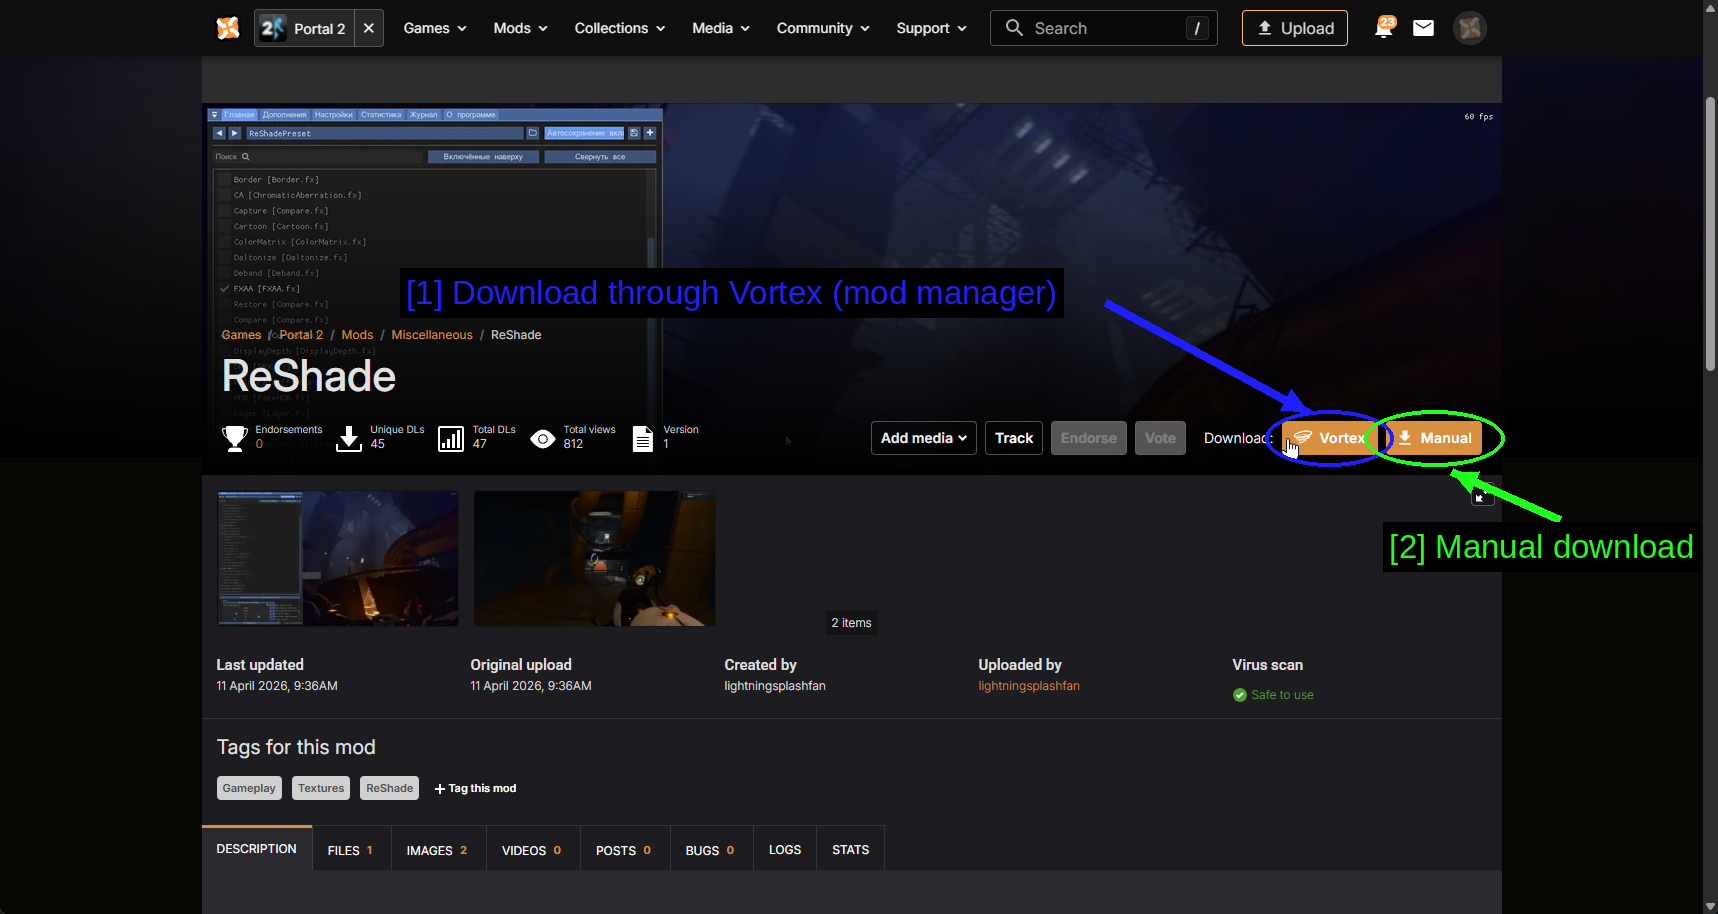
- Download through Vortex (mod manager): The orange Vortex button.
- Manual download: Manual downloads the archive through your browser instead, if you'd rather drop the files in yourself.
The Mods Page
Once installed, mods appear on the Mods page.
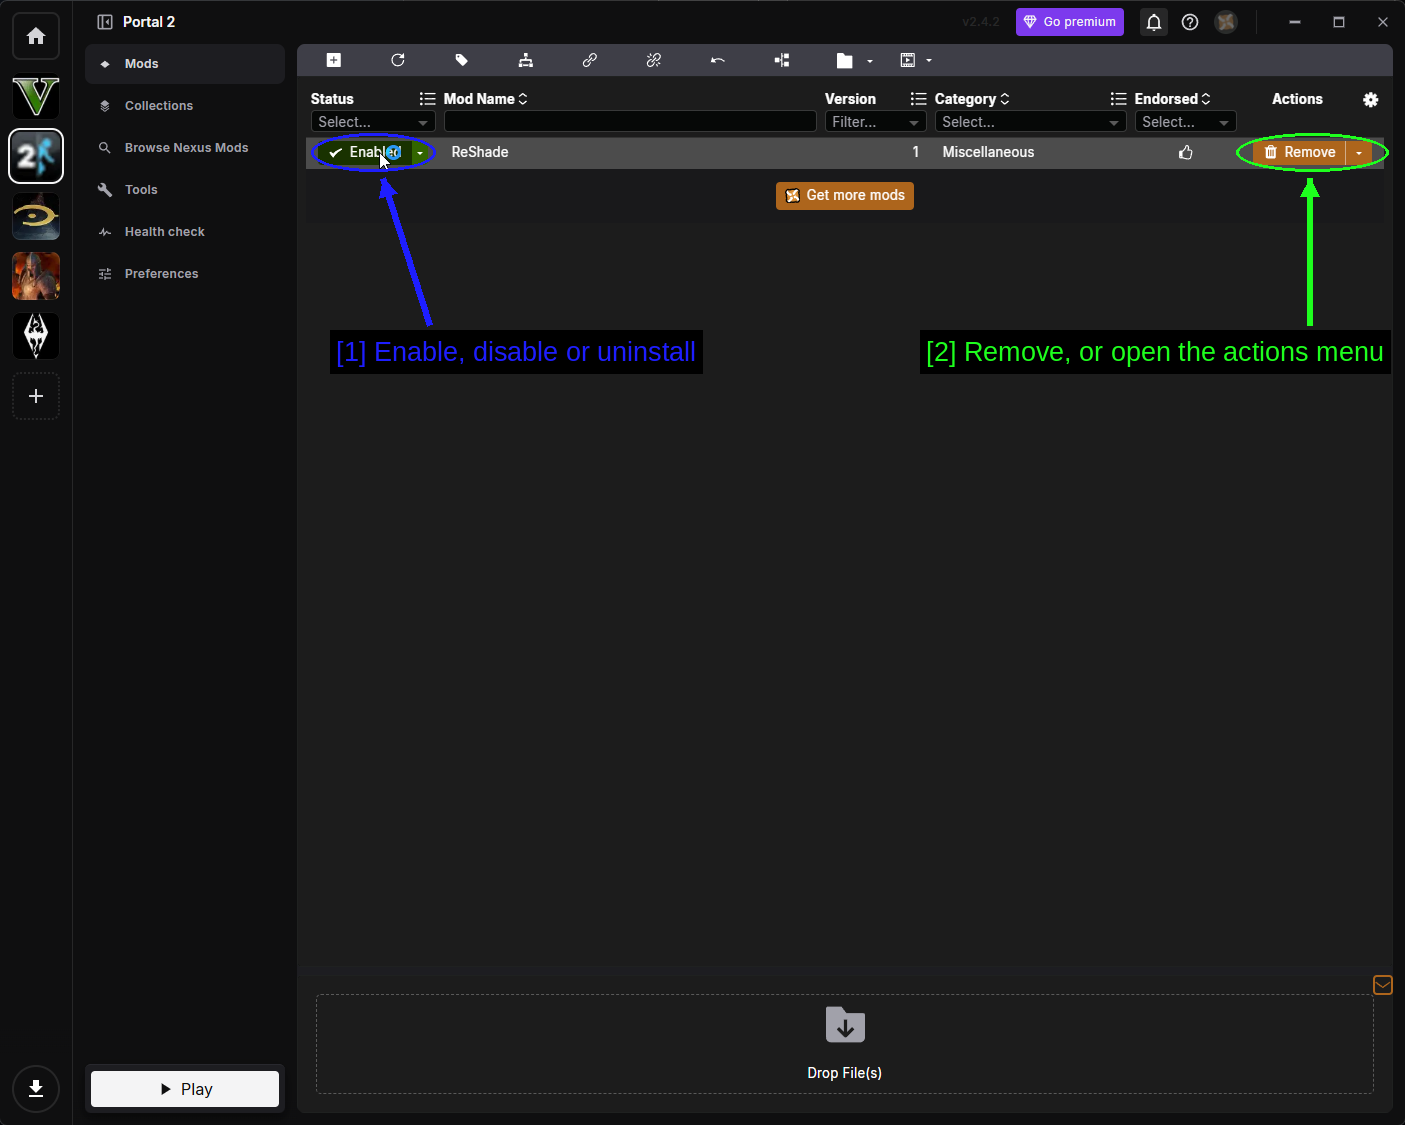
- Enable, disable or uninstall: The Status drop-down for each mod.
- Remove, or open the actions menu: Remove uninstalls the mod, and the arrow beside it opens the full actions menu.
The status drop-down has three options.
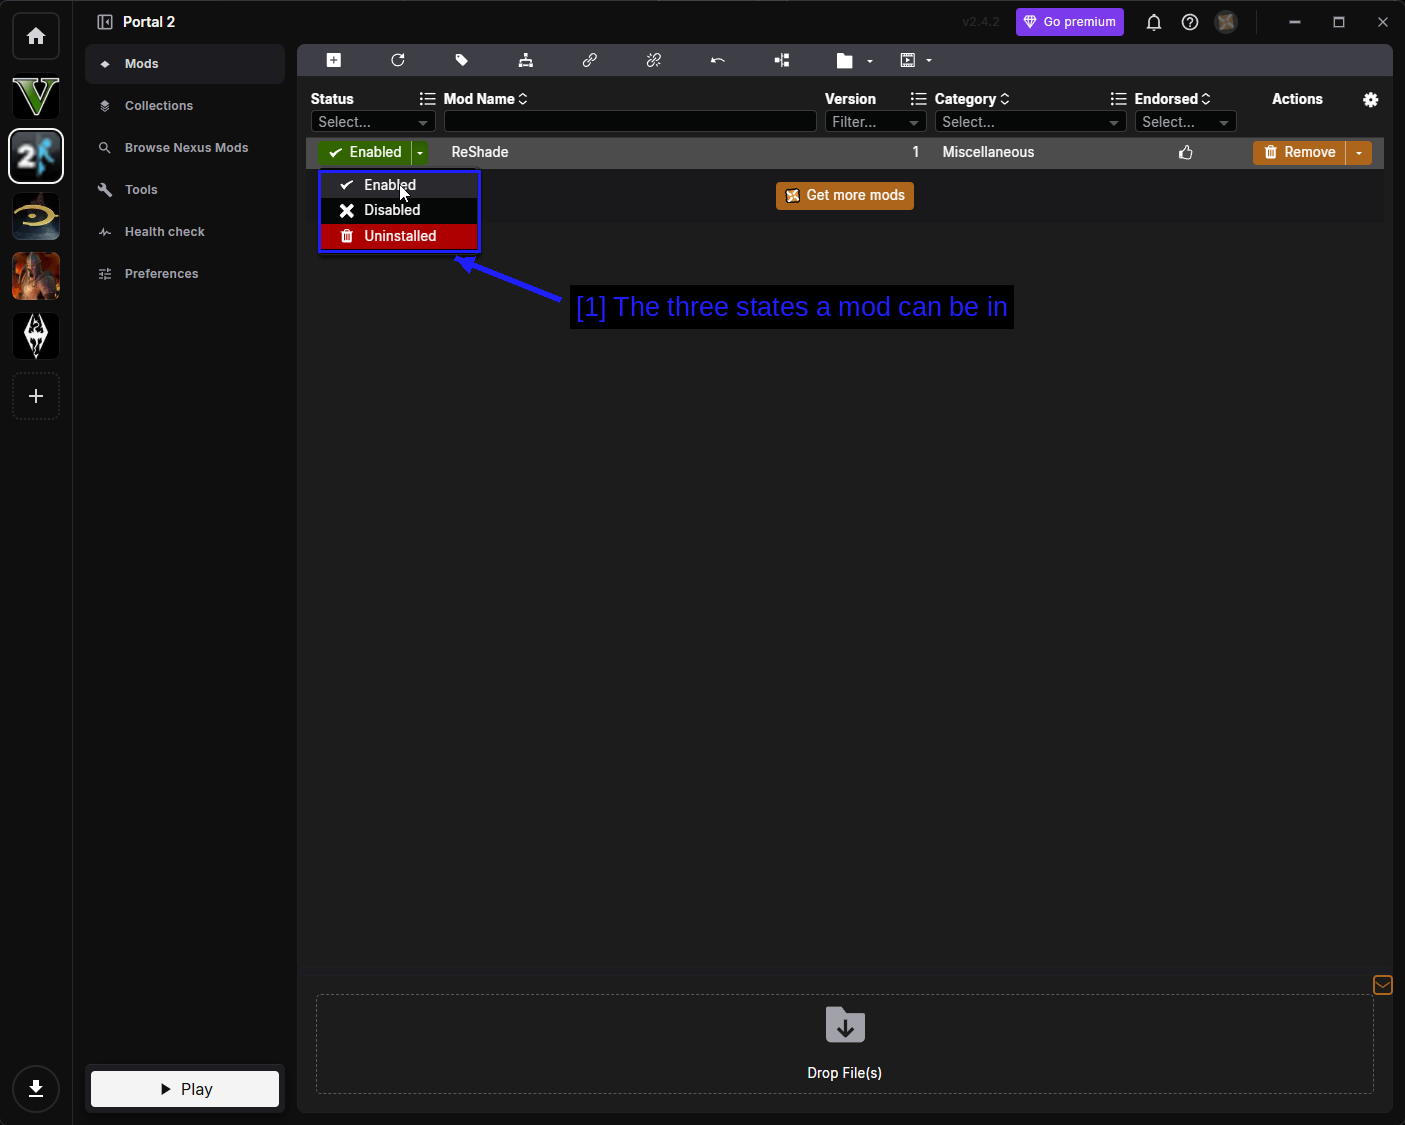
- The three states a mod can be in: Enabled means deployed to your game folder. Disabled keeps the mod in Vortex but pulls its files back out. Uninstalled removes the files but keeps the downloaded archive.
The actions menu covers everything else.
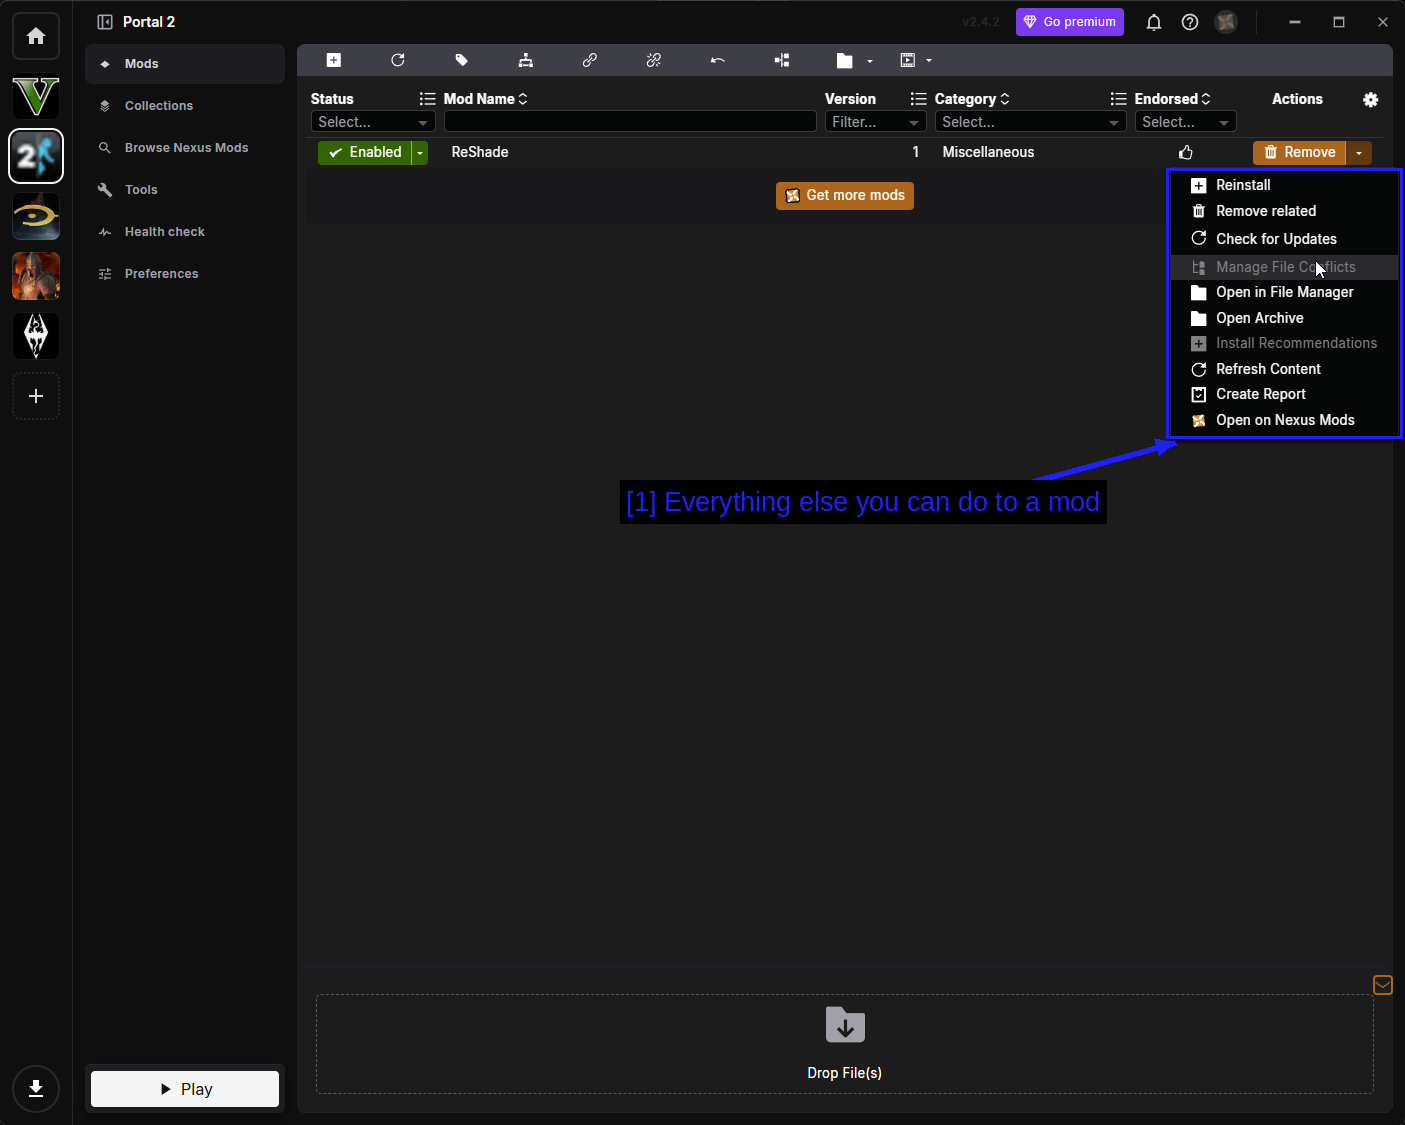
- Everything else you can do to a mod: The options are as follows.
- Reinstall - runs the installer again.
- Remove related - removes the mod and anything tied to it.
- Check for Updates - asks Nexus Mods for a newer version.
- Manage File Conflicts - decides which mod wins when two write the same file.
- Open in File Manager - opens the mod's staging folder.
- Open Archive - opens the downloaded archive.
- Install Recommendations - installs mods the author recommends alongside this one.
- Refresh Content - re-reads the mod's files from disk.
- Create Report - generates a report, useful when asking for help.
- Open on Nexus Mods - opens the mod page in your browser.
Browse Nexus Mods & Collections
You can search Nexus Mods from inside Vortex, though for this game there isn't much to find.
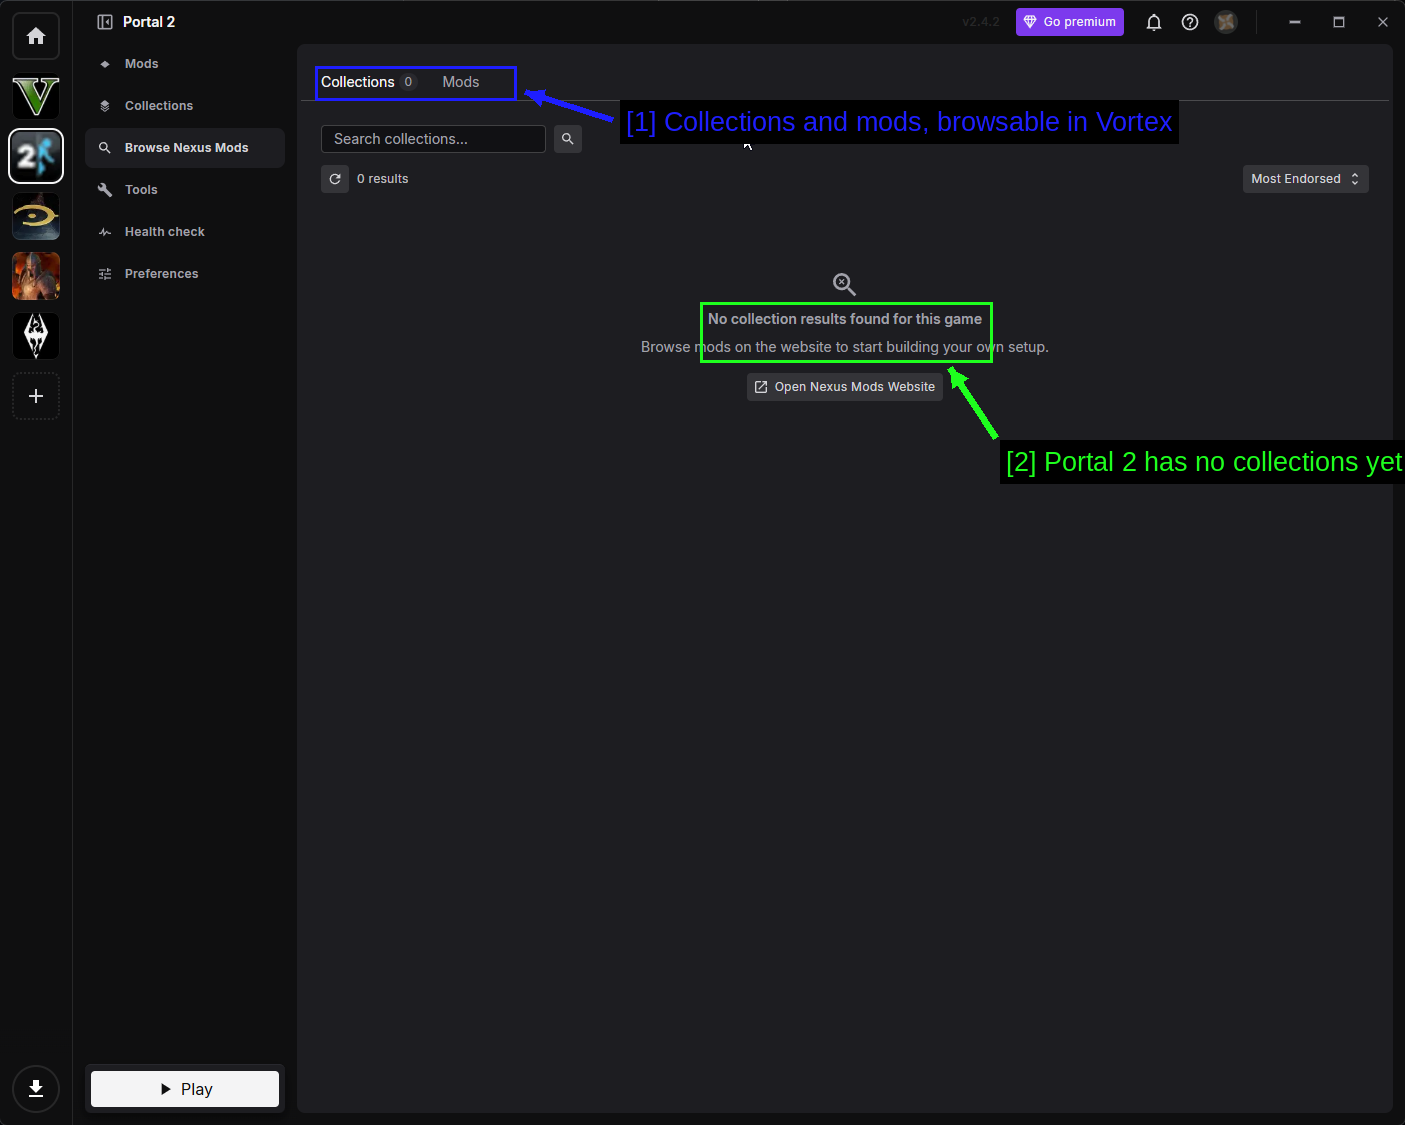
- Collections and mods, browsable in Vortex: Two tabs, Collections and Mods.
- Portal 2 has no collections yet: No collection results found for this game. With the Workshop covering the same ground far more conveniently, nobody has built any.
The Collections page is where added collections would appear.
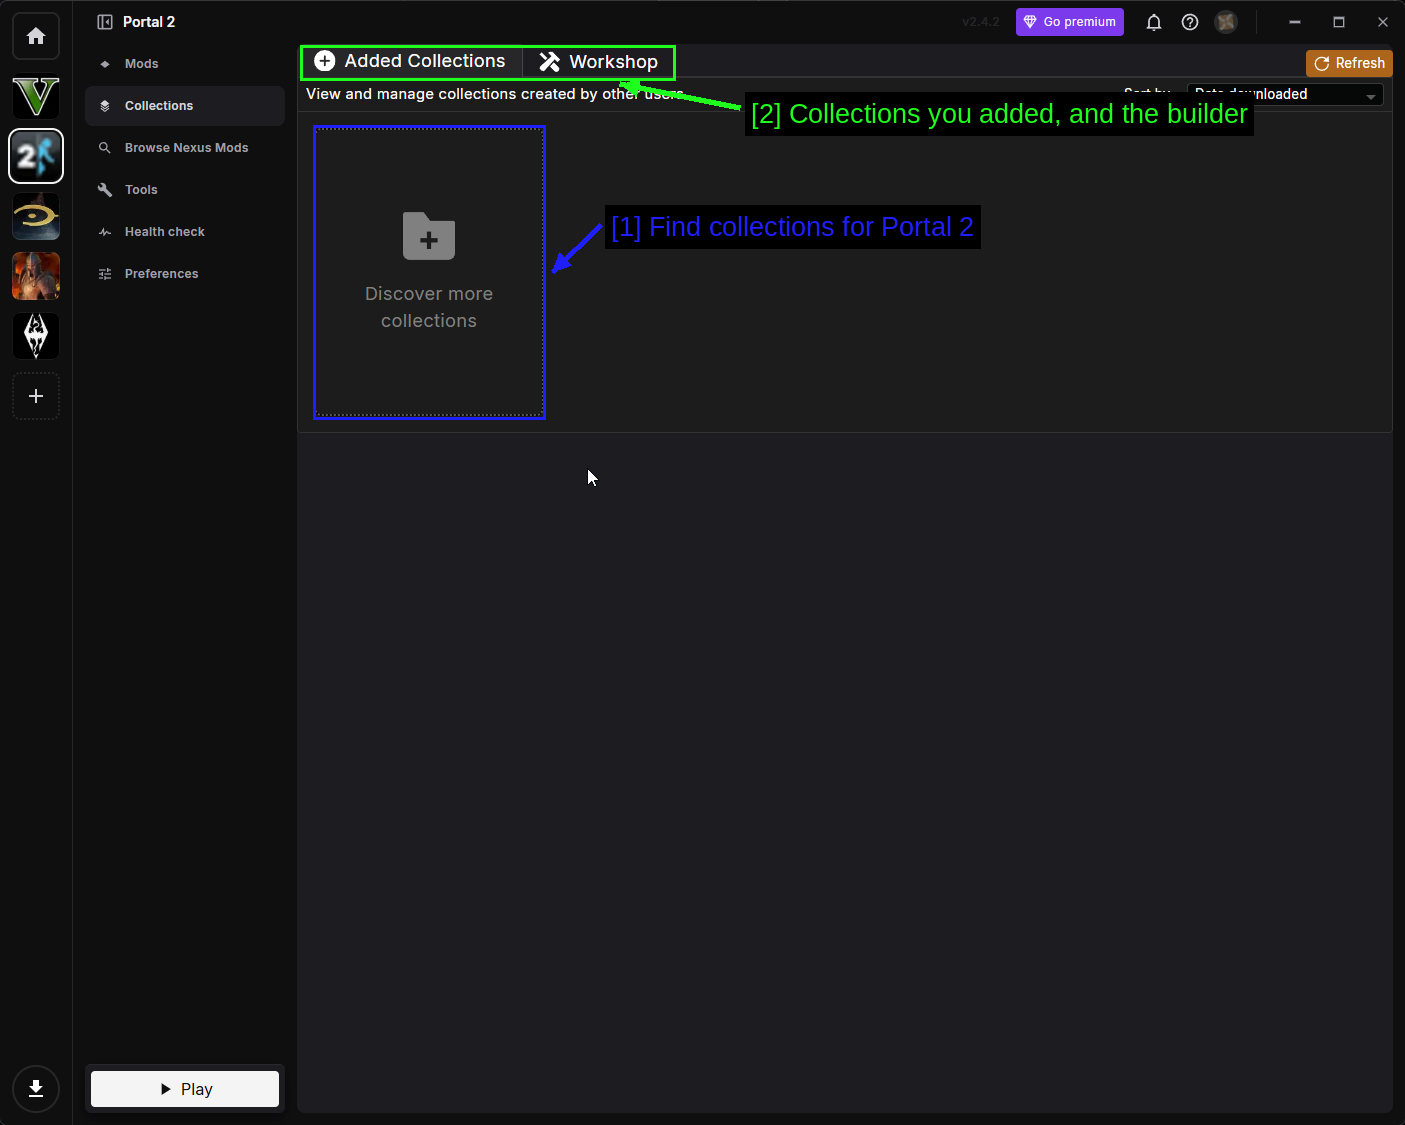
- Find collections for Portal 2: Discover more collections.
- Collections you added, and the builder: The Workshop tab here is Vortex's own collection builder. Nothing to do with the Steam Workshop, despite the name.
Tools
The Tools page lists external programs Vortex can launch alongside the game.
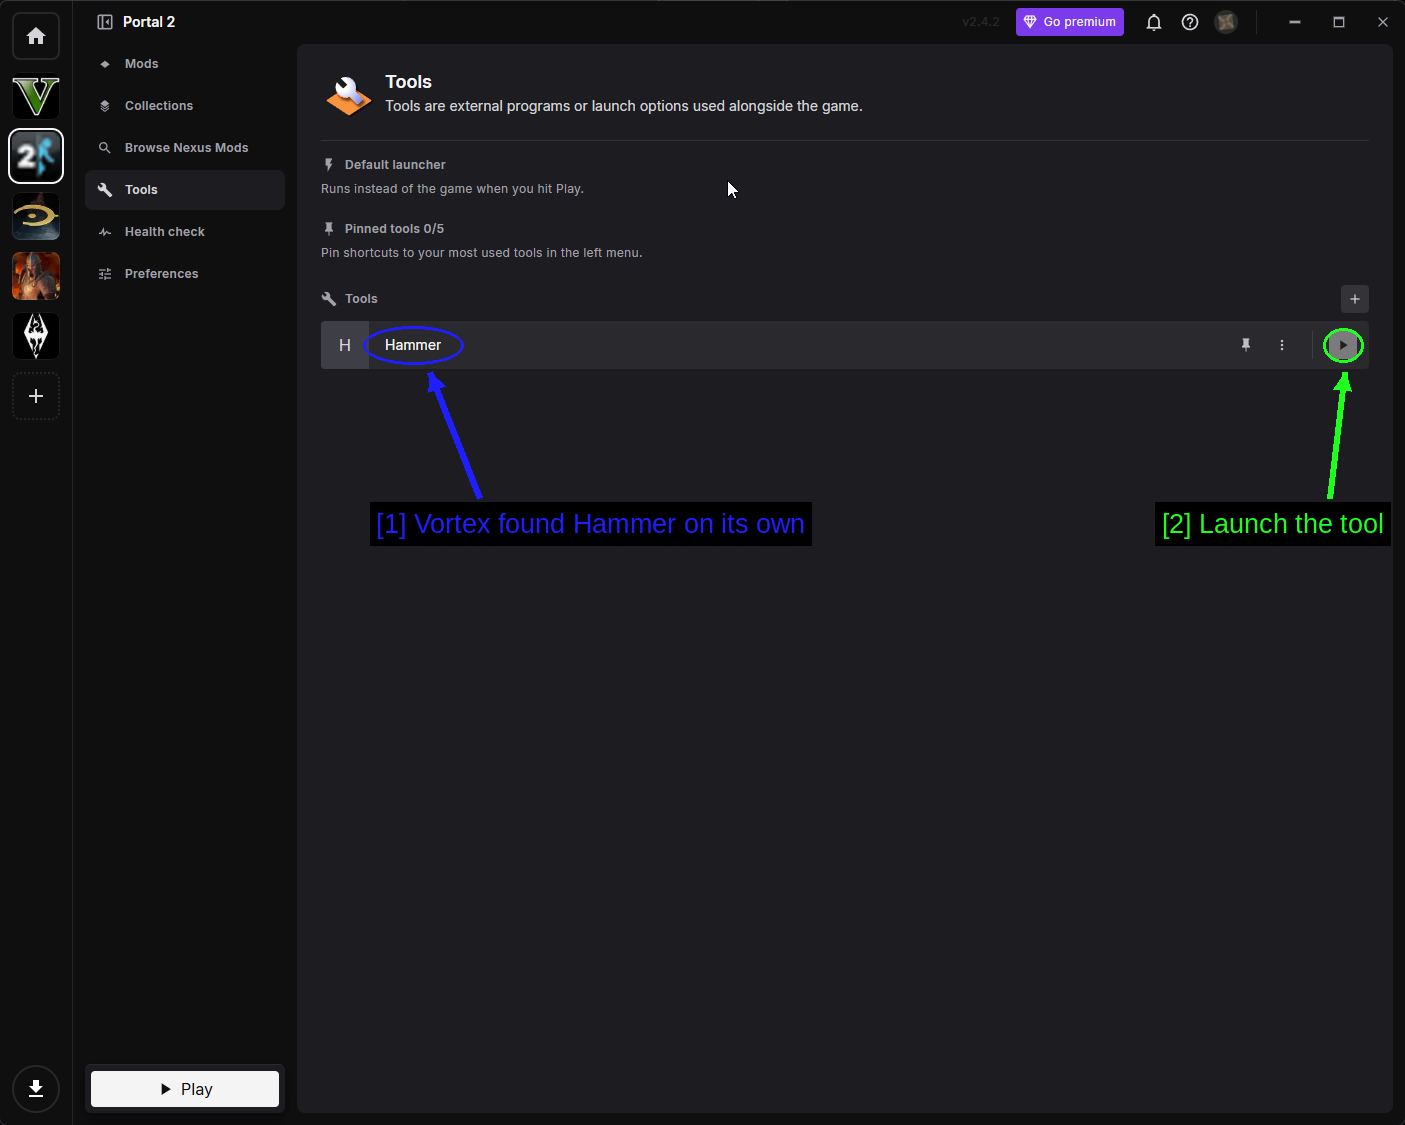
- Vortex found Hammer on its own: If you have the Portal 2 Authoring Tools installed, Vortex picks up Hammer automatically.
- Launch the tool: The play button runs it.
Health Check
Health Check reviews your setup and flags anything obviously wrong.
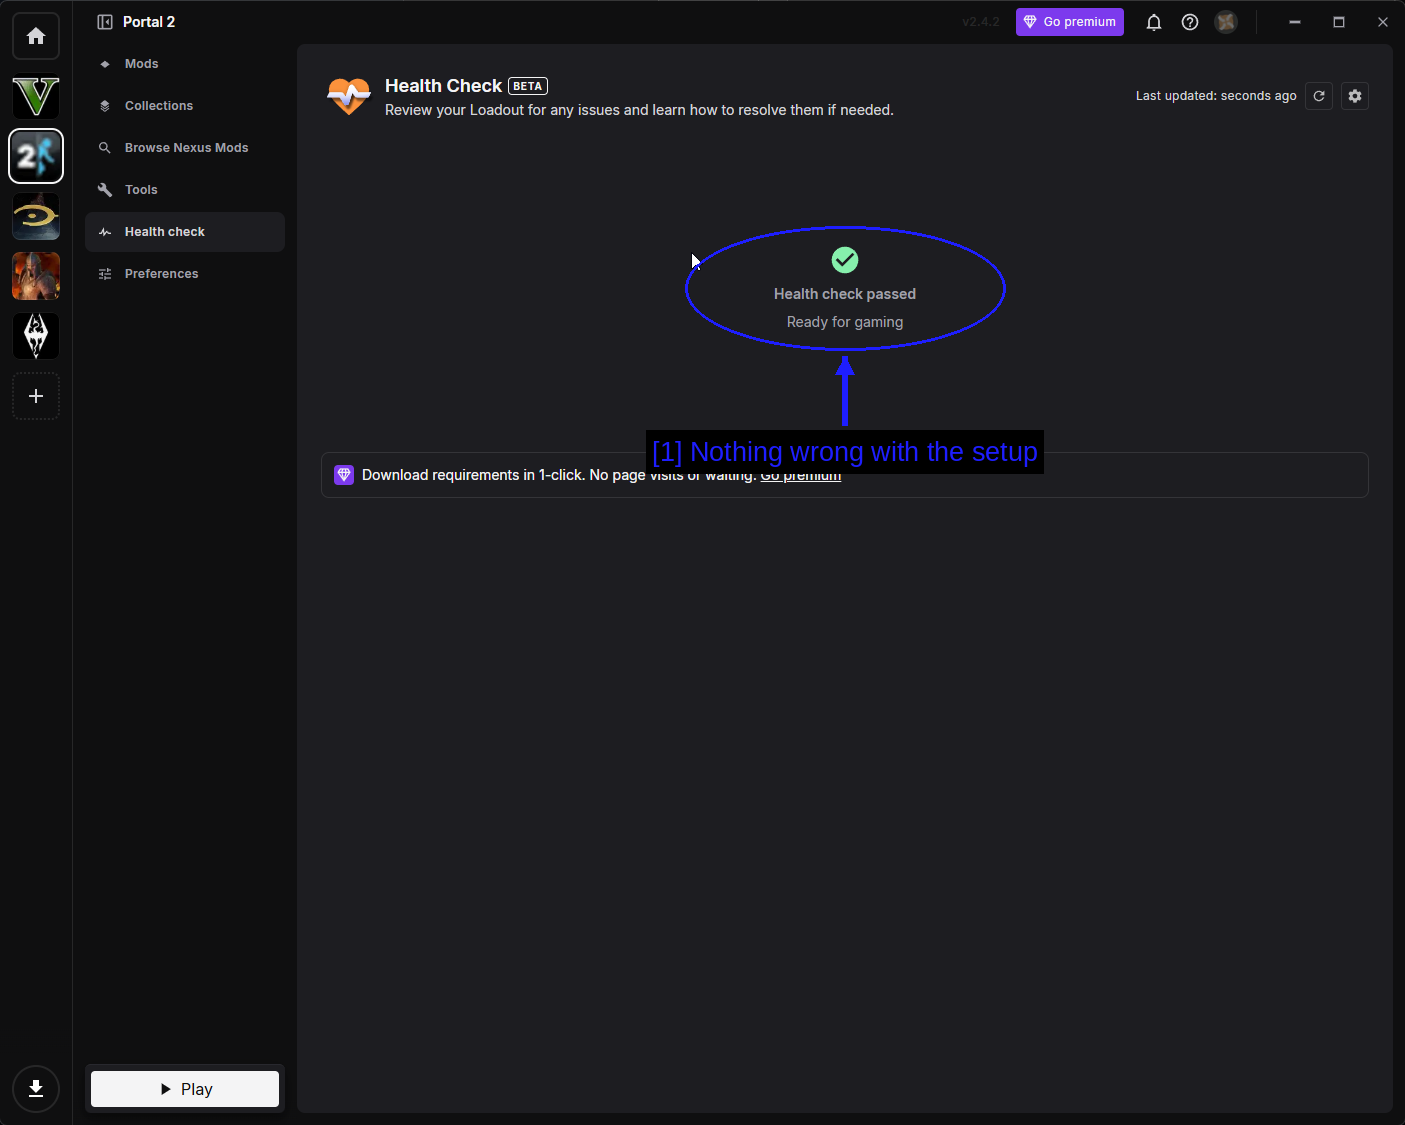
- Nothing wrong with the setup: A green Health check passed means Vortex is happy.
Preferences
Preferences holds the Portal 2 specific Vortex settings.
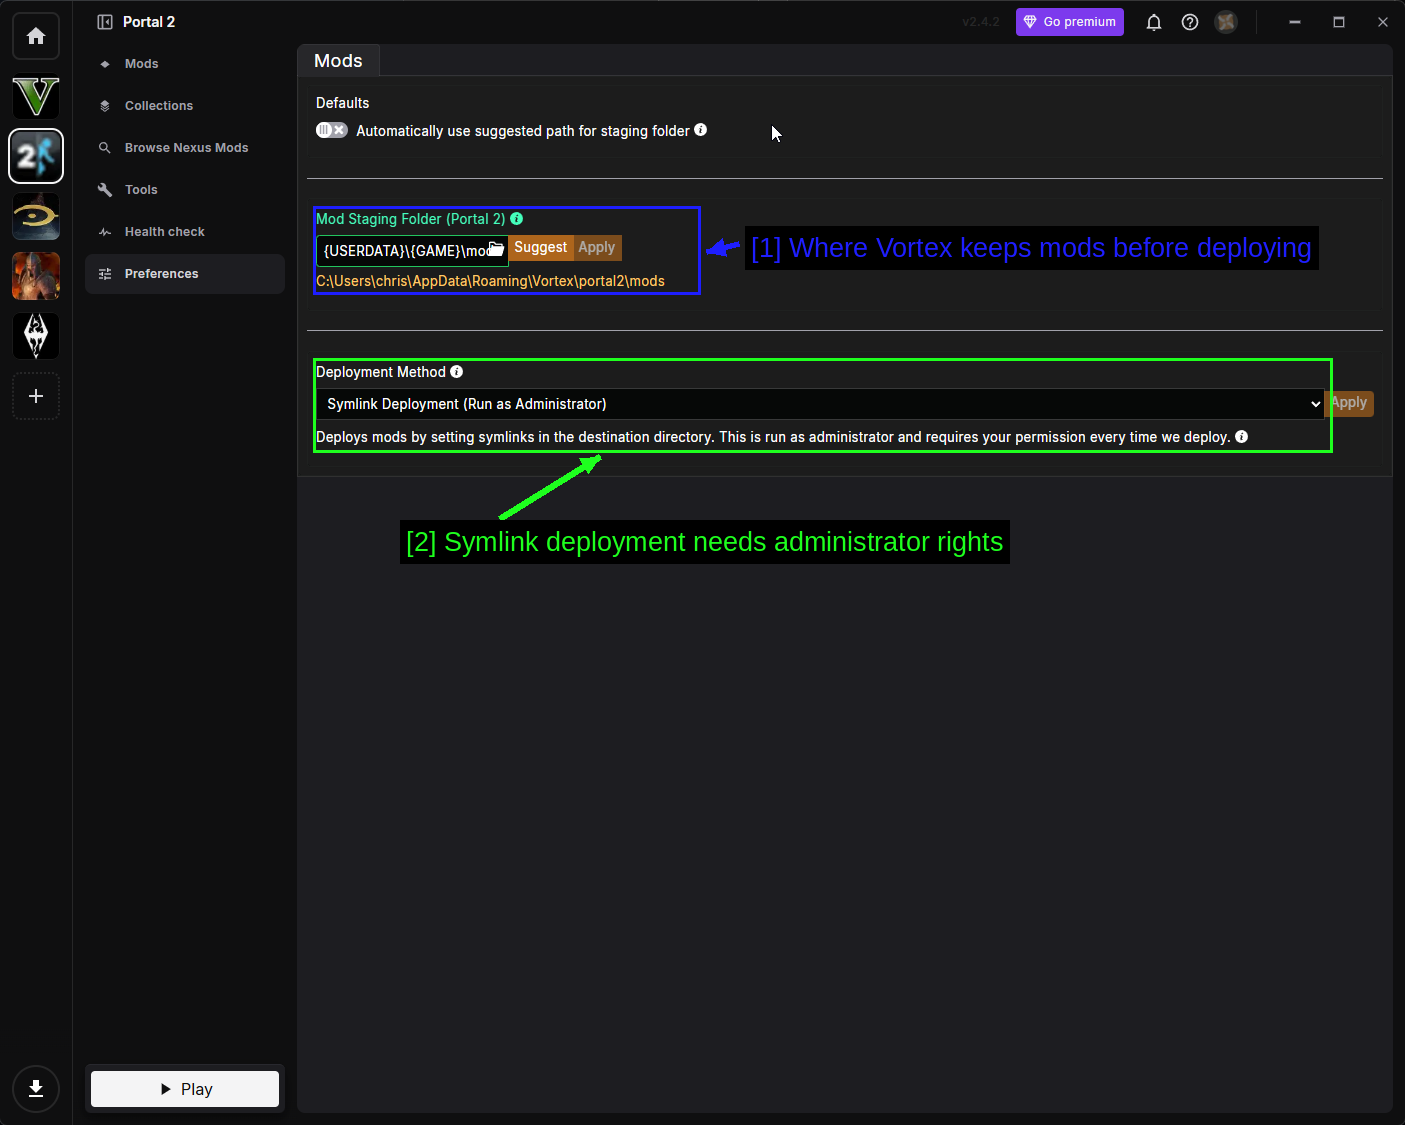
- Where Vortex keeps mods before deploying: The Mod Staging Folder. This must be on the same drive as your game install.
- Symlink deployment needs administrator rights: Portal 2 uses Symlink Deployment, which creates links in the game folder rather than copying files. It runs as administrator and asks permission every time it deploys. That's expected.
Troubleshooting
- A subscribed map isn't in my queue. Restart the game. Steam downloads Workshop content in the background and the queue is read at startup.
- BROWSE THE WORKSHOP does nothing. The Steam overlay is disabled. Turn it back on in Steam's settings.
- A Workshop map won't load. It was probably built with an old editor version. Look for Show incompatible items on the Workshop listing - if the map only appears with that ticked, it can't be loaded.
- My standalone mod isn't in my library. Fully restart Steam from the tray, and check that
gameinfo.txtis directly insidesourcemods\<modname>\rather than one folder deeper. - A standalone mod crashes on launch. Run base Portal 2 once first. Some mods rely on files the game generates on first run.
- Vortex says "Game support not installed". Download the community extension and restart Vortex. See Managing Portal 2 In Vortex.
- My co-op partner can't join a custom map. Both of you need to be subscribed to it. See Co-op Maps.
- ReShade does nothing. Check it's deployed in Vortex, and that you're not running the game in a mode ReShade can't hook (try windowed or borderless).
Notes
Co-op Maps
Cooperative Workshop maps work, but both players need to be subscribed to the same map. There's no automatic sync - if your partner hasn't subscribed, the map simply won't start.
The easiest approach is to send them the Workshop link, have them subscribe, and then load it from Play Cooperative Chambers.
Where Workshop Files Actually Live
Workshop content doesn't go into your Portal 2 folder. Steam keeps it here.
steamapps\workshop\content\620\
Each map gets a numbered folder matching its Workshop ID - the number at the end of the Workshop URL. You don't need to touch any of this, but it's useful to know when you're working out where a few gigabytes went, or when you want to back up a map before its author updates it.
See Also!
- Portal 2 Steam Workshop
- Enigma Protocol | Chapter 1
- BEEmod (BEE2.4)
- Nexus Mods - Portal 2
- ModDB - Portal 2 mods
- Portal 2: Community Edition
- Valve Developer Community - Portal 2
- How to Use Vortex & The Basics
- r/Portal
Conclusion
That's it! Portal 2 has one of the easiest modding setups of any game, largely because Valve did the hard part for you fifteen years ago.
The short version - use the Steam Workshop for maps, because it's one click and nothing can break. Use the sourcemods folder for standalone total conversions, and remember to fully restart Steam afterwards. Reach for Vortex only for loose-file mods from Nexus. And if you want to make something yourself, Create Test Chambers is right there on the main menu.
Guides we create are always open to edits and improvements, so if you have any suggestions or notice any issues, feel free to contribute by creating a pull request on our GitHub repository!
Please join our Discord server if you have any questions or need help with anything related to modding or our guides!