

A guide on how to download and install mods in Fallout 4 on PC. We cover both common methods: Vortex (the mod manager from Nexus Mods) and installing mods by hand, which is more advanced but worth knowing.
This guide is focused on Windows, but Linux users running Fallout 4 through Steam Proton or Wine should be able to follow along with most of it without any issues!
Fallout 4 has one of the biggest mod scenes on Nexus Mods, sitting at just under 70,000 mods at the time of writing. It's also a Bethesda game, which means two things are true at once: installing a mod is genuinely easy, and getting a load of mods running together without the game crashing on the loading screen is a skill. This guide covers the easy part properly so the hard part is less painful later.
To keep everything concrete we'll install the same two things through both methods - the Fallout 4 Script Extender (F4SE), which a huge number of mods depend on, and Armorsmith Extended, a popular armour overhaul that happens to have a required dependency of its own. That dependency is the interesting bit, because requirements are the single most common reason a mod doesn't work.
Requirements
- A PC copy of Fallout 4 (this guide uses the Steam version).
- 7-Zip or any other archive extraction software.
- A free Nexus Mods account (optional, but you'll want one).
- A basic understanding of copying and moving files around on Windows.
- Roughly a gigabyte of free disk space to start with. Fallout 4 mods get large fast - the two example mods in this guide are 850 MB between them.
Which Version Of Fallout 4 Are You Running?
Unlike Skyrim there's only one PC release of Fallout 4, but the game build matters a great deal and this is where most people come unstuck.
- 1.10.163 is the last pre-next-gen build. A lot of the older, bigger F4SE mods still target this and nothing else.
- 1.10.980 was the April 2024 "next-gen" update. It changed enough of the executable that plenty of mod authors simply refused to move to it.
- 1.11.x is the current series. At the time of writing the latest build is 1.11.240, released on 18 August 2026.
You can see your build by right-clicking Fallout4.exe, opening Properties, and checking the Details tab.
The practical advice is straightforward. If you're starting fresh, stay on the current build and only install mods that say they support it. If you're rebuilding an old load order that depends on mods which were never updated, downgrading to 1.10.163 is still what the community does, and there are tools like the Fallout 4 Downgrader for exactly that.
NOTE - If you do downgrade, you'll also want Backported Archive2 Support System. It teaches older builds how to read the newer BA2 archive format, which a lot of modern mods now ship with.
WARNING - Steam updates Fallout 4 automatically by default. If your mod setup depends on a specific build, set the game to Only update this game when I launch it in its Steam properties, otherwise a patch will quietly break everything overnight.
Running Mods On Linux (Proton/Steam Deck)
Fallout 4 is rated Gold on ProtonDB and is Steam Deck Verified, so the game itself is not the problem. Mods work fine in most cases.
The awkward part is the tooling. Vortex, F4SE, LOOT and FO4Edit are all Windows programs, so you'll either be running them through Proton in the same prefix as the game (usually with Protontricks) or installing mods manually. Manual installation is honestly the less painful route on Linux, and everything in the manual section below applies - just with Proton paths.
Back Up Your Game Files!
Before you install anything we strongly recommend backing up your game folder and saves. This gives you something to fall back on if a mod corrupts your install or breaks a playthrough.
The default paths are below.
- Steam:
C:\Program Files (x86)\Steam\steamapps\common\Fallout 4 - GOG:
C:\Program Files (x86)\GOG Galaxy\Games\Fallout 4 - Epic Games:
C:\Program Files\Epic Games\Fallout4
Your saves and INI files live somewhere else entirely.
C:\Users\<user>\Documents\My Games\Fallout4
Saves is in there, along with Fallout4.ini, Fallout4Prefs.ini and (once you create it) Fallout4Custom.ini.
WARNING - Keep note of both of these locations. You'll need them repeatedly throughout this guide.
TIP - You don't have to copy the whole 35+ GB game folder. Copy the loose files in the root of it, and let Steam verify the rest if you ever need to roll back. Your saves are tiny by comparison and absolutely worth copying in full.
Enable Modding In Your INI Files
Out of the box, Fallout 4 ignores loose files that mods drop into Data. You have to tell it not to.
Create or open the following file in Notepad.
C:\Users\<user>\Documents\My Games\Fallout4\Fallout4Custom.ini
Then add these three lines.
[Archive]
bInvalidateOlderFiles=1
sResourceDataDirsFinal=
bInvalidateOlderFiles=1 lets mod files override the game's own, and clearing sResourceDataDirsFinal removes the restriction that only lets the game read out of STRINGS\. Without them, a mod can be installed perfectly and still do absolutely nothing.
NOTE - Recent game updates have started shipping these lines in Fallout4.ini already. Putting them in Fallout4Custom.ini anyway is harmless and survives game updates, which Fallout4.ini does not.
TIP - If Fallout 4 keeps overwriting your changes, right-click Fallout4Custom.ini, open Properties, and tick Read-only.
Where To Download Mods
The main source for Fallout 4 mods is Nexus Mods.
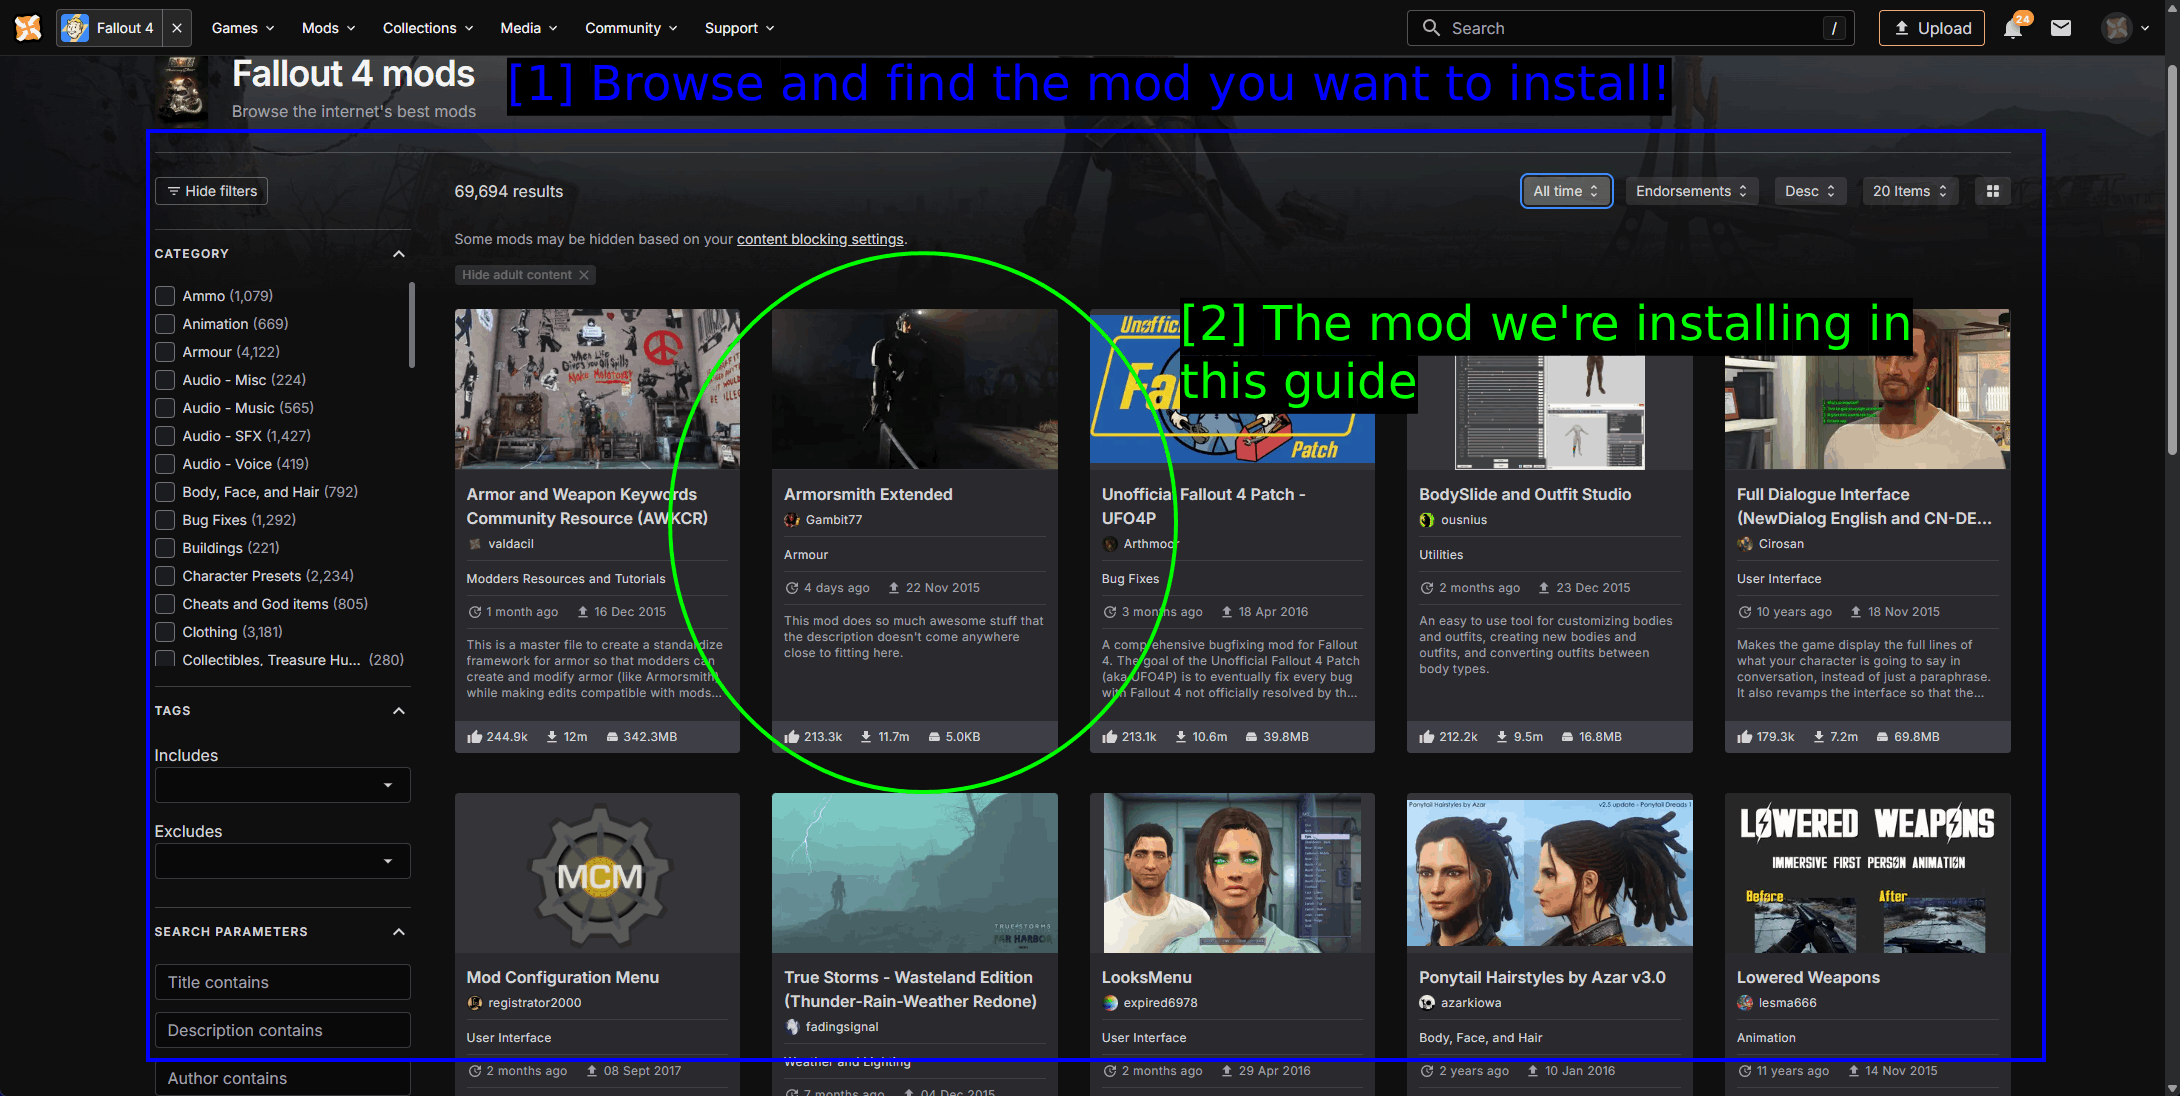
- Browse and find the mod you want to install!: There are just under 70,000 mods for the game. The Category list down the left is the fastest way to narrow things down, and sorting by Endorsements is the quickest way to find mods people actually use rather than mods that were merely uploaded.
- The mod we're installing in this guide: Armorsmith Extended.
Other places worth knowing about are below.
- Bethesda.net / Creations - the official in-game mod browser. Smaller selection, no script extender mods, but it works on console too.
- ModDB - mostly larger total conversions.
- LoversLab - adult content, obviously. Mentioned because a surprising number of dependency chains lead there.
- TMC - us! We're still new, but growing.
TIP - Read the Description, Requirements and the first page of Posts before you install anything. The posts tab in particular will tell you within about thirty seconds whether a mod currently works on the latest game build.
The Mods We're Installing
We're using Armorsmith Extended by Gambit77 as the example mod. It reworks how armour and clothing layer together so you can wear far more combinations than the base game allows, and it's been near the top of the Fallout 4 charts for about a decade.
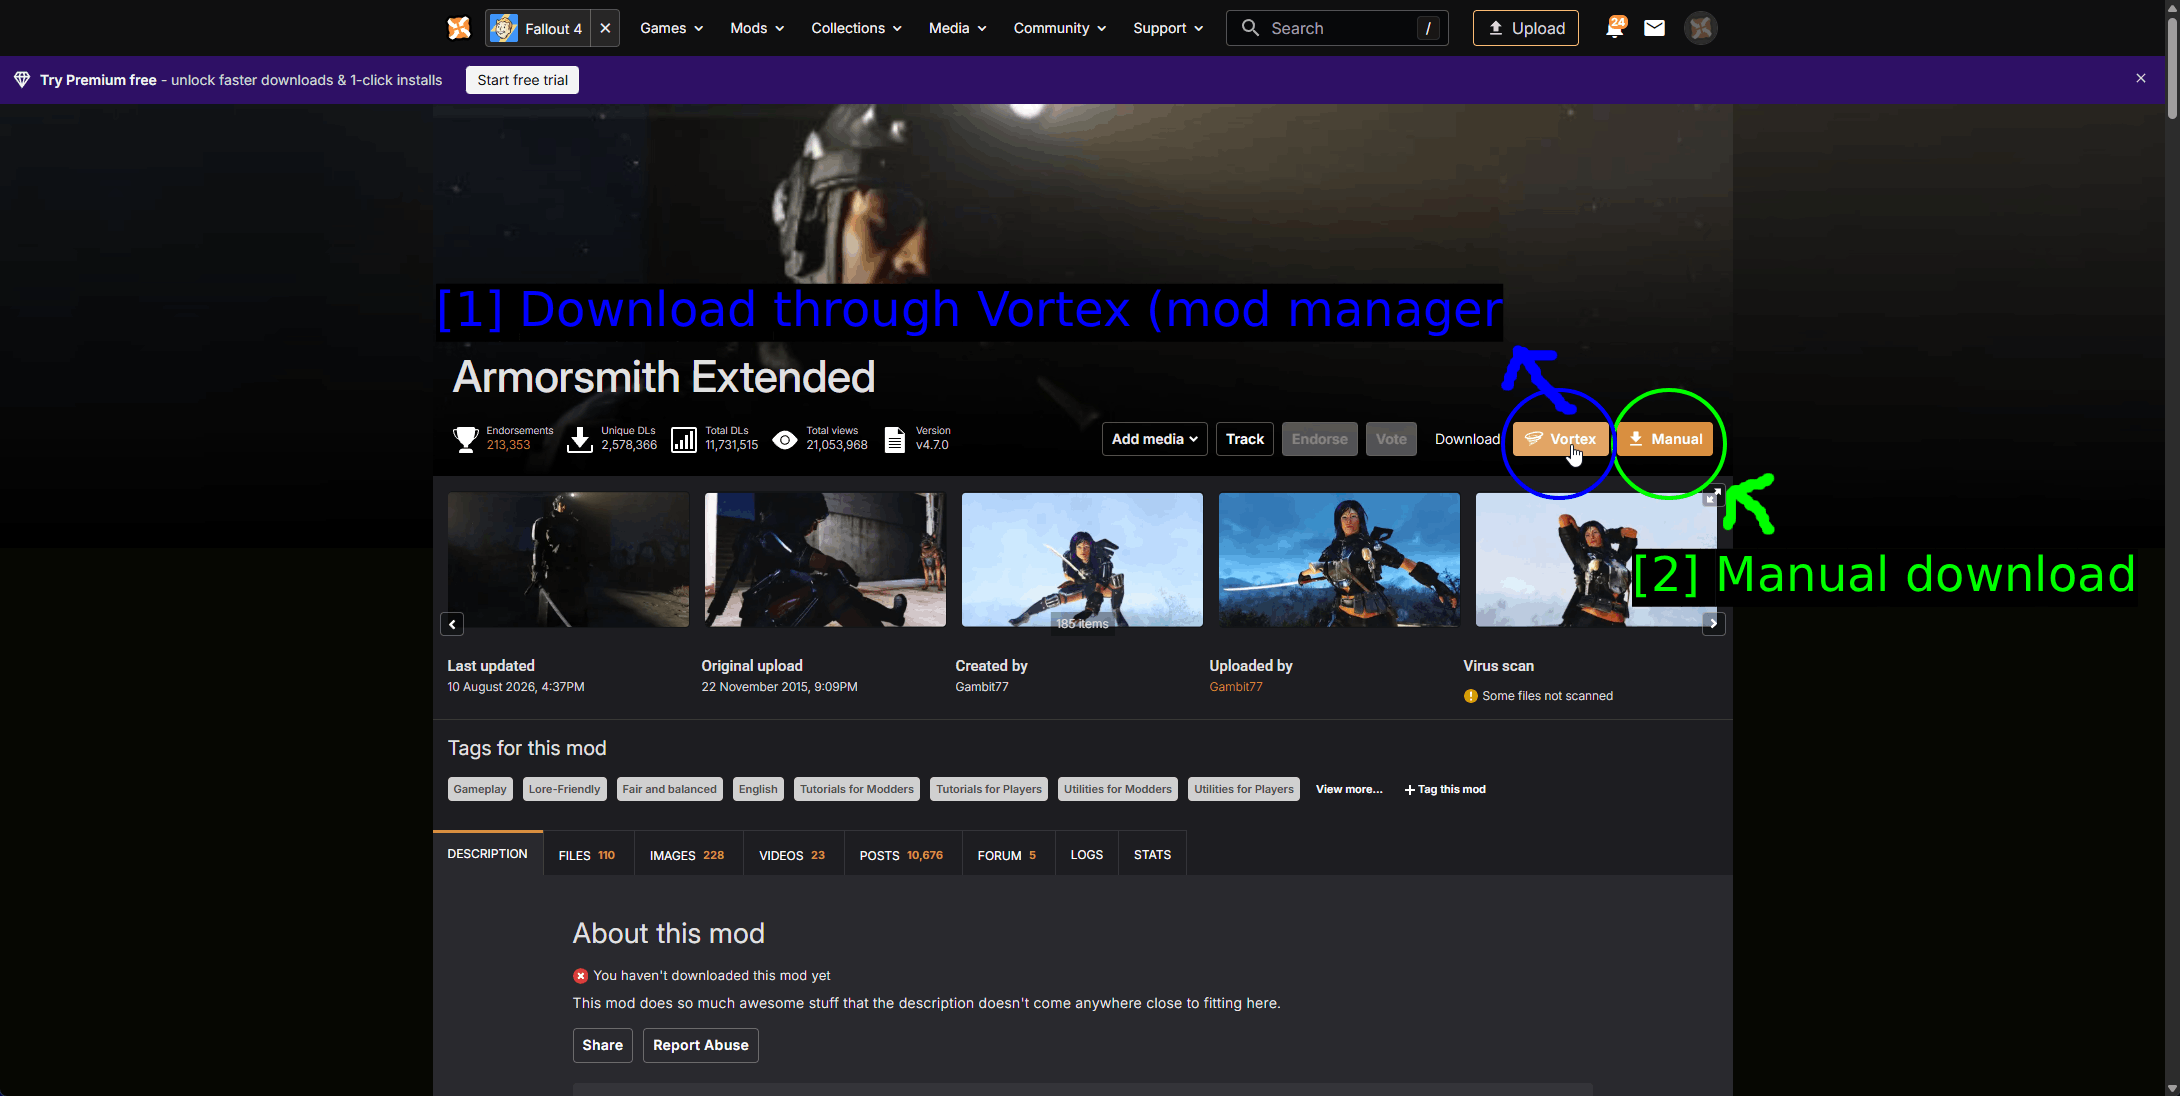
- Download through Vortex (mod manager): The orange Vortex button hands the file straight to the mod manager. If a mod page doesn't have this button, that mod has to be installed manually.
- Manual download: Manual downloads the archive through your browser instead.
Requirements Are Not Optional
Armorsmith Extended needs Armor and Weapon Keywords Community Resource (AWKCR) installed first. AWKCR is a shared framework that dozens of armour mods build on top of, and without it Armorsmith will either do nothing or take your game down with it.
Nexus Mods tells you this when you click Download, and it's worth actually reading that dialog rather than clicking through it.
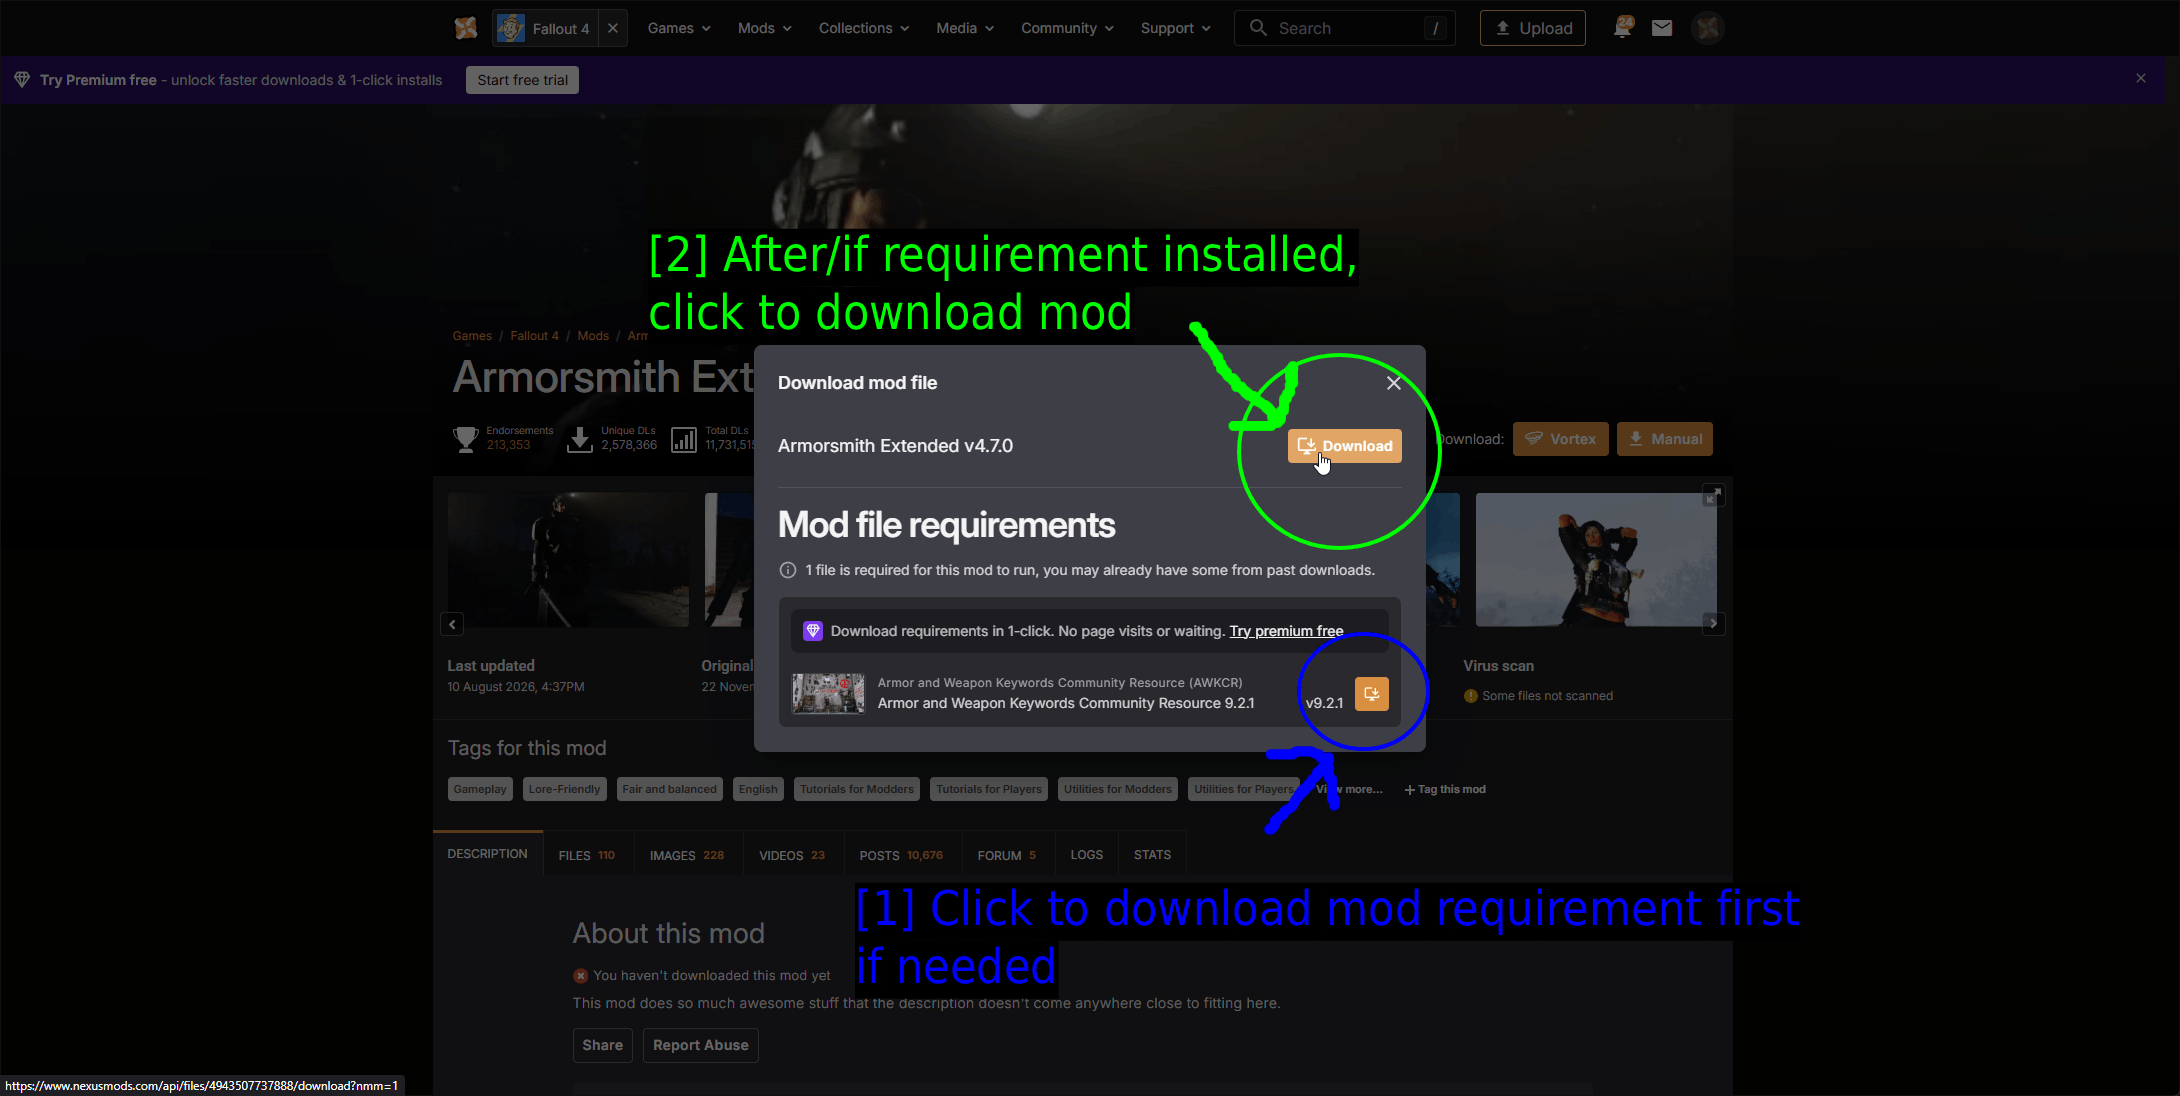
- Click to download mod requirement first if needed: The Mod file requirements list. Here it's a single entry, Armor and Weapon Keywords Community Resource 9.2.1, with its own download button next to it.
- After/if requirement installed, click to download mod: Only then grab Armorsmith itself.
Requirements come in two flavours and the dialog separates them. Mod file requirements are other mods you need. DLC requirements are official Bethesda DLC that you have to actually own, and no amount of mod installing works around those.
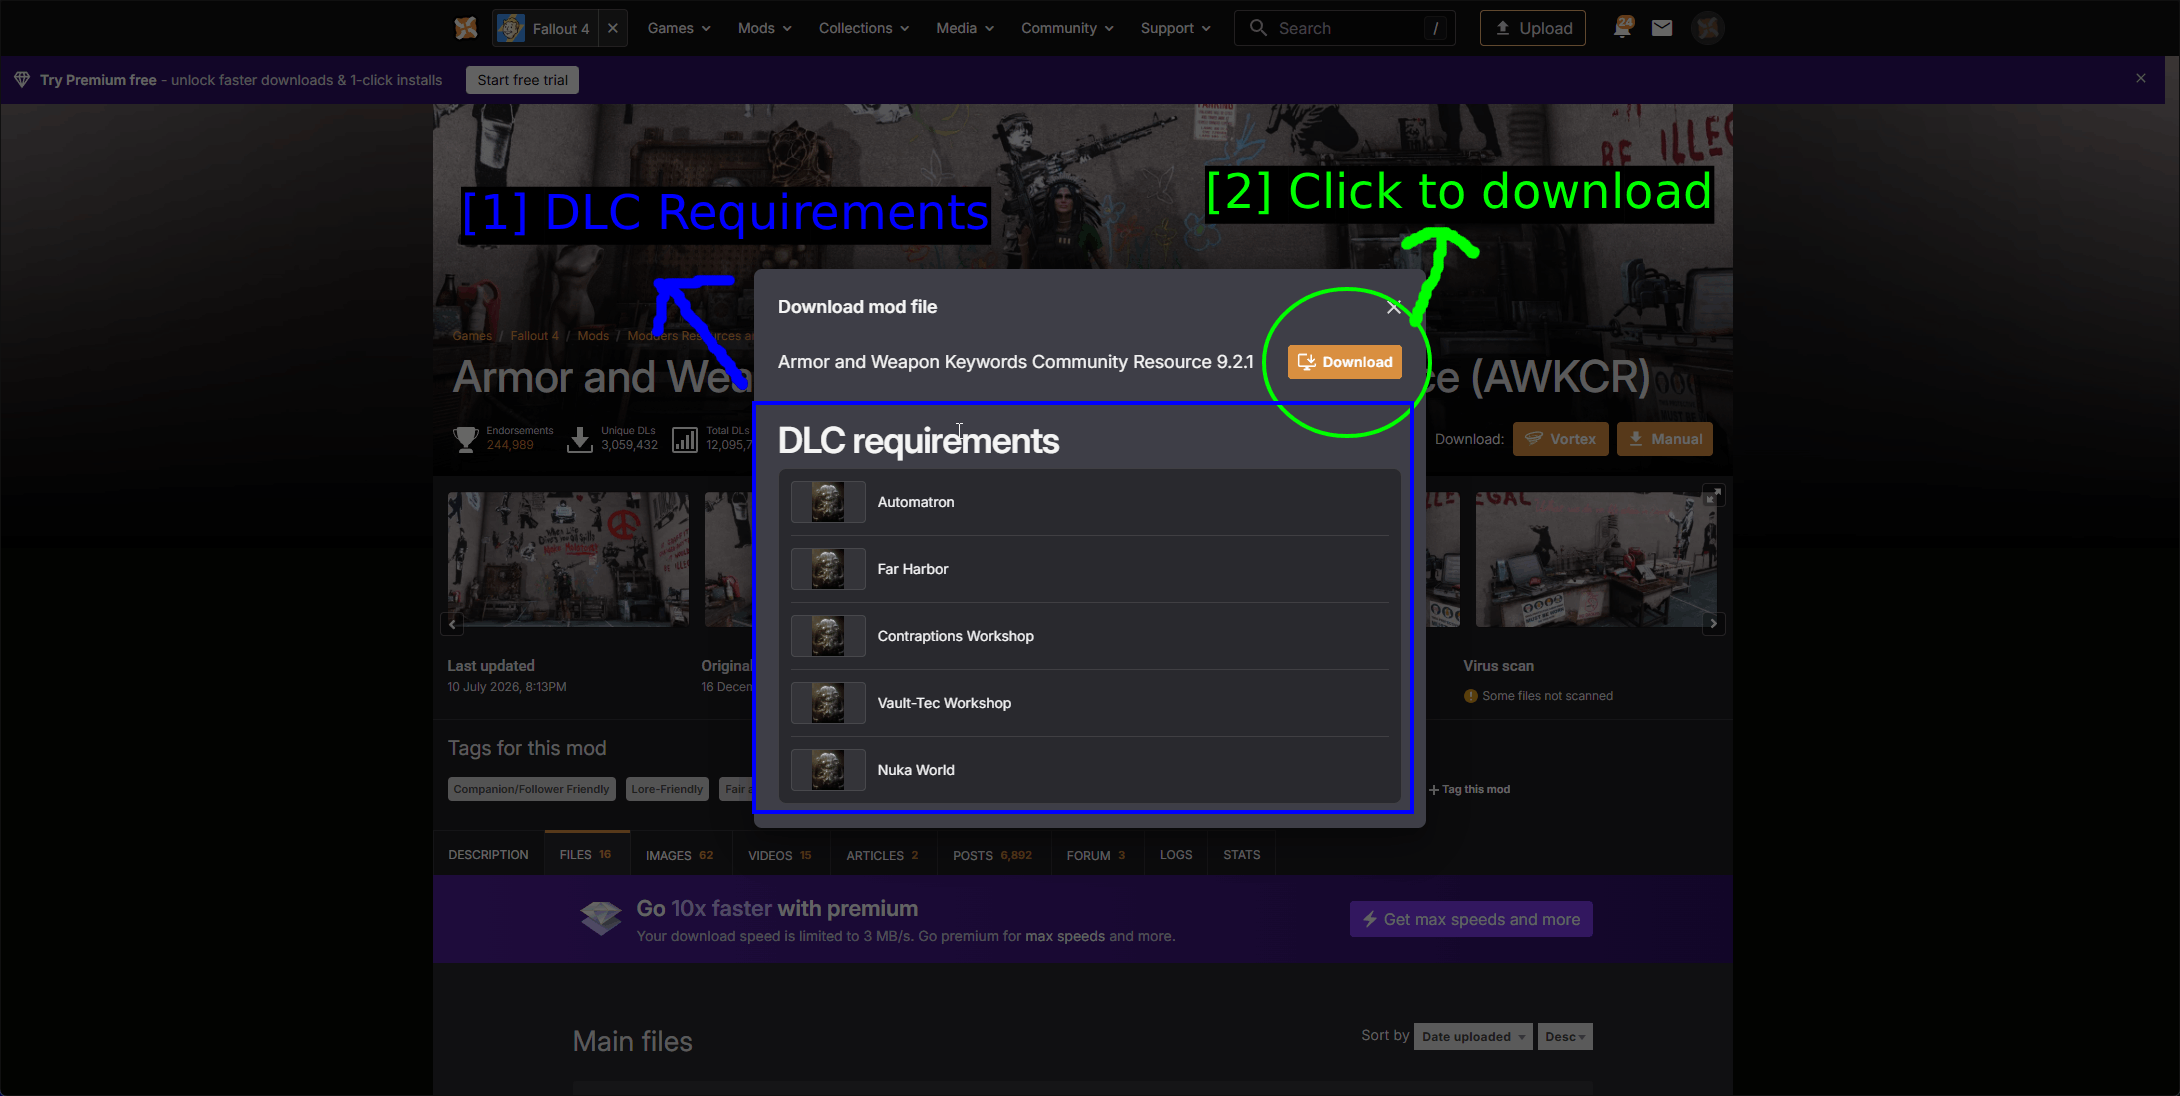
- DLC Requirements: AWKCR wants Automatron, Far Harbor, Contraptions Workshop, Vault-Tec Workshop and Nuka World. In other words, the full Season Pass.
- Click to download: The download button for AWKCR itself.
Here's the AWKCR mod page for reference. It looks identical to any other mod page, which is the point - a "requirement" is just a normal mod that something else expects to find.
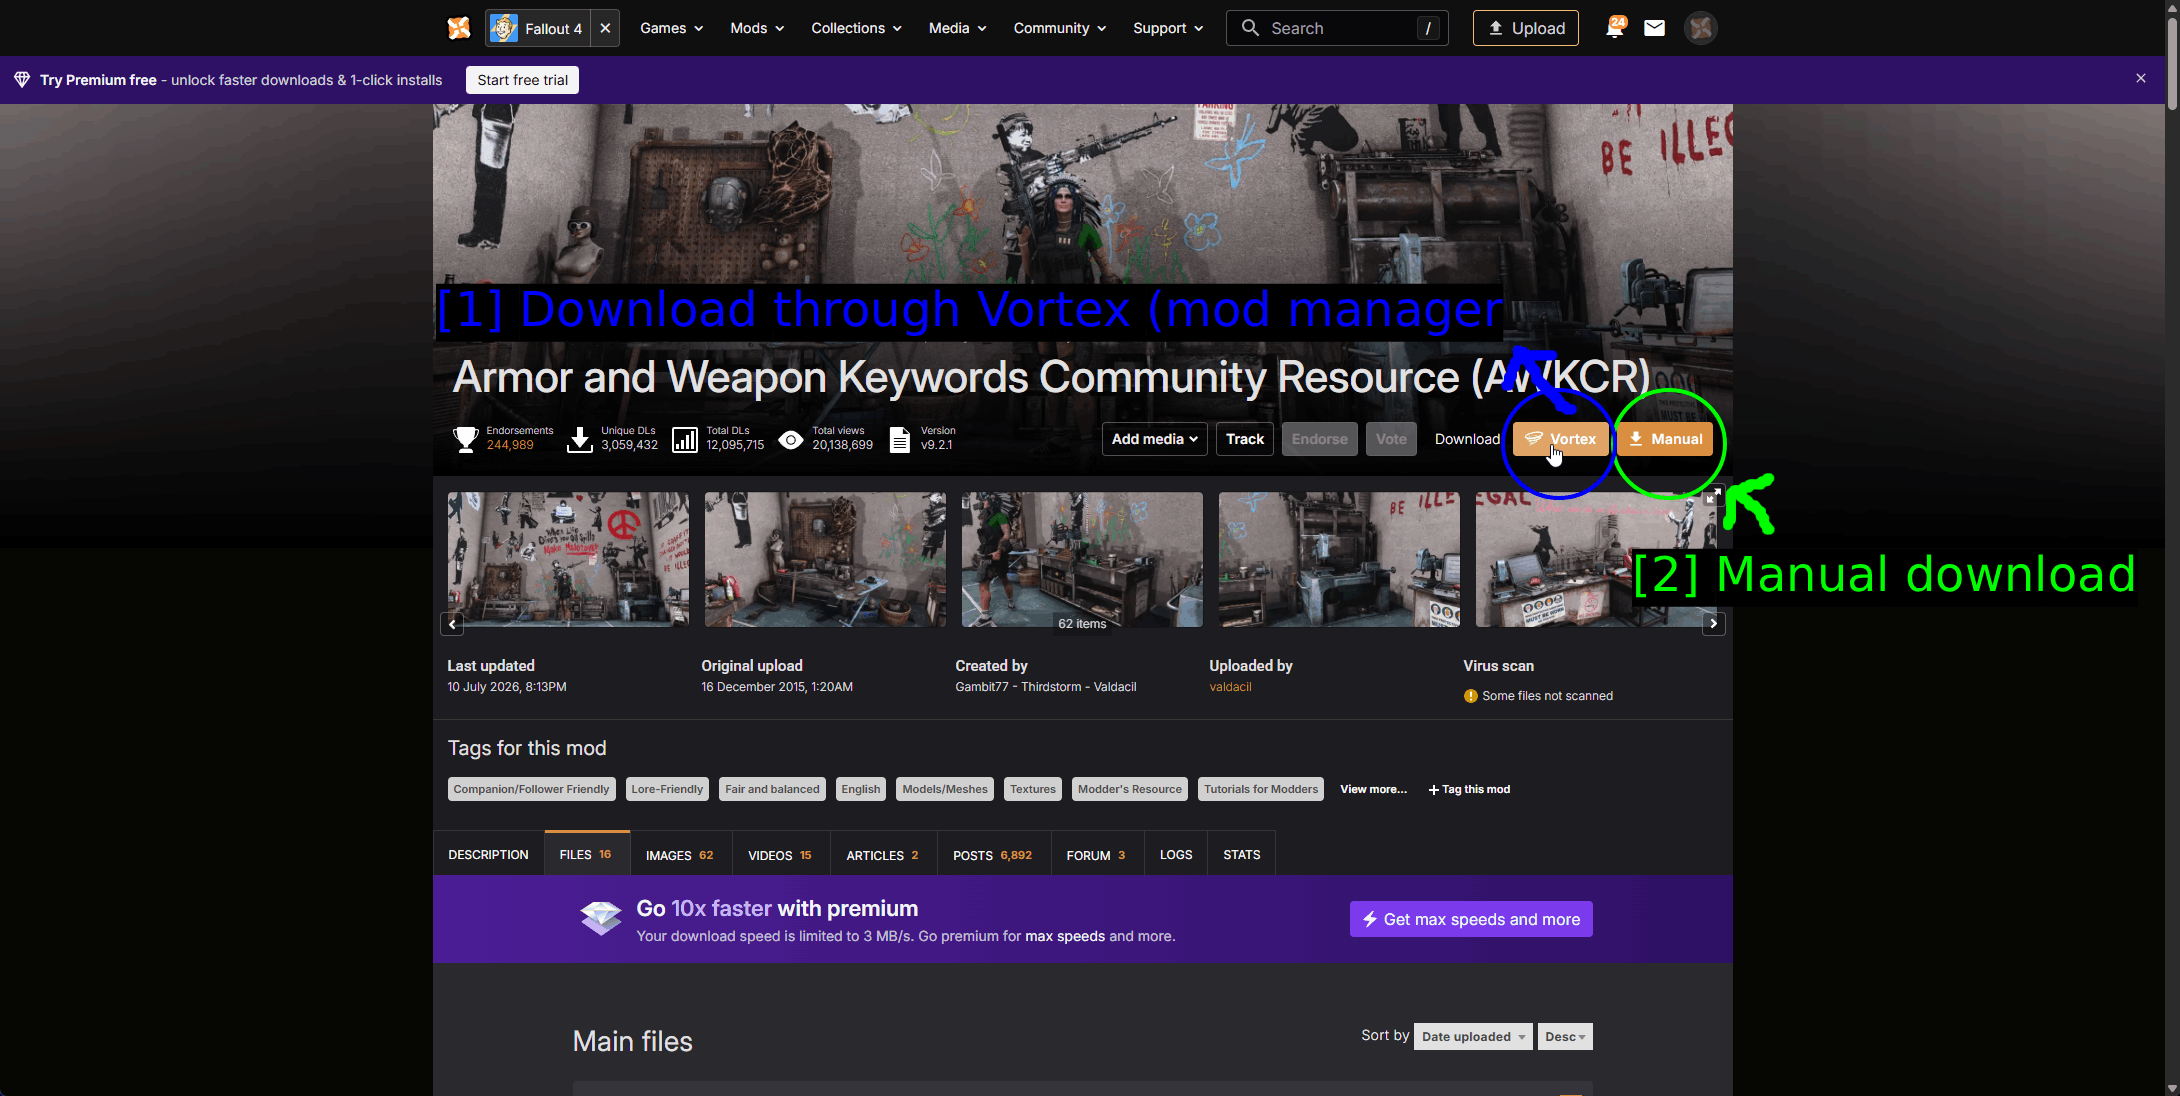
- Download through Vortex (mod manager): Same orange Vortex button.
- Manual download: Same Manual button.
NOTE - Requirements can be nested. A mod requires a framework, which requires a patch, which requires another framework. Work your way down the chain and install from the bottom up. Vortex will prompt you about missing dependencies but it won't chase them all down for you.
Installing Mods Through Vortex
Vortex is the official mod manager from Nexus Mods and it's the easiest way to handle Fallout 4 mods. It downloads, installs, tracks dependencies, manages your plugin load order and can run F4SE for you.
For a full walkthrough of Vortex - downloading it, installing it, and a breakdown of every setting - see our dedicated How to Use Vortex & The Basics guide. The sections below cover the Fallout 4 specific parts.
Managing Fallout 4 In Vortex
Vortex won't touch a game until you tell it to manage that game.
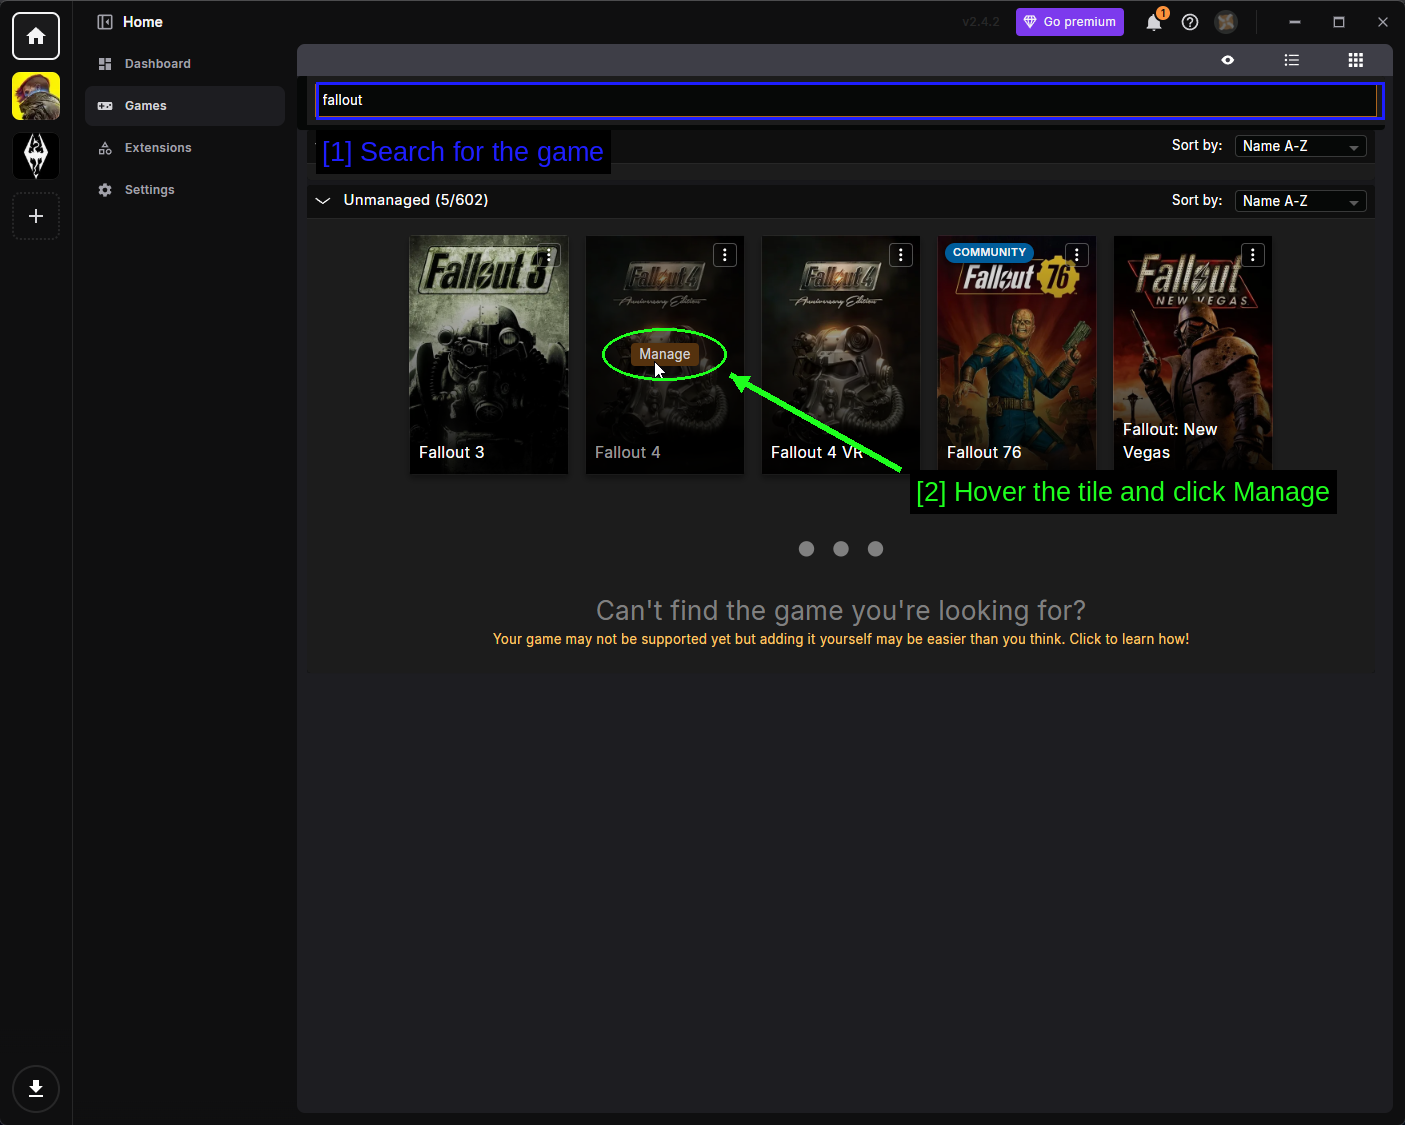
- Search for the game: Open Games in the left sidebar and type
falloutinto the search bar. You'll get several results, so make sure you pick plain Fallout 4 and not Fallout 4 VR, which is a separate game with its own separate mods. - Hover the tile and click Manage: Vortex scans for the install and adds Fallout 4 to the left rail.
If Vortex can't find your install, click the three dots (⋮) in the corner of the game tile, choose Manually Set Location, and point it at the folder containing Fallout4.exe.
NOTE - The tile may be labelled Fallout 4 Anniversary Edition depending on which edition you own. It's the same game and the same mods.
Downloading A Mod Through Vortex
With the game managed, head to a mod page in your browser and use the Vortex button. Your browser will ask for permission to open Vortex - accept it, and tick Always allow if you'd rather not be asked every single time.
Install AWKCR first, then Armorsmith Extended. Vortex will warn you if you do it the other way round, but it's cleaner to just get the order right.
Free Nexus Mods accounts get a short wait before each download starts.
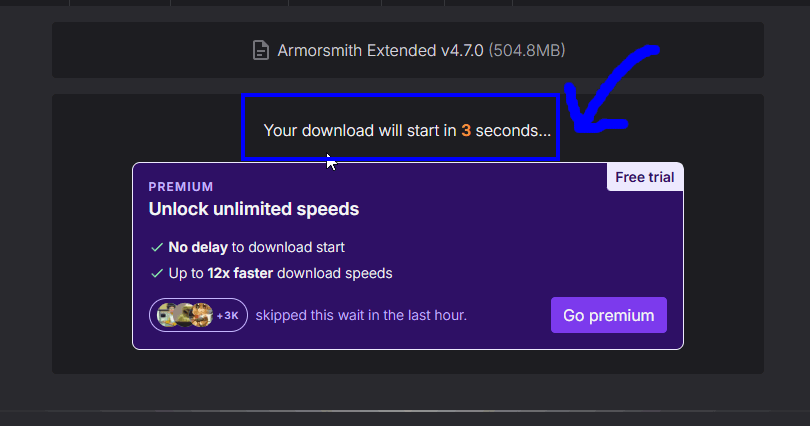
- Your download will start in 3 seconds: This is normal, not something going wrong. Premium accounts skip it.
Watching The Download
Vortex's Downloads page shows everything currently in flight.
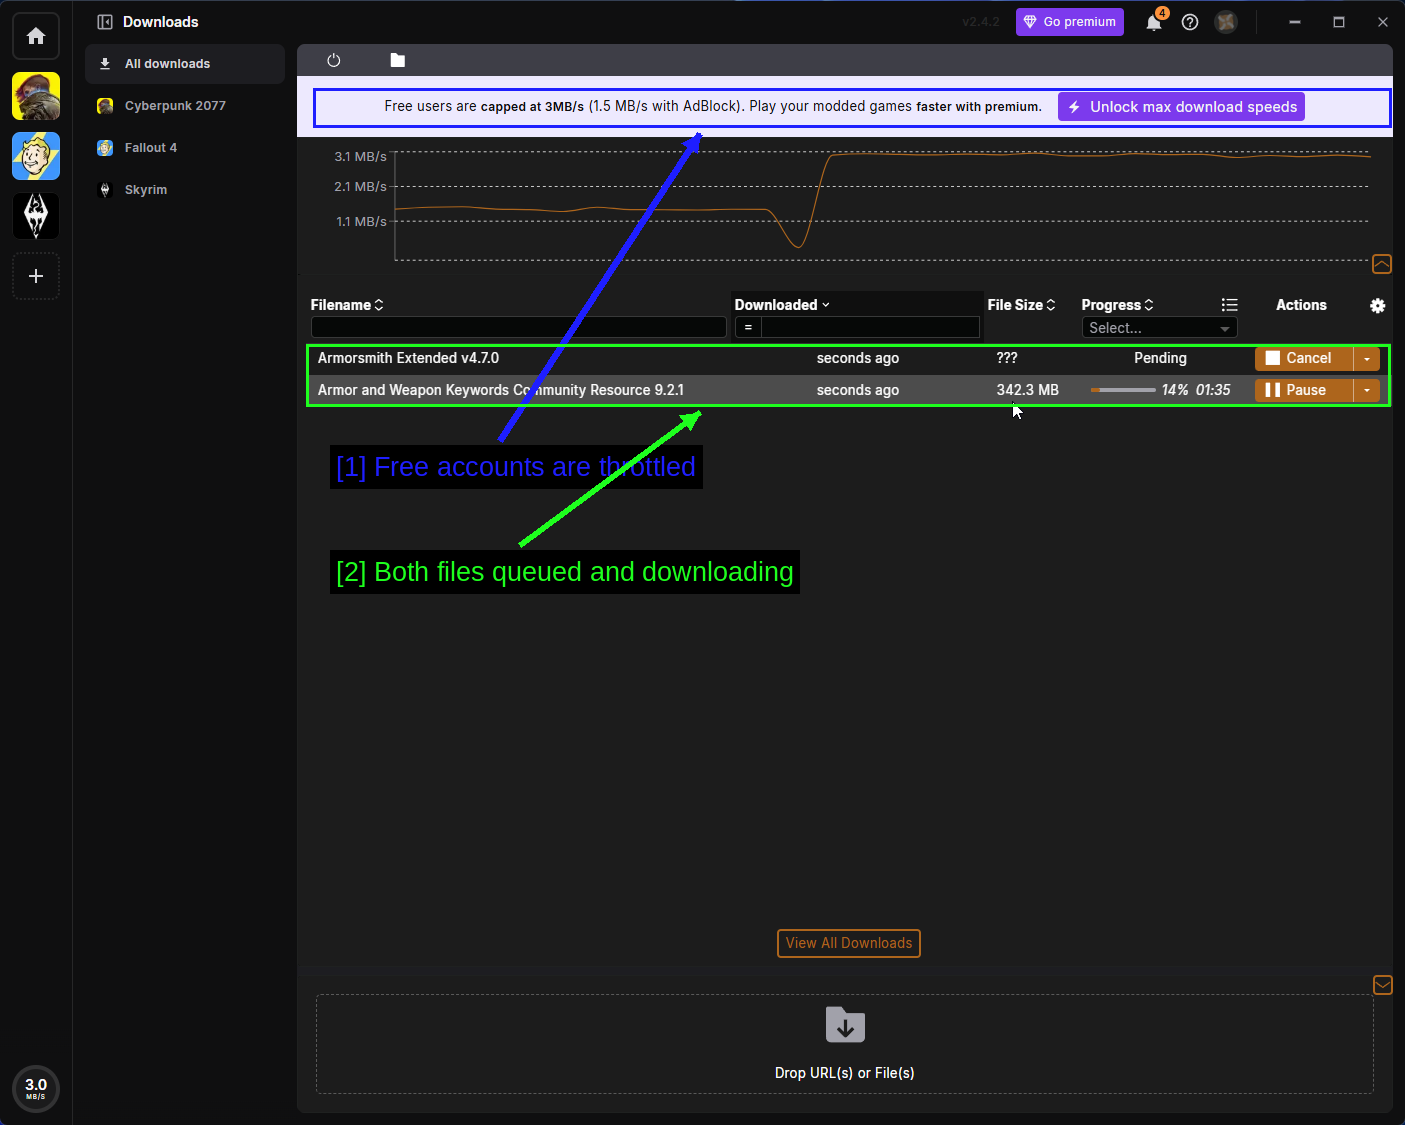
- Free accounts are throttled: Nexus Mods caps free downloads at around 3 MB/s, and lower again if you're running an ad blocker. AWKCR is 342 MB, so budget a couple of minutes.
- Both files queued and downloading: Queued downloads show as Pending and start automatically once the one ahead finishes.
Once a download completes, Vortex installs it and asks whether you want to enable it. Say yes, then click Deploy Mods if you get prompted.
The Mods Page
The Mods page is where you'll spend most of your time.
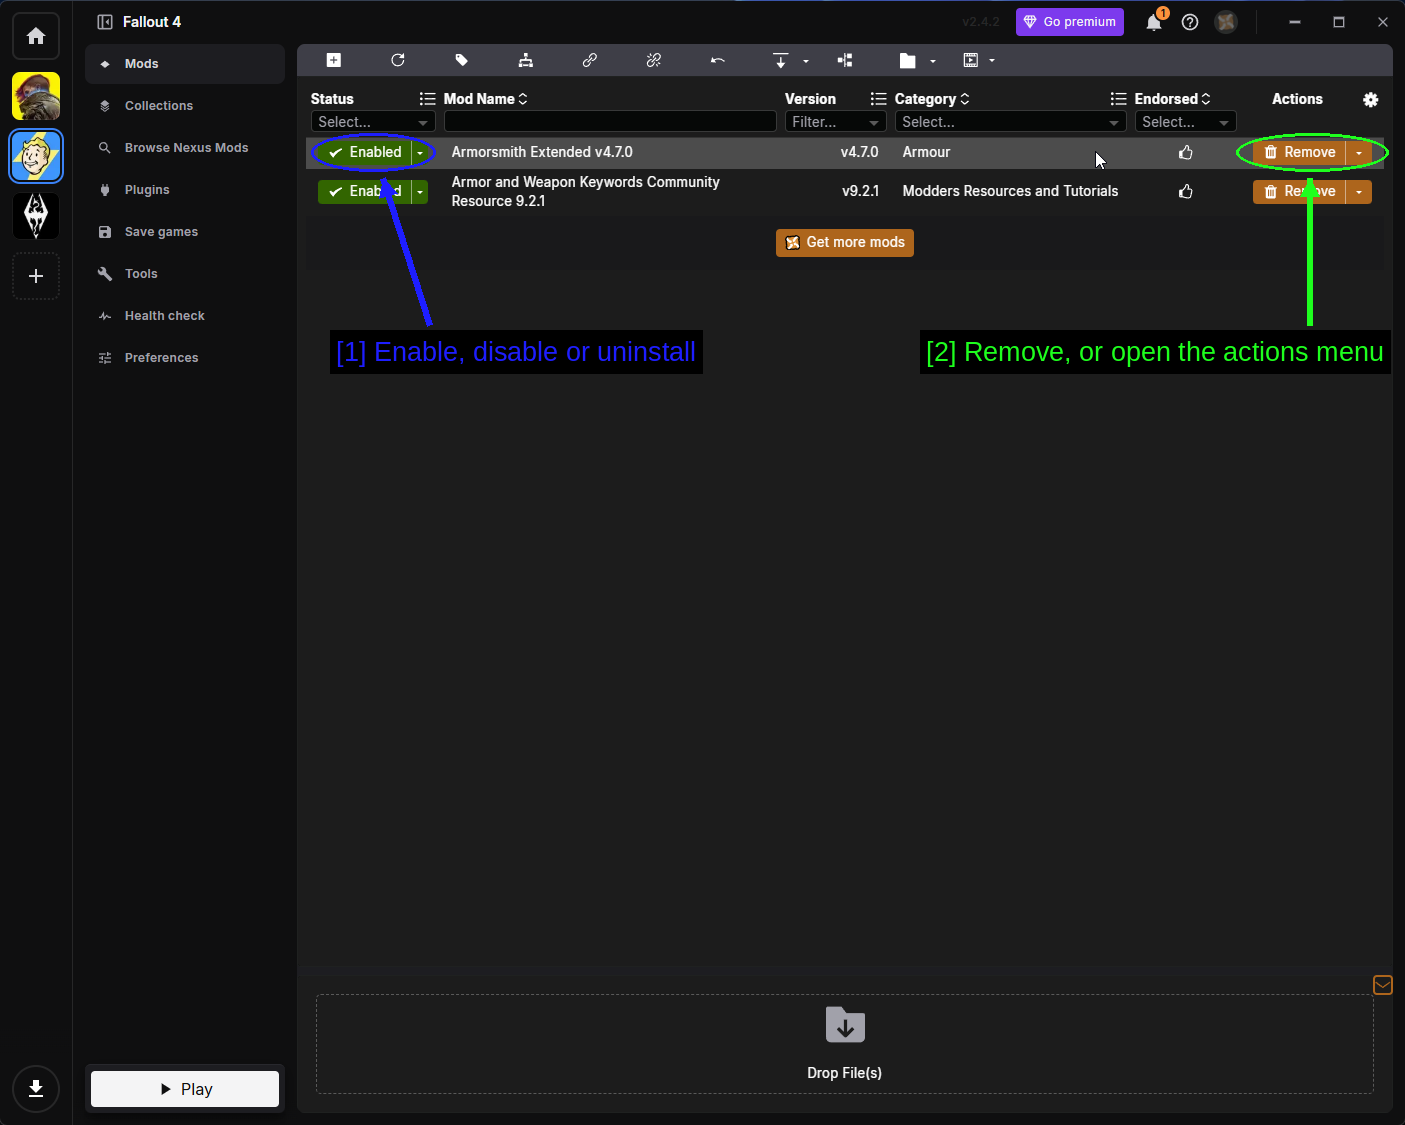
- Enable, disable or uninstall: The Status drop-down for each mod.
- Remove, or open the actions menu: Remove uninstalls the mod, and the arrow beside it opens the full actions menu.
The status drop-down has three options and the difference between them matters.
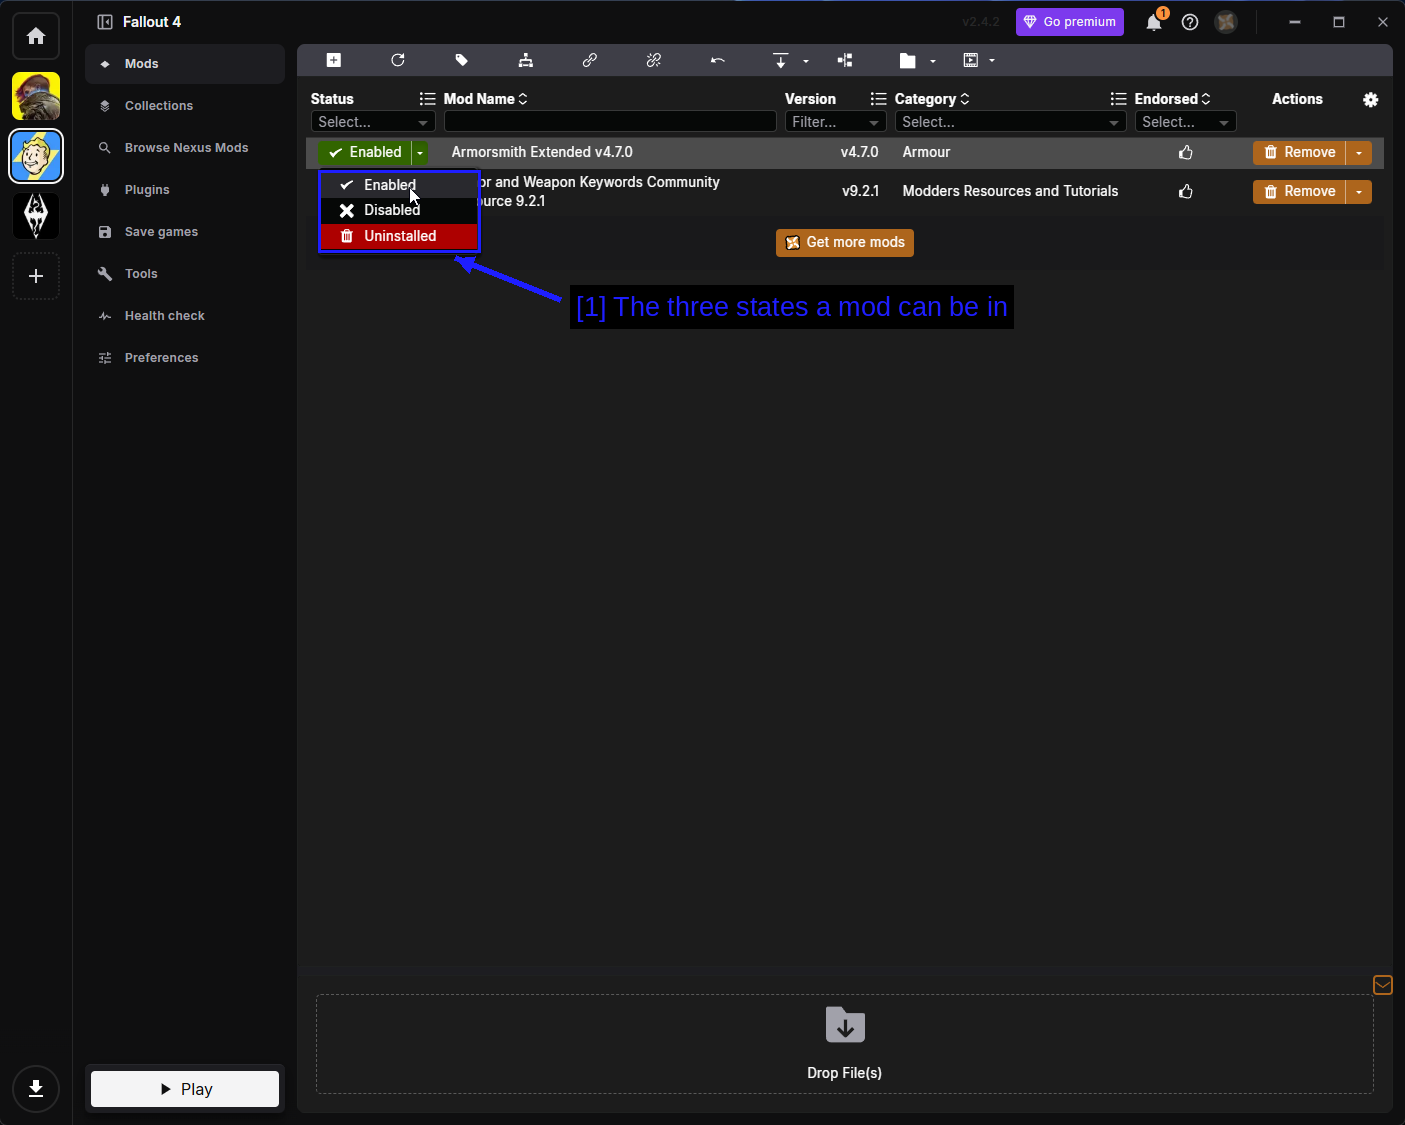
- The three states a mod can be in: Enabled means deployed to your game. Disabled keeps the mod installed in Vortex but removes its files from the game folder. Uninstalled deletes the installed files but keeps the downloaded archive so you can reinstall without downloading again.
Disabling is the single most useful troubleshooting tool you have. When your game starts crashing, disable half your mods, test, and repeat.
The actions menu covers everything else you can do to a mod.
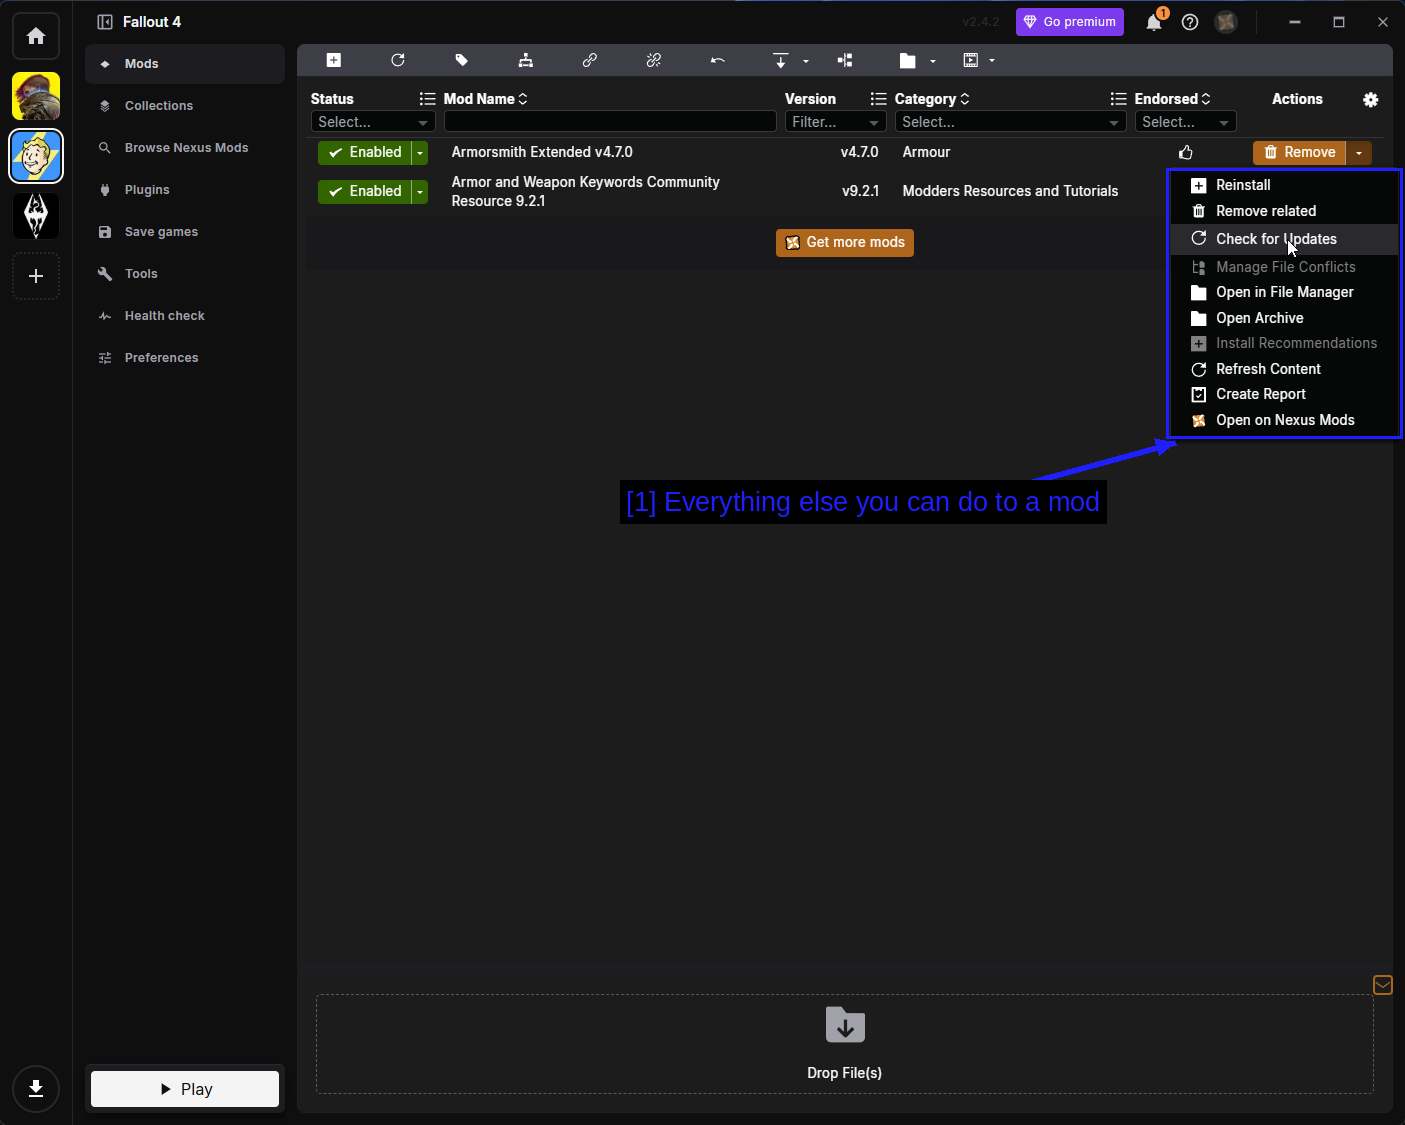
- Everything else you can do to a mod: The options are as follows.
- Reinstall - runs the installer again, useful if you picked the wrong options first time.
- Remove related - removes the mod along with anything tied to it.
- Check for Updates - asks Nexus Mods whether there's a newer version.
- Manage File Conflicts - decides which mod wins when two of them write the same file.
- Open in File Manager - opens the mod's staging folder.
- Open Archive - opens the downloaded archive.
- Install Recommendations - installs mods the author recommends alongside this one.
- Refresh Content - re-reads the mod's files from disk.
- Create Report - generates a report about the mod, handy when asking for help.
- Open on Nexus Mods - opens the mod page in your browser.
The gear icon at the top-right of the table controls which columns are shown.
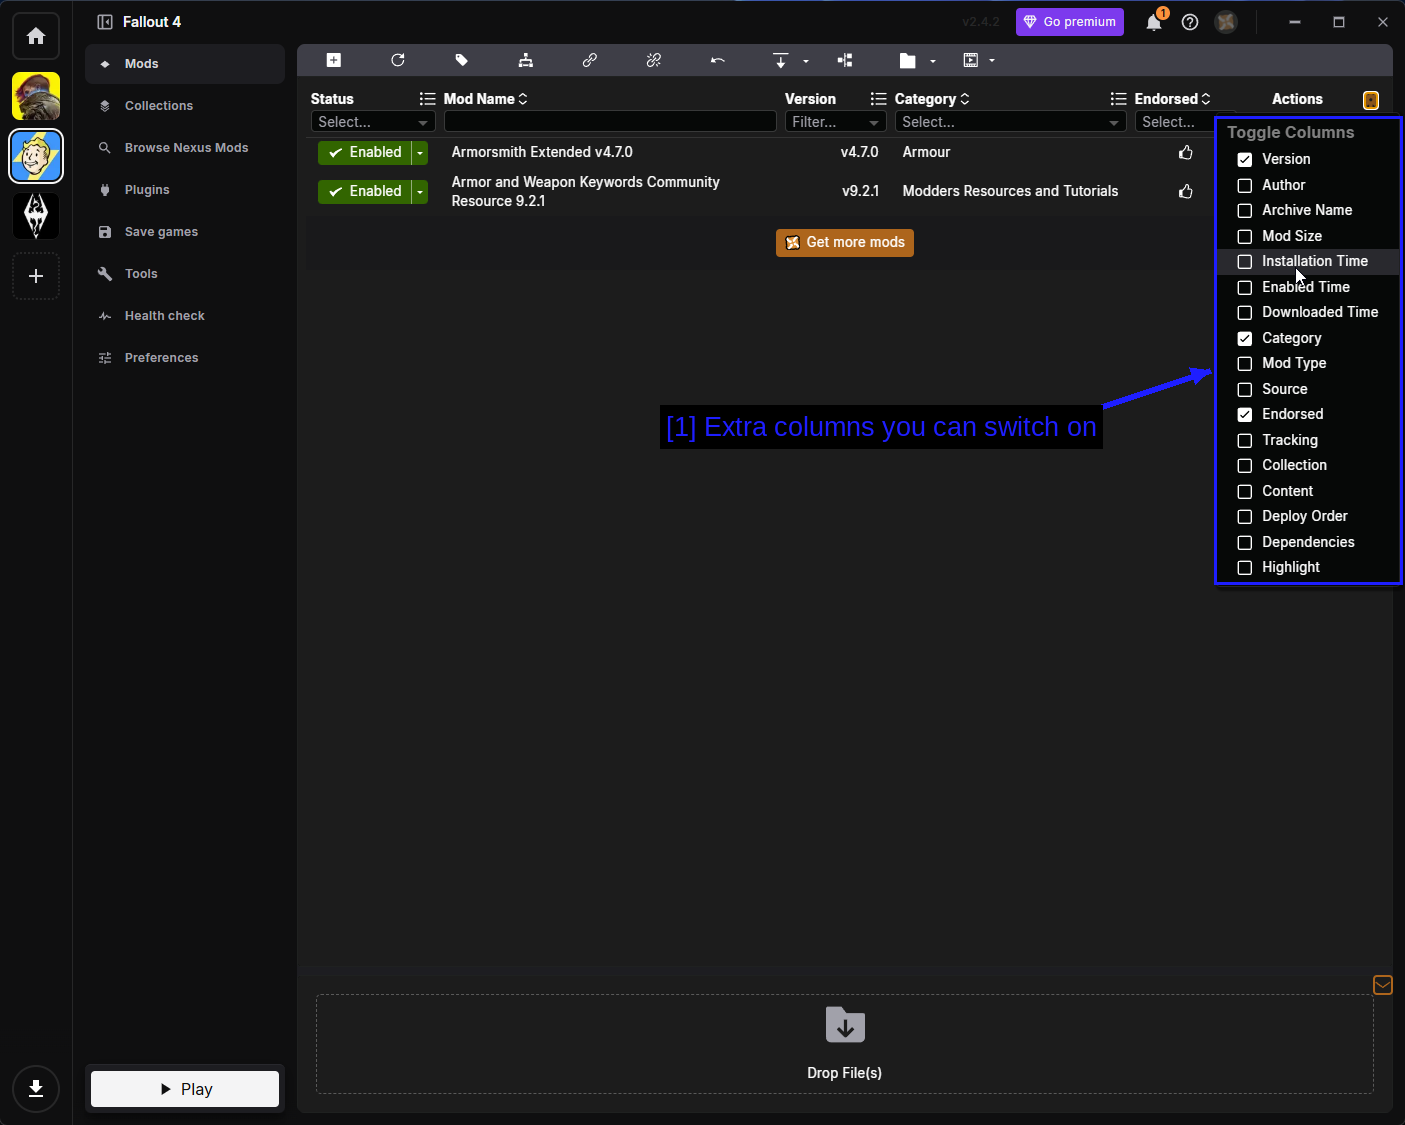
- Extra columns you can switch on: Version, Author, Archive Name, Mod Size, Installation Time, Enabled Time, Downloaded Time, Category, Mod Type, Source, Endorsed, Tracking, Collection, Content, Deploy Order, Dependencies and Highlight.
Mod Size and Author are the two worth turning on early. Once you're 80 mods deep, knowing which one is eating 14 GB is genuinely useful.
The Plugins Page
Fallout 4 mods that add or change records in the game world ship a plugin - an .esp, .esm or .esl file. The Plugins page controls what order those load in.
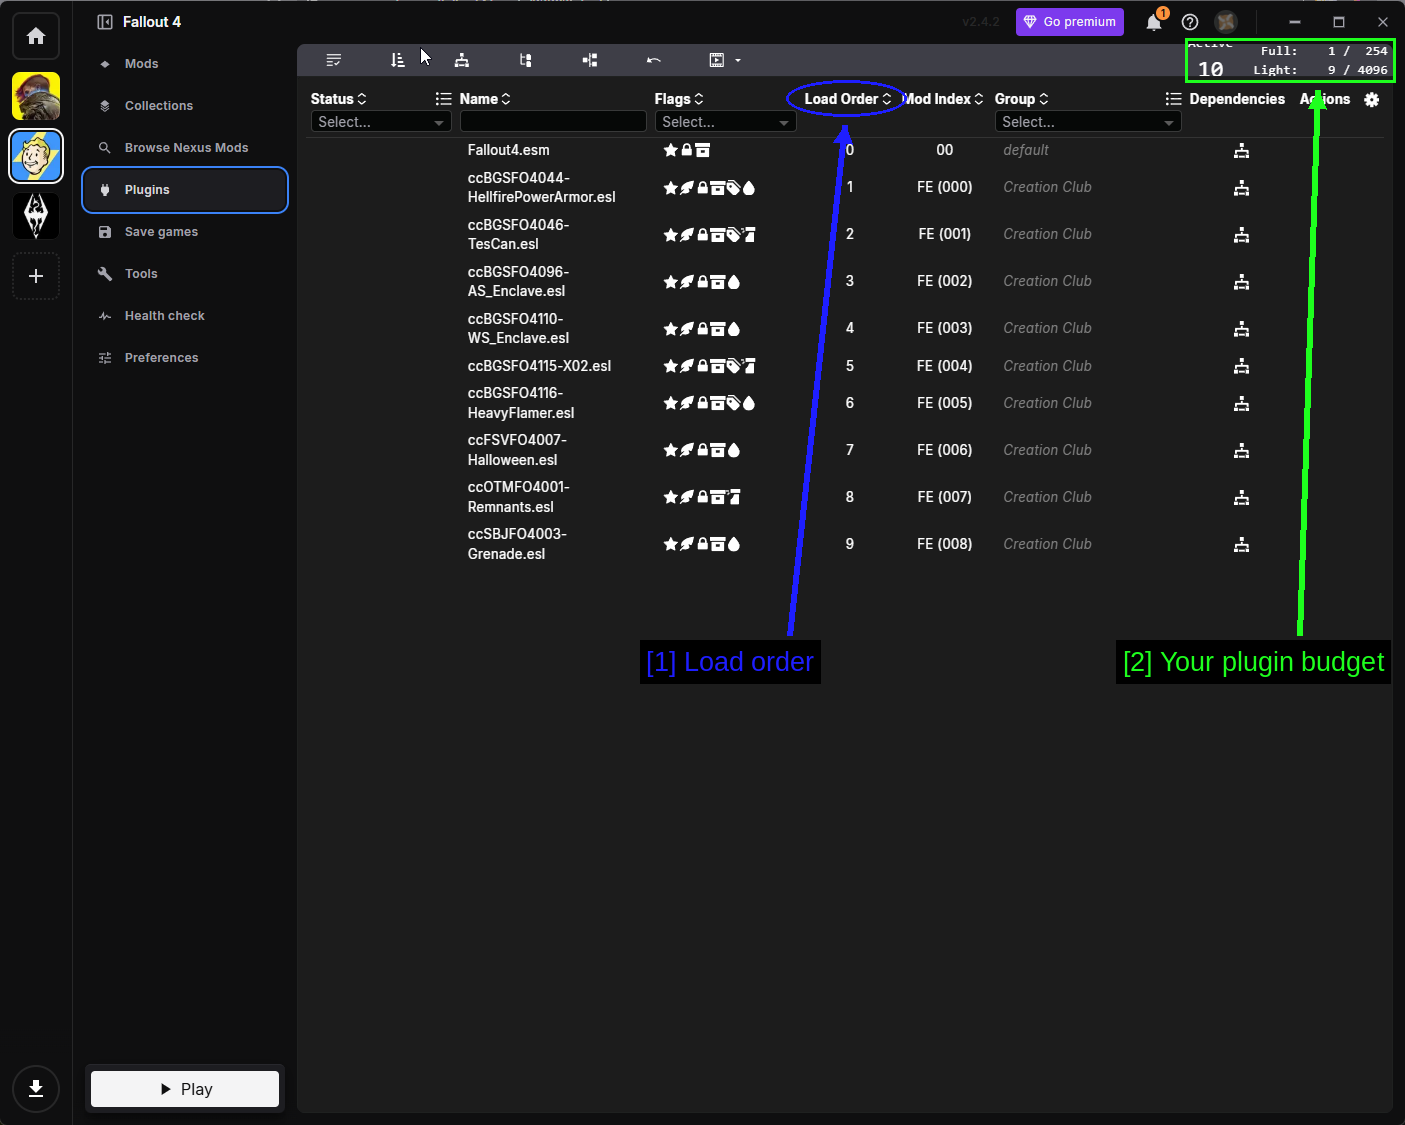
- Load order: Plugins load top to bottom. When two plugins change the same record, the one loaded later wins. This is the opposite of how Vortex orders mods on the Mods page, which catches people out constantly.
- Your plugin budget: Full plugins (
.esp/.esm) are capped at 254. Light plugins (.esl, and.espfiles flagged as light) get their own 4096 slot budget. The screenshot above is a clean install - everything listed is Creation Club content that ships with the game.
Bethesda's own masters (Fallout4.esm and the DLC) always load first and Vortex locks them in place.
TIP - Don't sort your load order by hand unless you know exactly why. Use LOOT, which has a community-maintained rules database and gets it right far more often than you will.
Browse Nexus Mods & Collections
You don't actually have to leave Vortex to find mods.
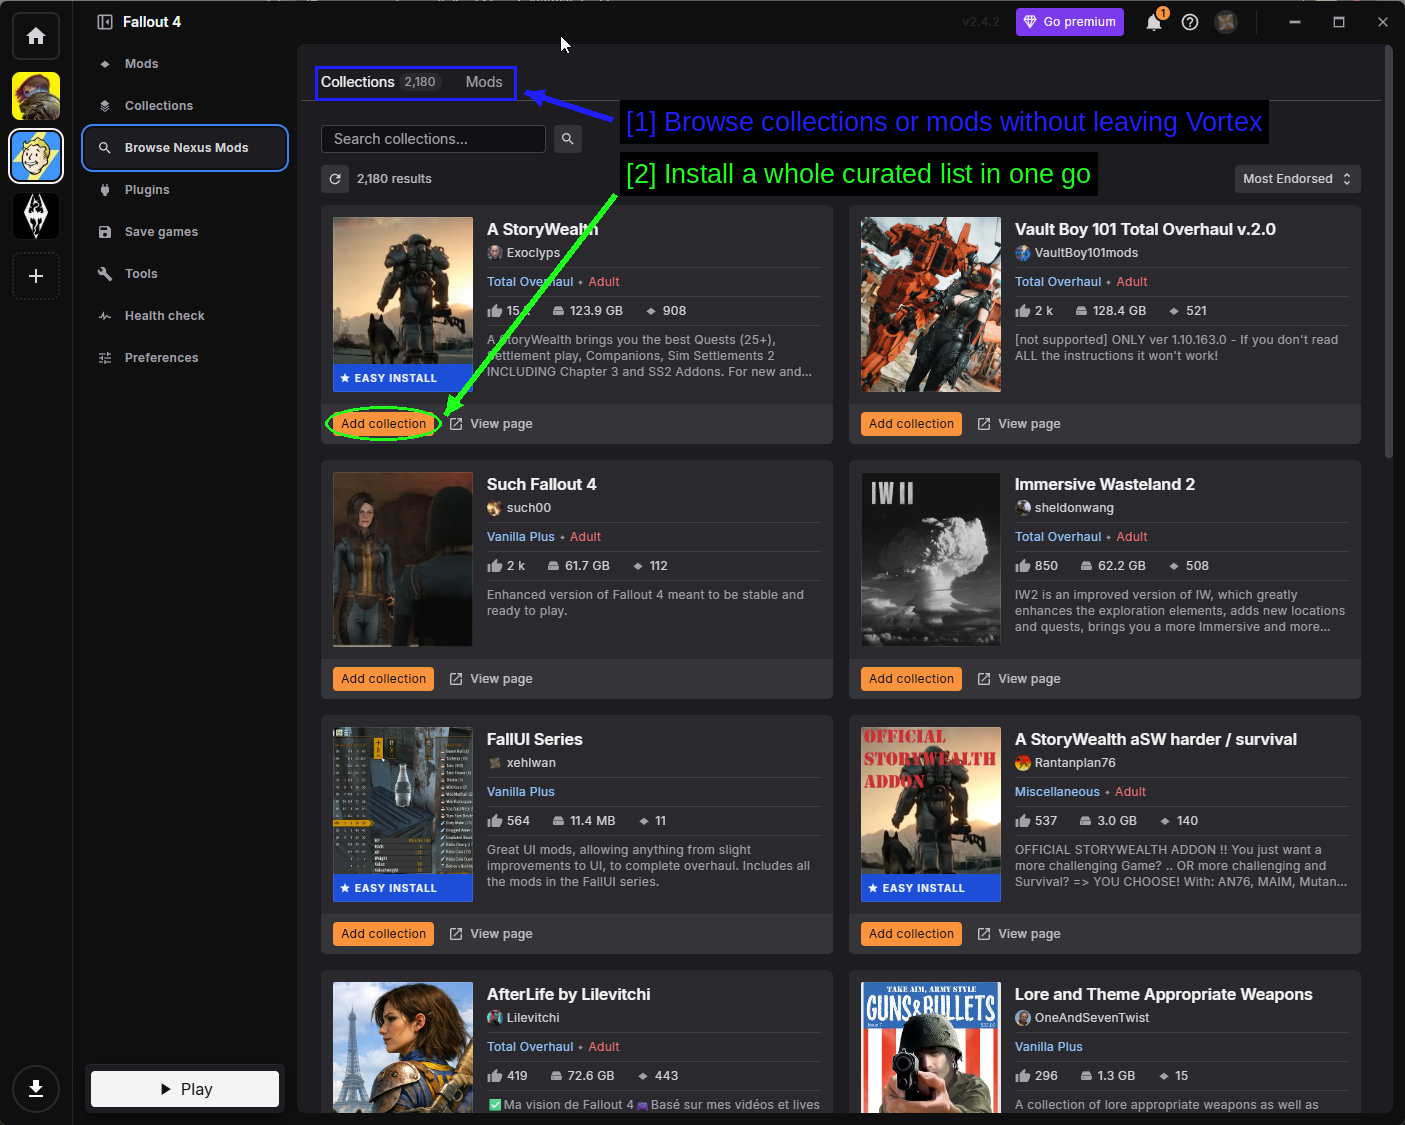
- Browse collections or mods without leaving Vortex: Two tabs, Collections and Mods, both searchable and both installable in place.
- Install a whole curated list in one go: Add collection downloads and installs every mod in that collection, in the right order, with the author's chosen install options.
A collection is a mod list somebody else built, tested and published. For Fallout 4 there are over 2,000 of them, ranging from small quality-of-life bundles to 120 GB total overhauls. They're a reasonable shortcut if you want a modded game rather than a modding hobby - just remember you're trusting whoever built it, and a 120 GB collection is a 120 GB download.
The Collections page manages the ones you've added.
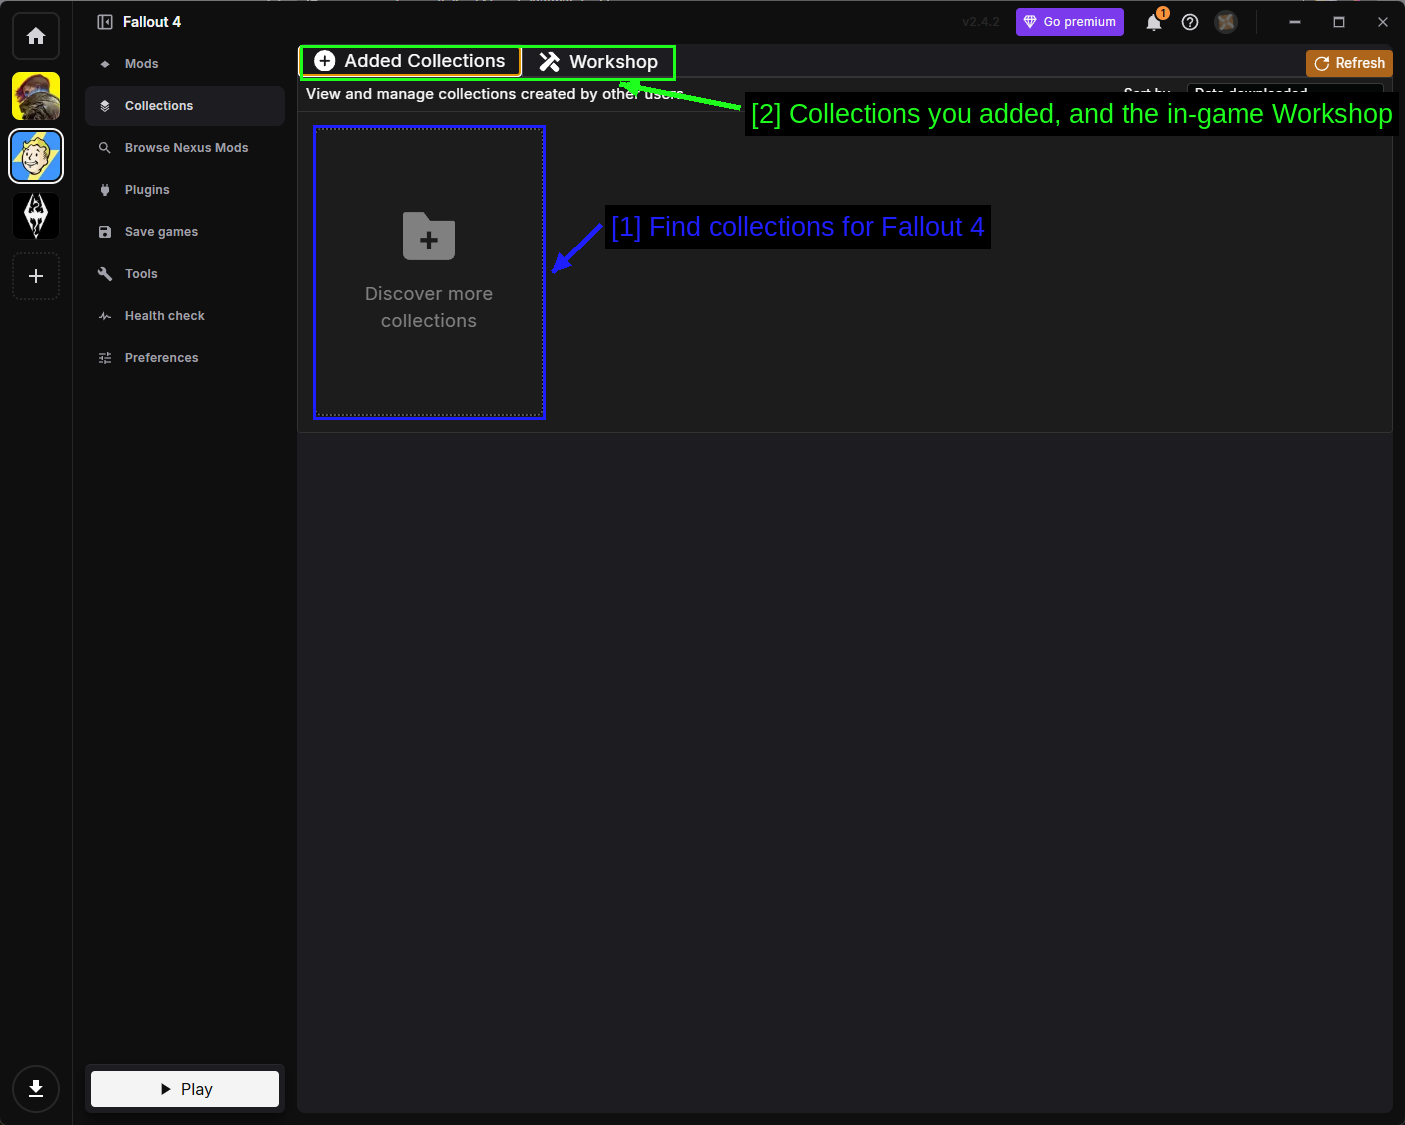
- Find collections for Fallout 4: Discover more collections takes you to the Fallout 4 collection listing.
- Collections you added, and the in-game Workshop: The Workshop tab is for building and publishing your own.
Save Games
Vortex reads your Fallout 4 saves and shows them in a sortable table.
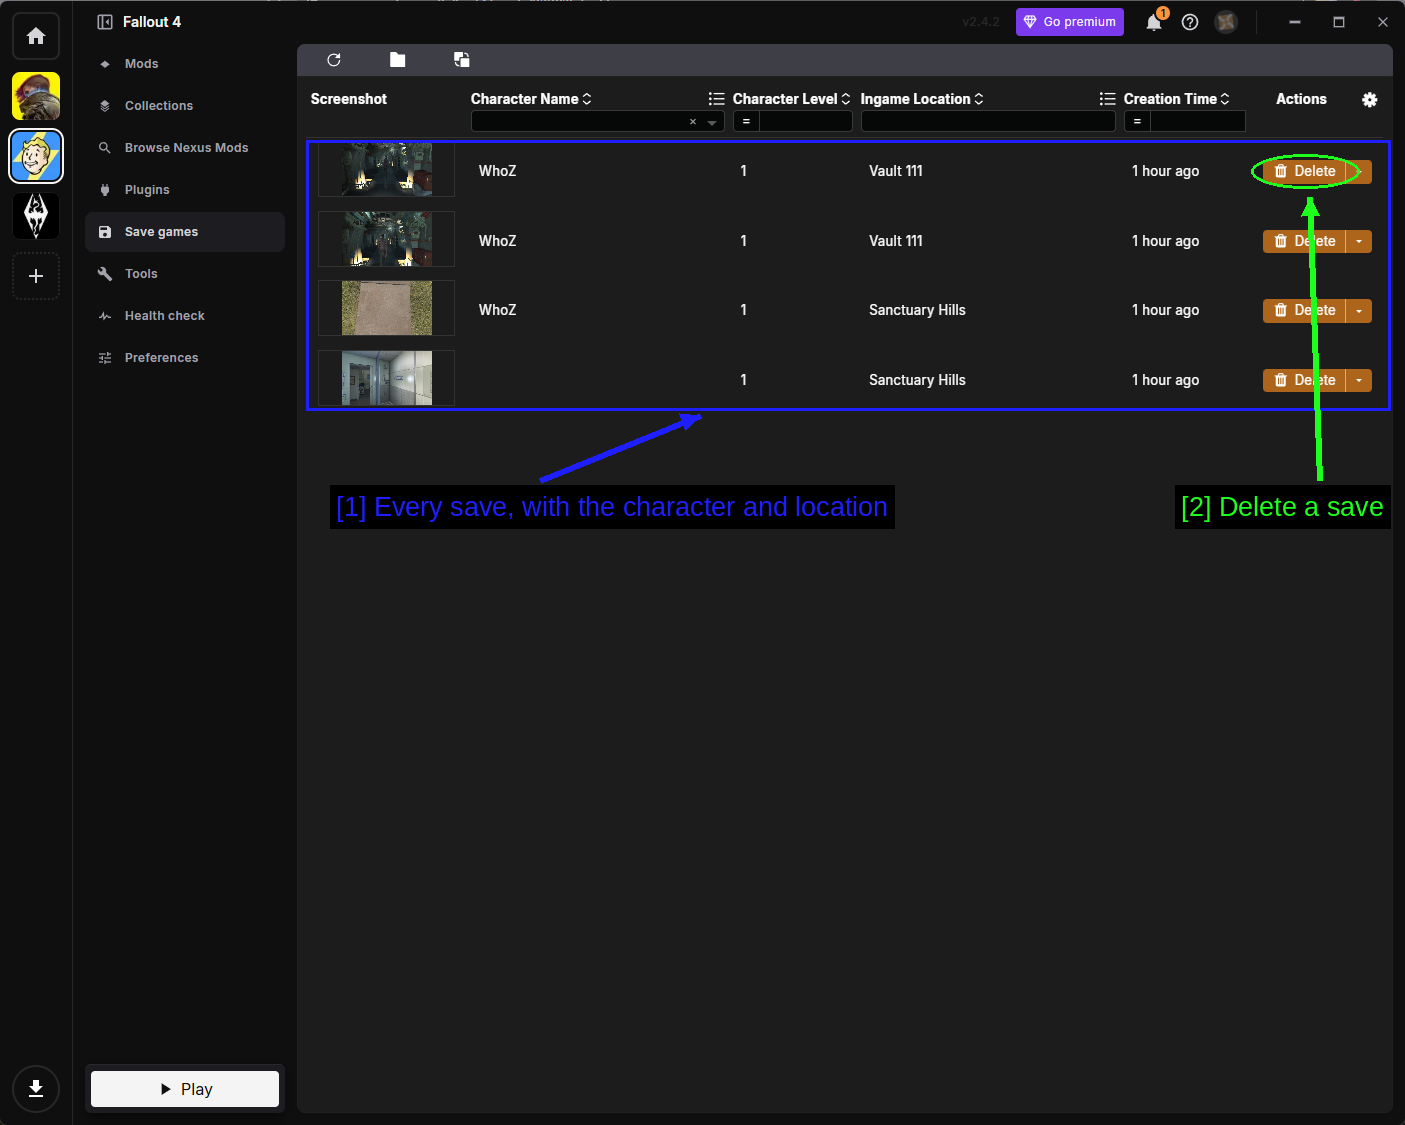
- Every save, with the character and location: Screenshot, character name, level, in-game location and creation time.
- Delete a save: Removes it from disk.
This page also flags saves that depend on plugins you no longer have installed, which is a useful warning sign before you load one and wonder why half your inventory vanished.
Tools
The Tools page lists external programs Vortex can launch alongside the game.
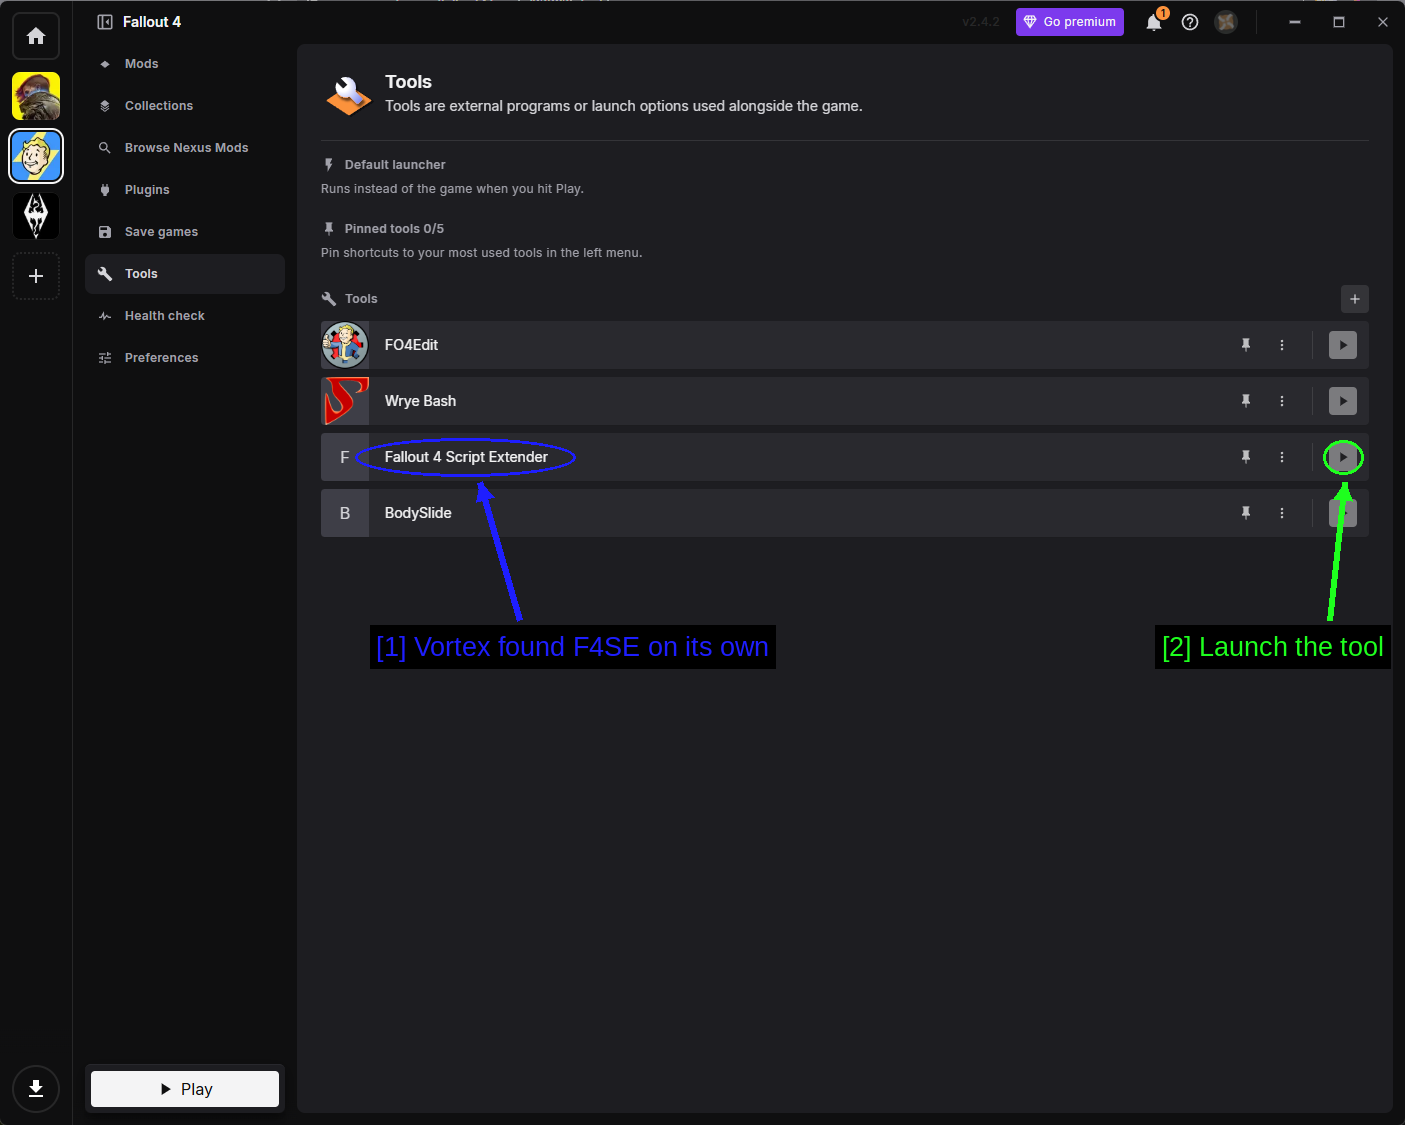
- Vortex found F4SE on its own: Vortex scans your game folder on startup and adds anything it recognises. Here it has picked up FO4Edit, Wrye Bash, Fallout 4 Script Extender and BodySlide without being told about any of them.
- Launch the tool: The play button runs it.
You can pin up to five tools to the left menu with the pin icon, and add your own with the + button in the top-right. Setting Fallout 4 Script Extender as the Default launcher means Vortex's big Play button starts the game through F4SE, which is exactly what you want once you have F4SE installed.
Health Check
Health Check reviews your setup and flags anything obviously wrong.
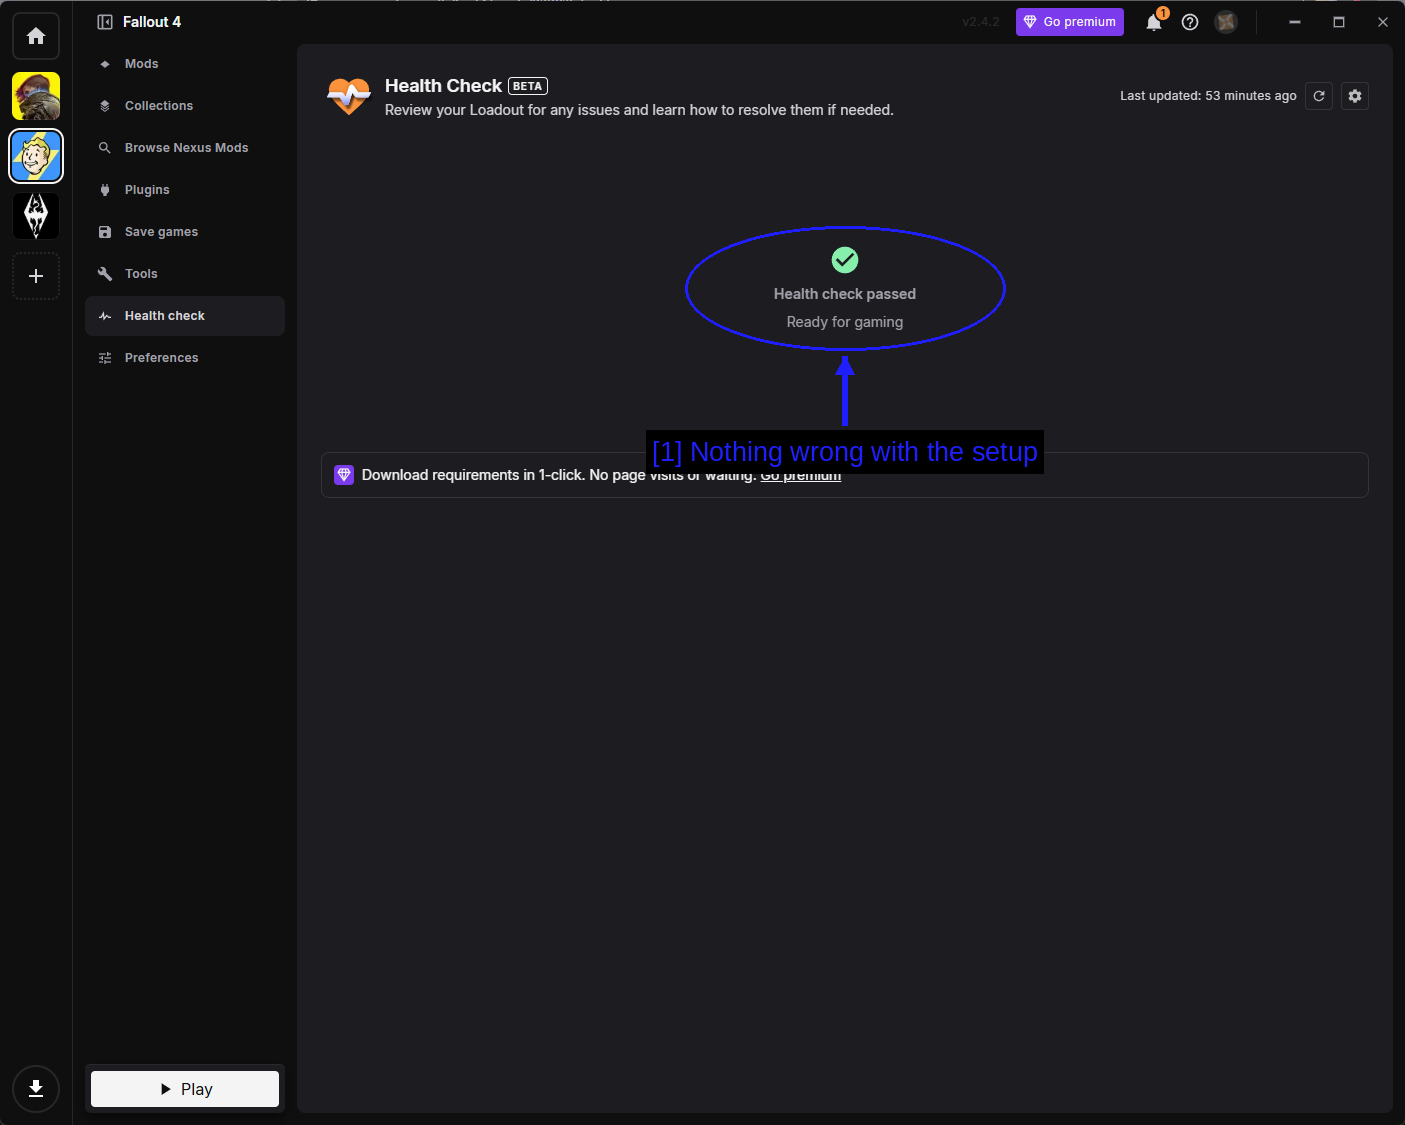
- Nothing wrong with the setup: A green Health check passed means Vortex is happy. When it isn't, it explains the problem and how to fix it here, which is a much better first stop than digging through logs.
Preferences
Preferences holds the Fallout 4 specific Vortex settings.
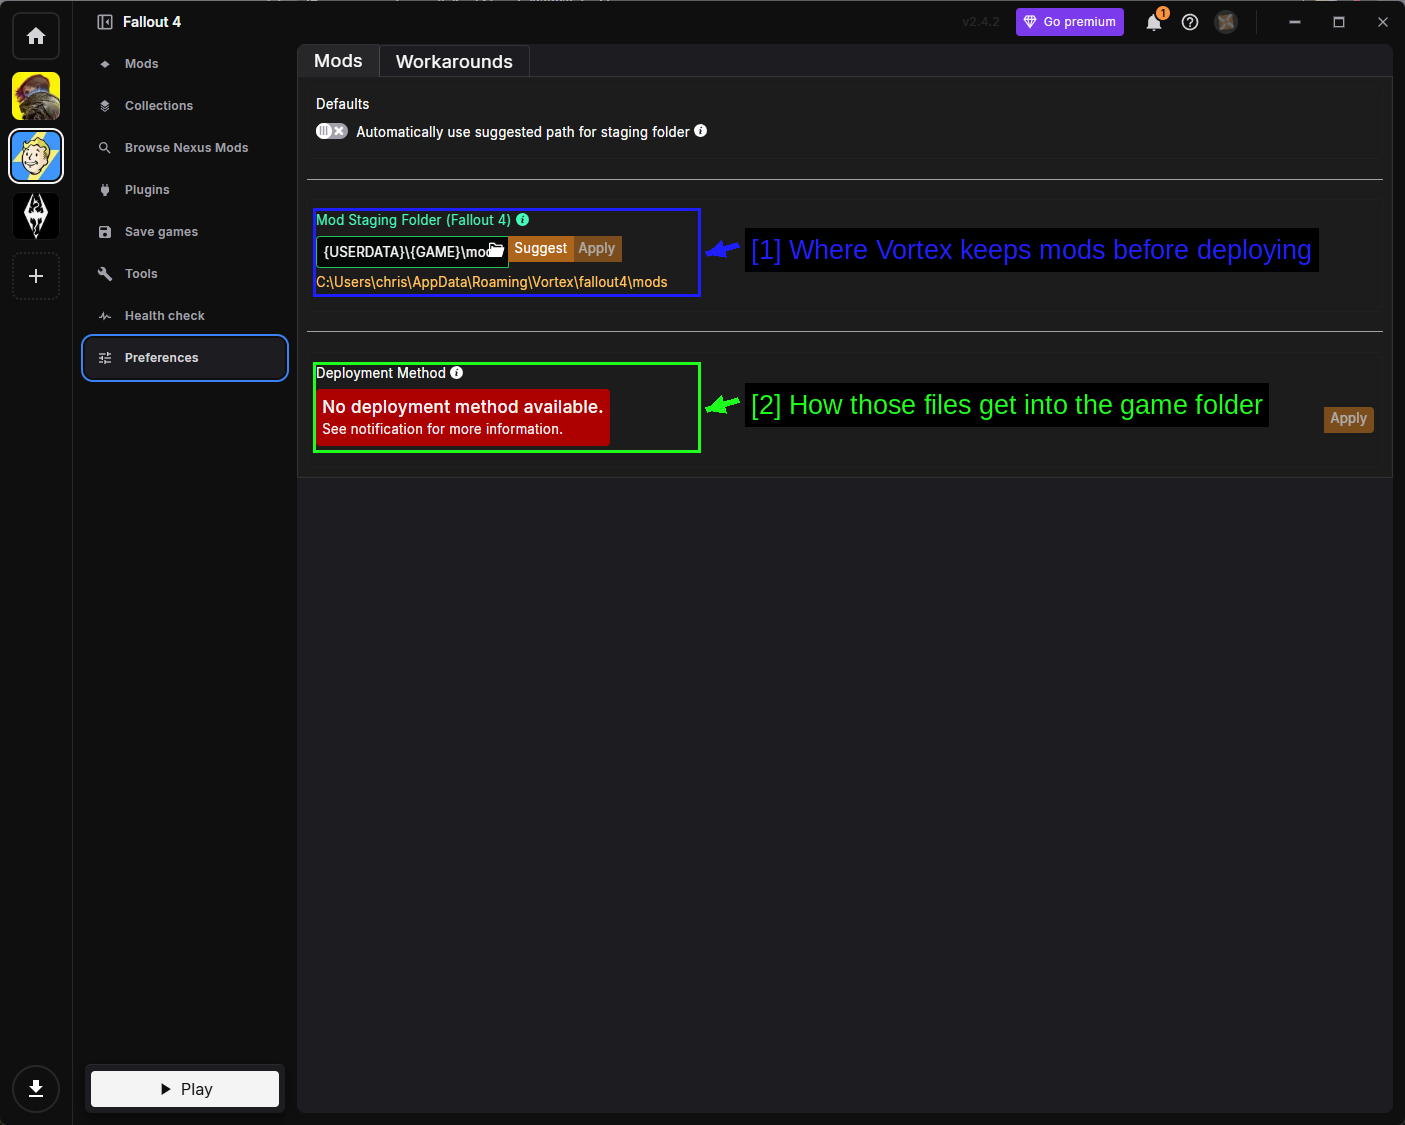
- Where Vortex keeps mods before deploying: The Mod Staging Folder. This has to be on the same drive as your game install - that's a hard requirement of how deployment works, not a suggestion. If you move it later, reinstall your mods rather than assuming the move was enough.
- How those files get into the game folder: The Deployment Method. Hardlink Deployment is the default and the fastest. Symlink Deployment is the fallback and needs administrator rights. The red No deployment method available message in the screenshot means the staging folder and the game are on different drives - fix the path above it and this resolves itself.
There's a second tab worth knowing about.
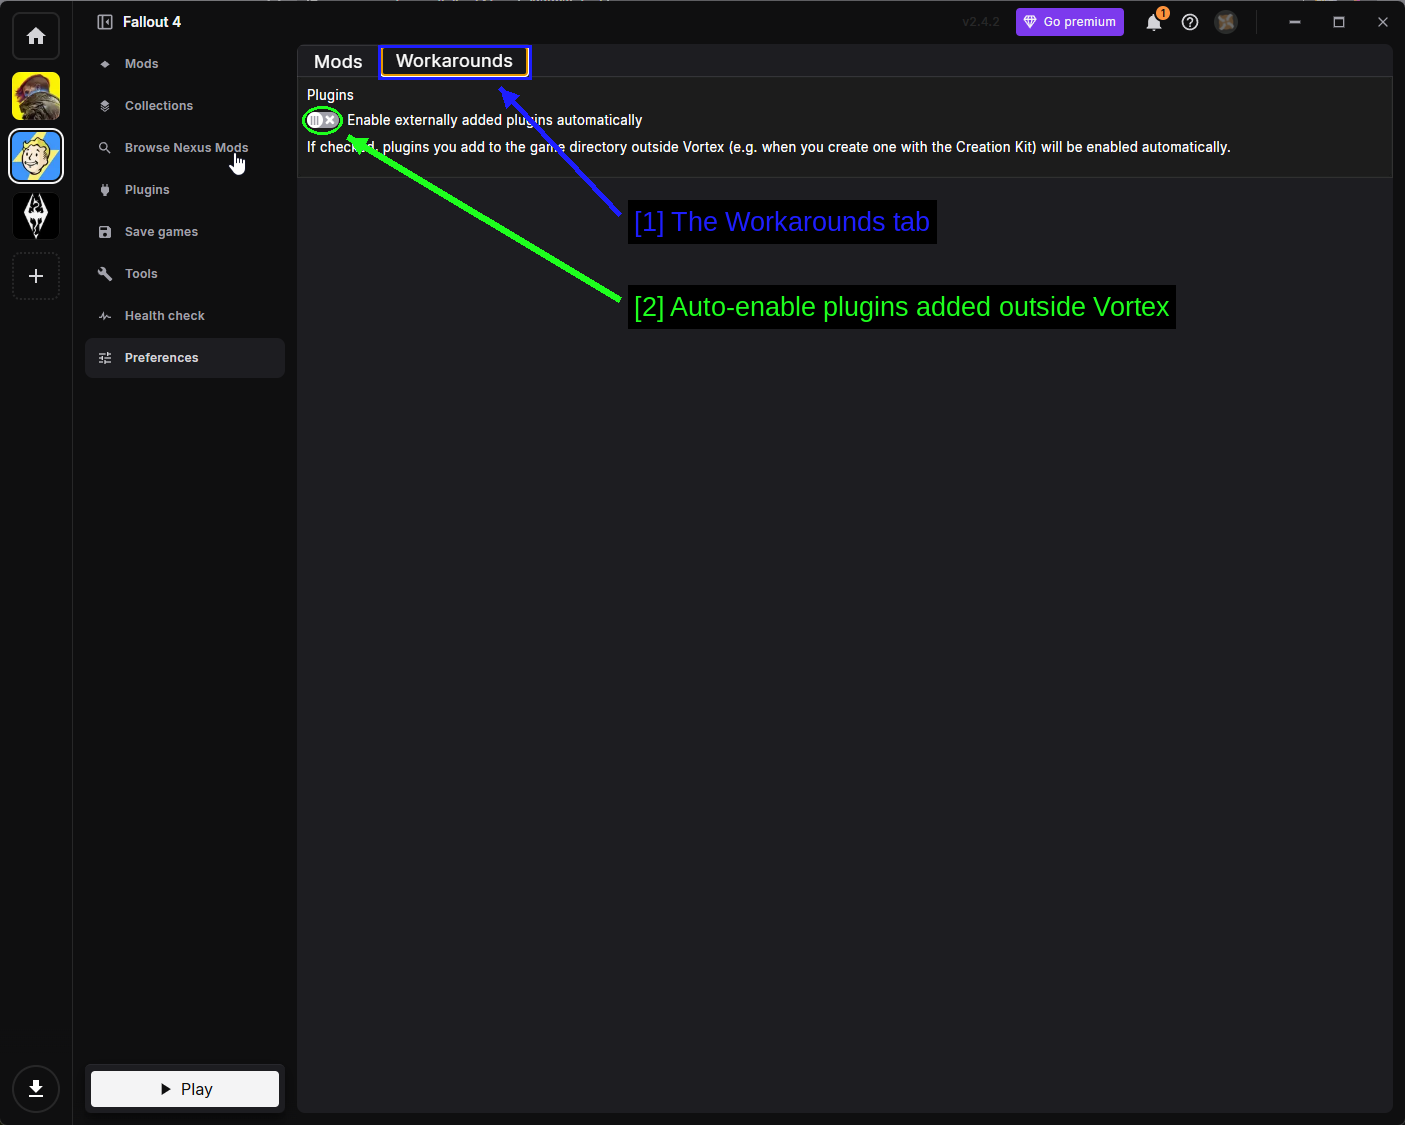
- The Workarounds tab: Fallout 4 specific behaviour toggles.
- Auto-enable plugins added outside Vortex: Enable externally added plugins automatically. If you install some mods by hand and manage others in Vortex, turn this on and Vortex will pick up the manual ones instead of ignoring them.
NOTE - If Vortex shows a Deploy Mods notification, click it. Nothing reaches your game folder until mods are deployed.
Installing F4SE
The Fallout 4 Script Extender expands what mod scripts are allowed to do. It doesn't change anything on its own, but a large chunk of the more interesting mods - anything with a configuration menu, most UI overhauls, most gameplay frameworks - simply will not run without it.
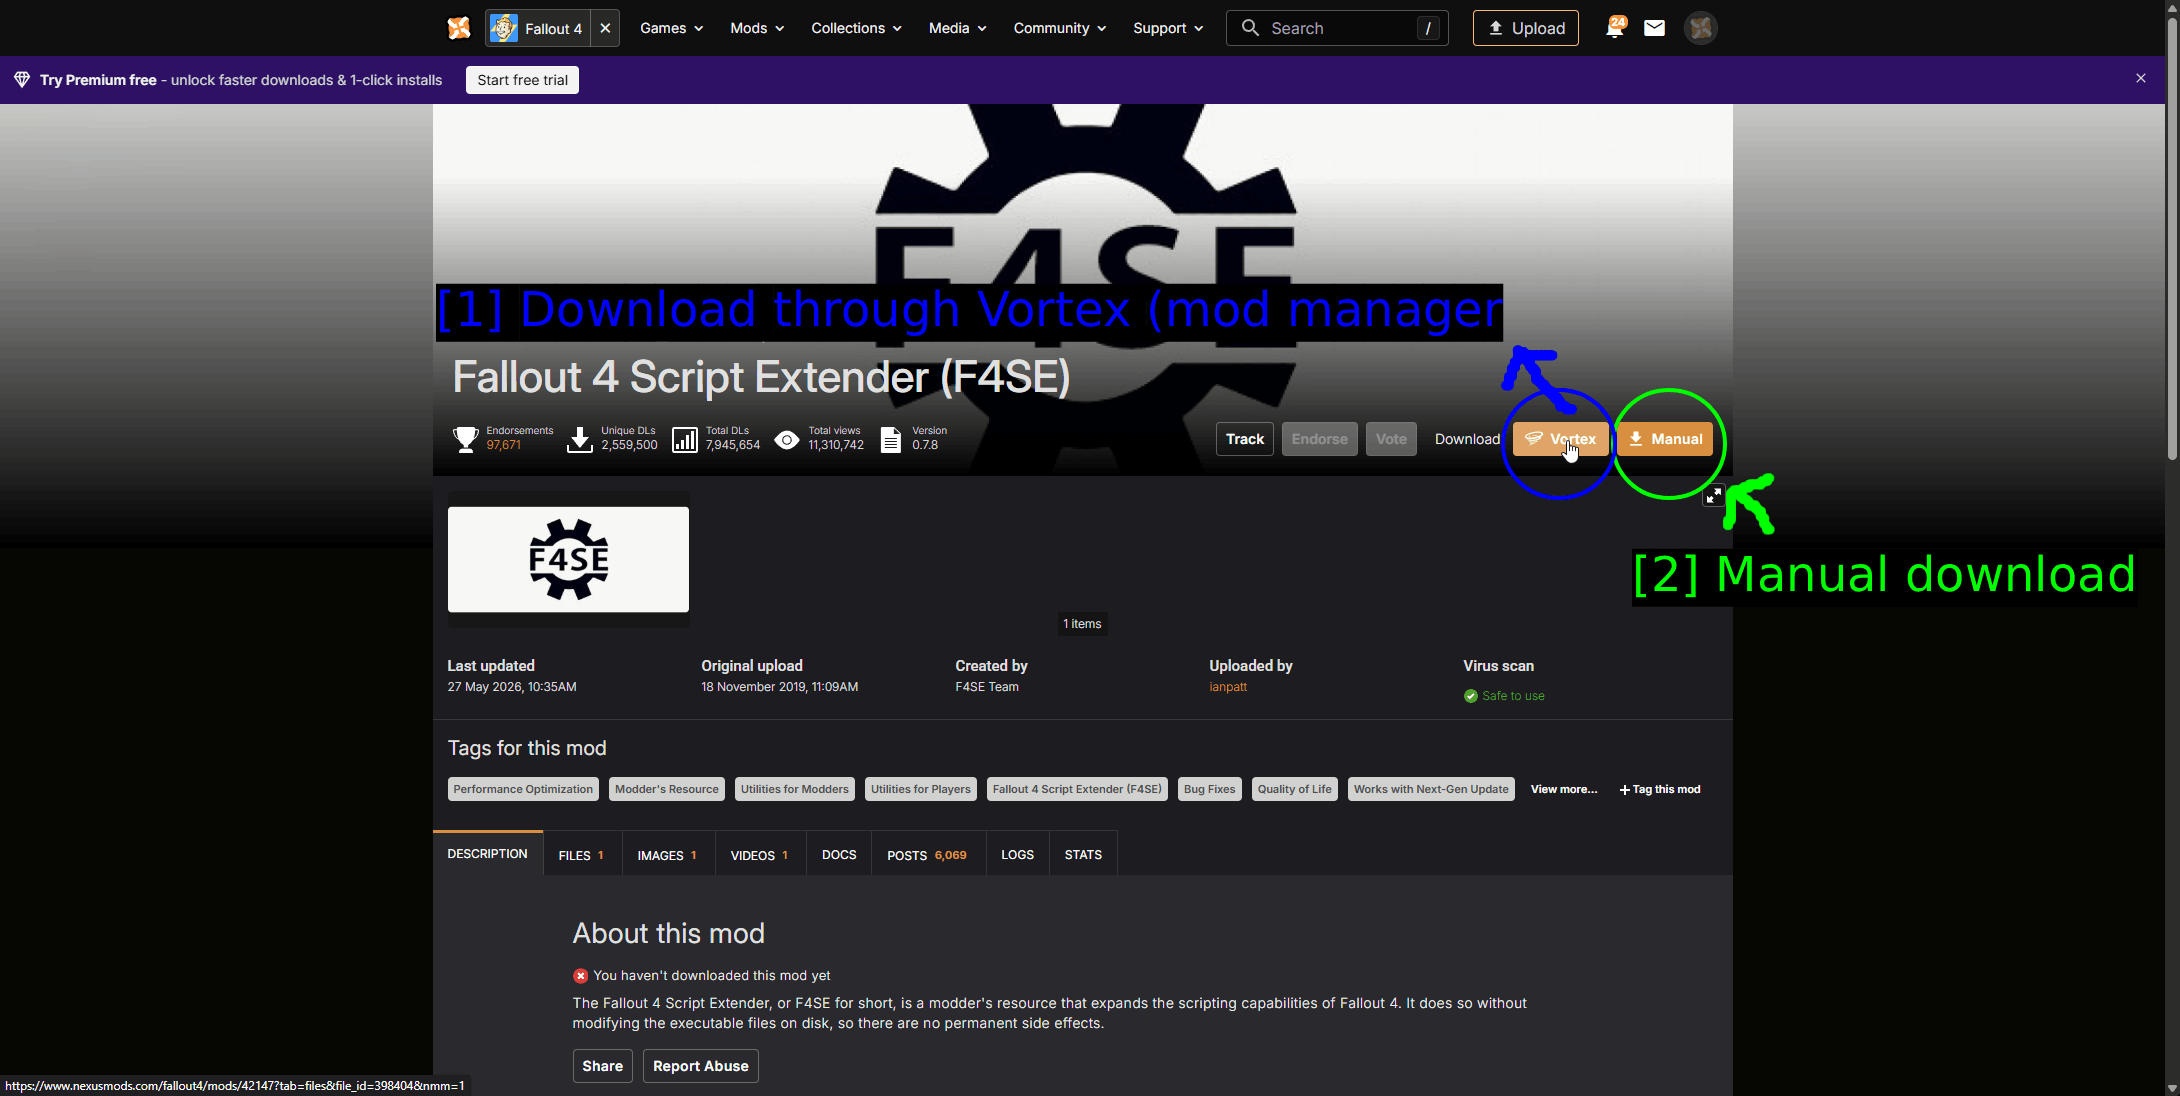
- Download through Vortex (mod manager): The Vortex button.
- Manual download: The Manual button.
F4SE is available from Nexus Mods and from the official site at f4se.silverlock.org. Both are the same files.
Which Build Do You Need?
This is the one thing people get wrong. F4SE is tied to an exact game build. A mismatch doesn't degrade gracefully, it just refuses to launch.
| F4SE version | Game runtime |
|---|---|
| 0.7.9 | 1.11.240 |
| 0.7.8 | 1.11.221 |
| 0.7.7 | 1.11.191 |
| 0.7.6 | 1.11.169 |
| 0.6.23 | 1.10.163 |
Check your game build first (right-click Fallout4.exe → Properties → Details), then download the matching F4SE. The DLL inside the archive is named after the runtime it supports, so f4se_1_11_221.dll is for game build 1.11.221 - a quick sanity check before you copy anything.
WARNING - Do not extract the archive with the built-in Windows extractor if you can avoid it, and definitely don't use anything from the Microsoft Store. Use 7-Zip. This is the one piece of advice the F4SE authors put on their own download page.
Installing F4SE Through Vortex
Use the Vortex button on the Nexus page and Vortex installs it like any other mod.
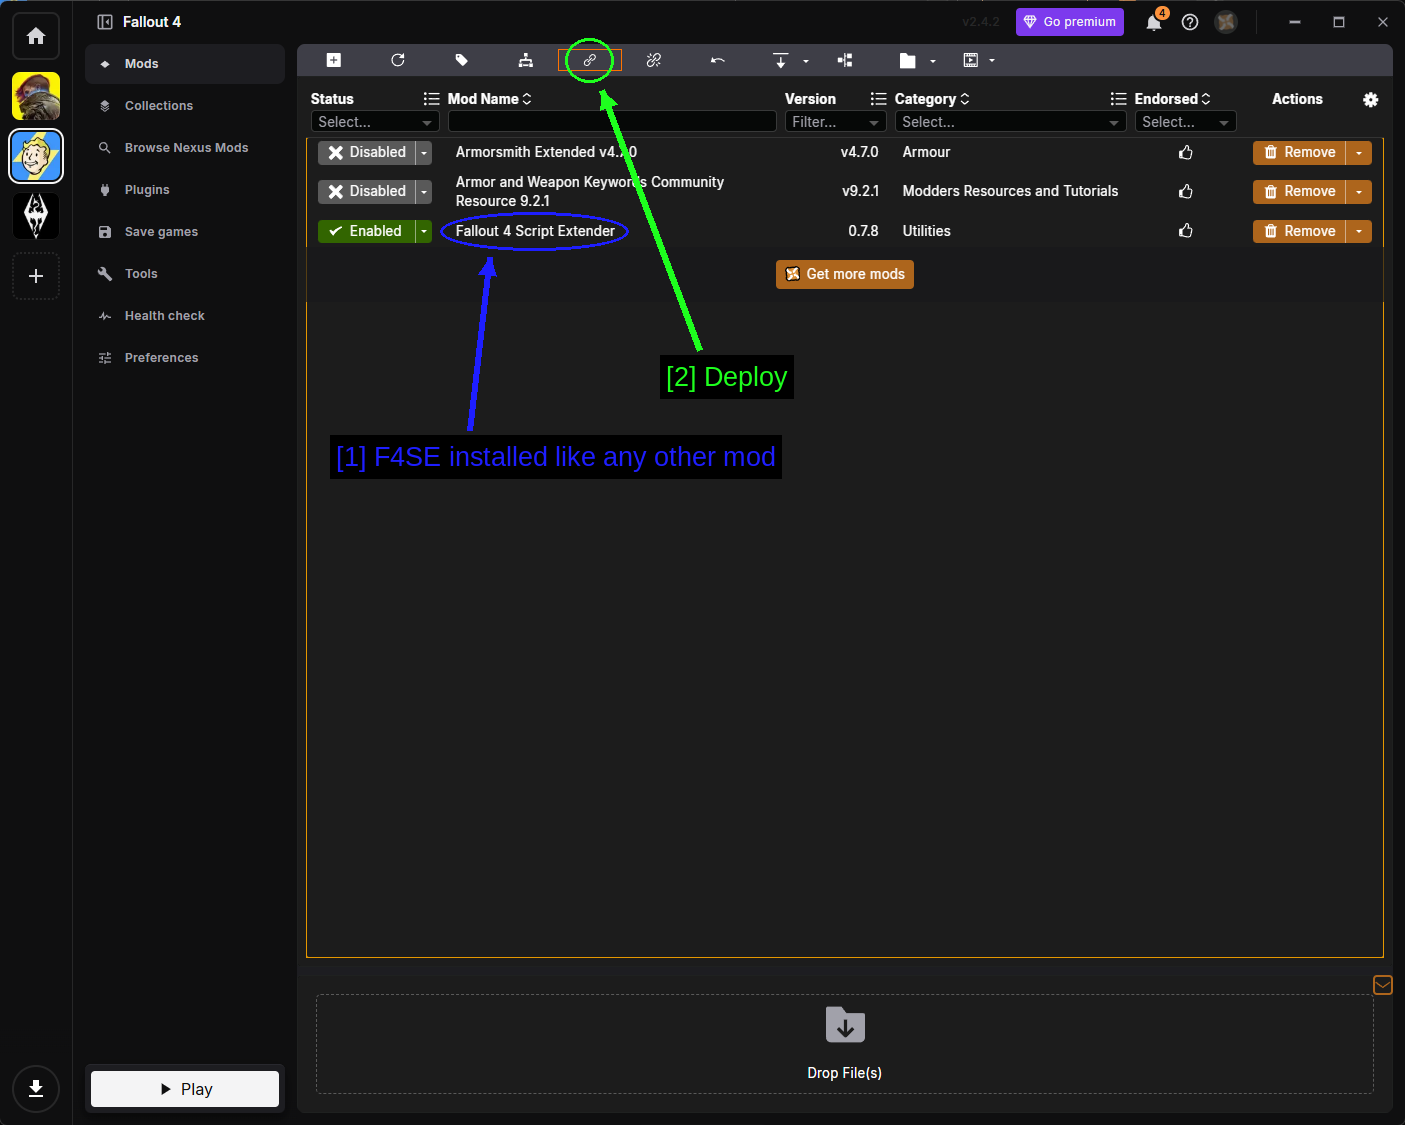
- F4SE installed like any other mod: It shows up on the Mods page with the version number, categorised under Utilities.
- Deploy: Click deploy so the loader actually lands in your game folder.
Then head to the Tools page, find Fallout 4 Script Extender, and set it as your Default launcher so Vortex's Play button uses it.
Installing F4SE Manually
Download the archive with the Manual button and extract it.
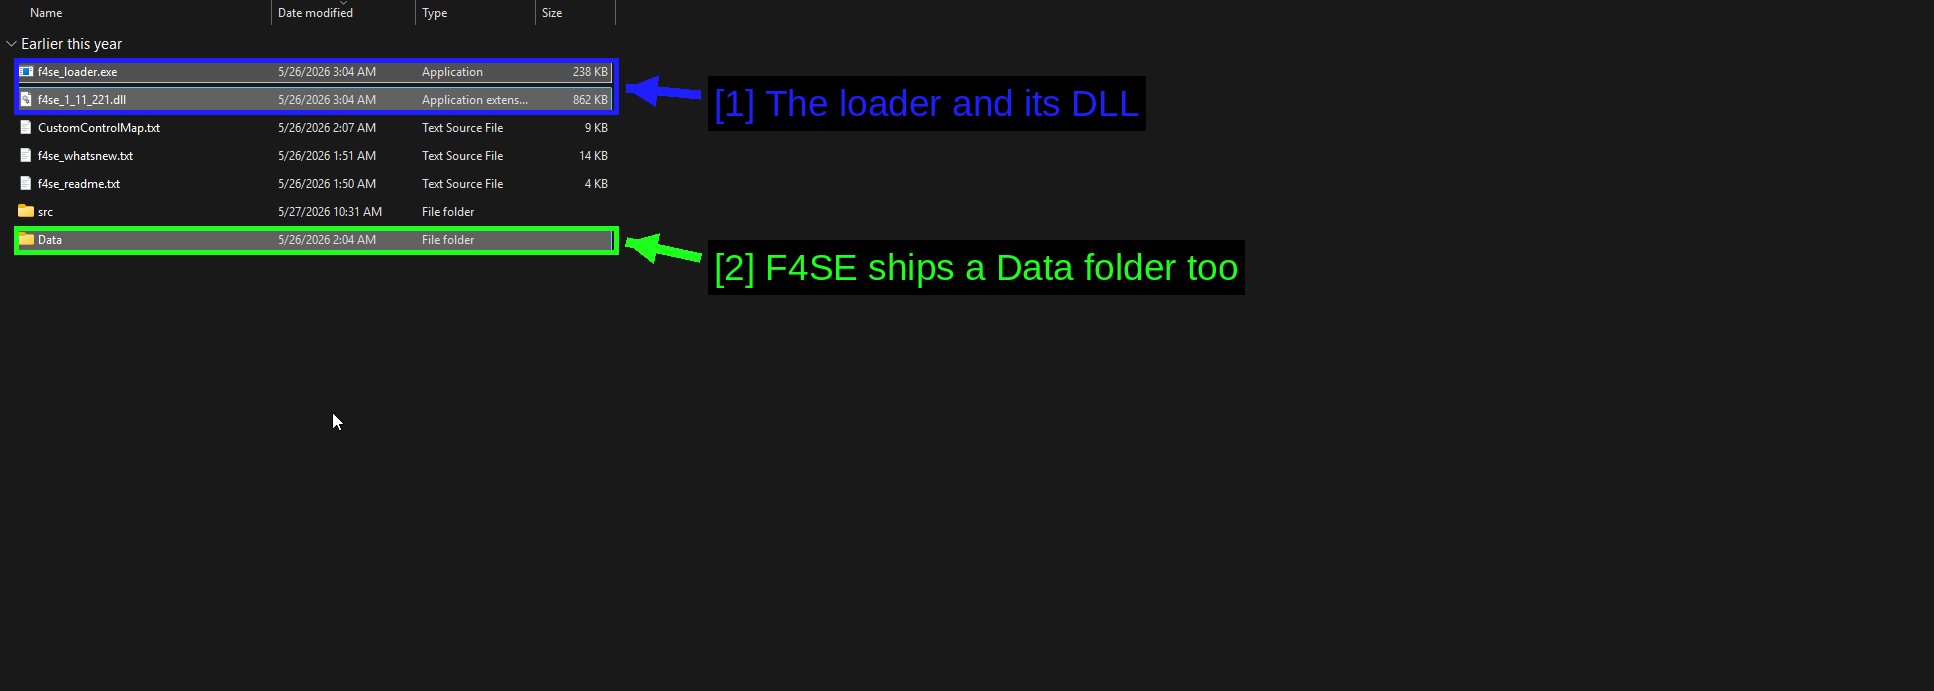
- The loader and its DLL:
f4se_loader.exeandf4se_1_11_221.dll. These two go in your game folder. - F4SE ships a Data folder too: Its contents go into your game's
Datafolder. It holds the F4SE script files that mods call into.
The src folder is source code for mod authors and f4se_readme.txt / f4se_whatsnew.txt are documentation. None of those need copying.
Copy f4se_loader.exe and the f4se_*.dll into the root of your game folder, next to Fallout4.exe.
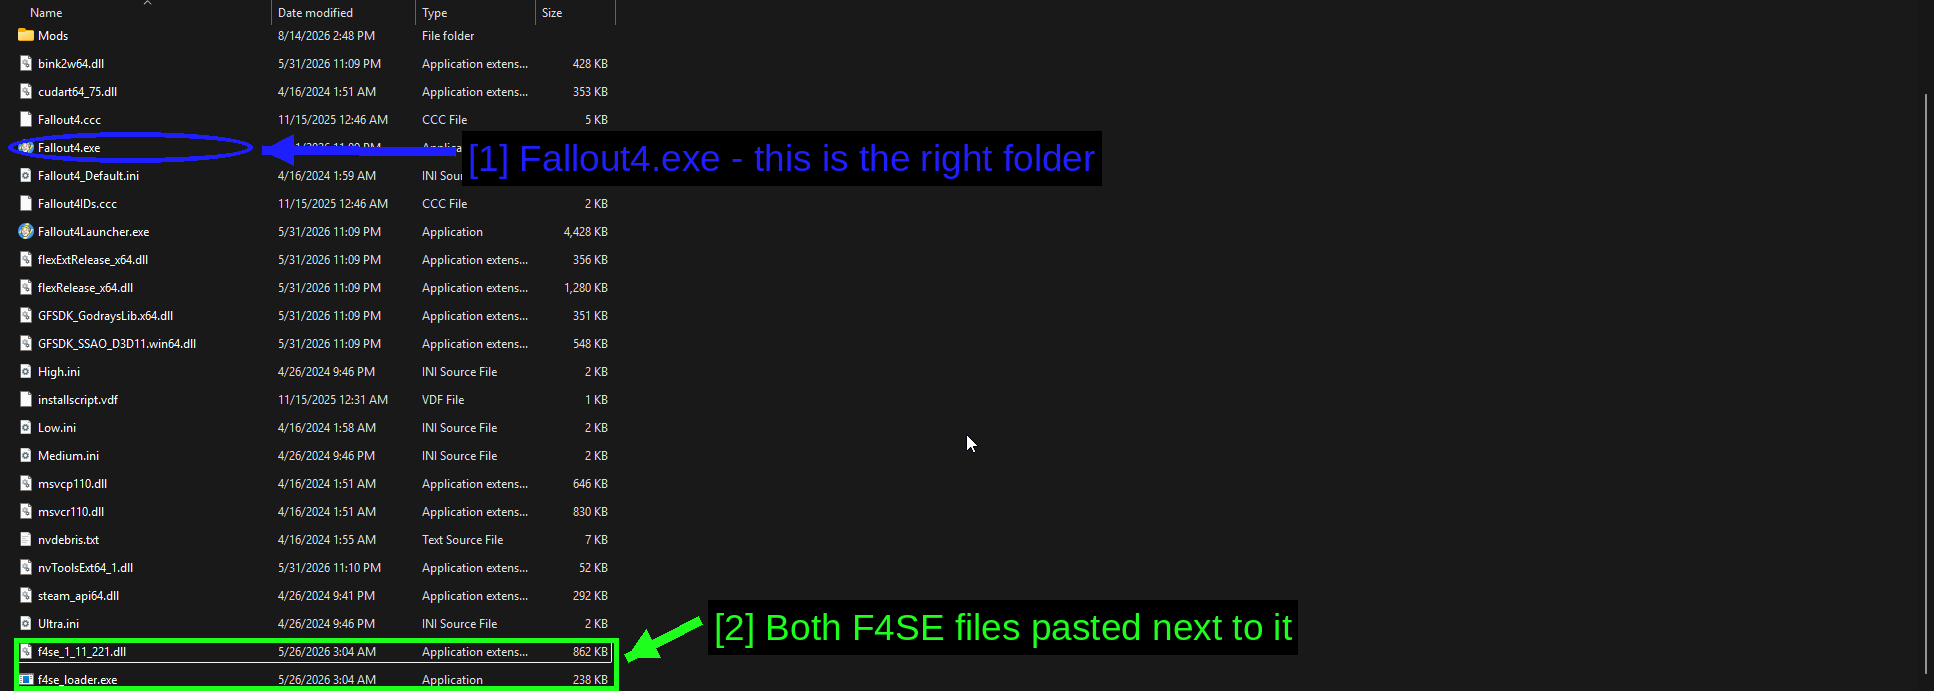
- Fallout4.exe - this is the right folder: If you can see
Fallout4.exe, you're in the right place. If you can only see aDatafolder, you've gone one level too deep. - Both F4SE files pasted next to it:
f4se_1_11_221.dllandf4se_loader.exesitting alongside the game's own files.
Then copy the Data folder from the archive over your game's Data folder and merge when Windows asks.
Launching The Game Through F4SE
F4SE only does anything if you launch the game with it. Running Fallout4.exe or hitting Play in Steam loads the game without it, and every F4SE-dependent mod silently does nothing.
You have three options.
- Run
f4se_loader.exefrom the game folder directly. - Set Fallout 4 Script Extender as the Default launcher on Vortex's Tools page, then use Vortex's Play button.
- Add
f4se_loader.exeto Steam as a non-Steam game, so the overlay and playtime tracking still work.
TIP - To confirm F4SE actually loaded, open the console in-game with the tilde key (~) and type getf4seversion. If it prints a version number you're fine. If the command isn't recognised, you launched the wrong executable.
Installing Mods Manually (Advanced)
Sometimes you want more control, sometimes a mod isn't packaged in a way Vortex understands, and sometimes you're on Linux and would rather not fight with Proton. Manual installation is not difficult for Fallout 4 - almost everything lands in one folder.
Downloading The Files
Use the Manual button on the mod page. You'll get the same requirements dialog as before, just with Manual download buttons instead.
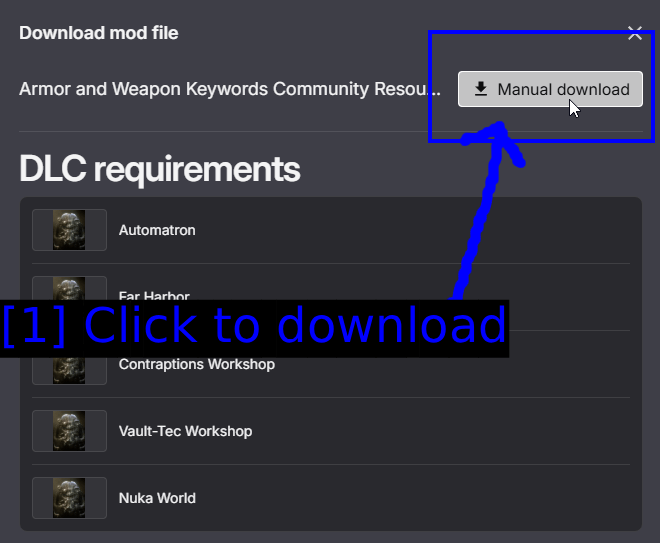
- Click to download: Manual download saves the archive through your browser.
Extracting The Archives
Extract each archive with 7-Zip. Right-click → 7-Zip → Extract to "" gives you a tidy folder per mod.
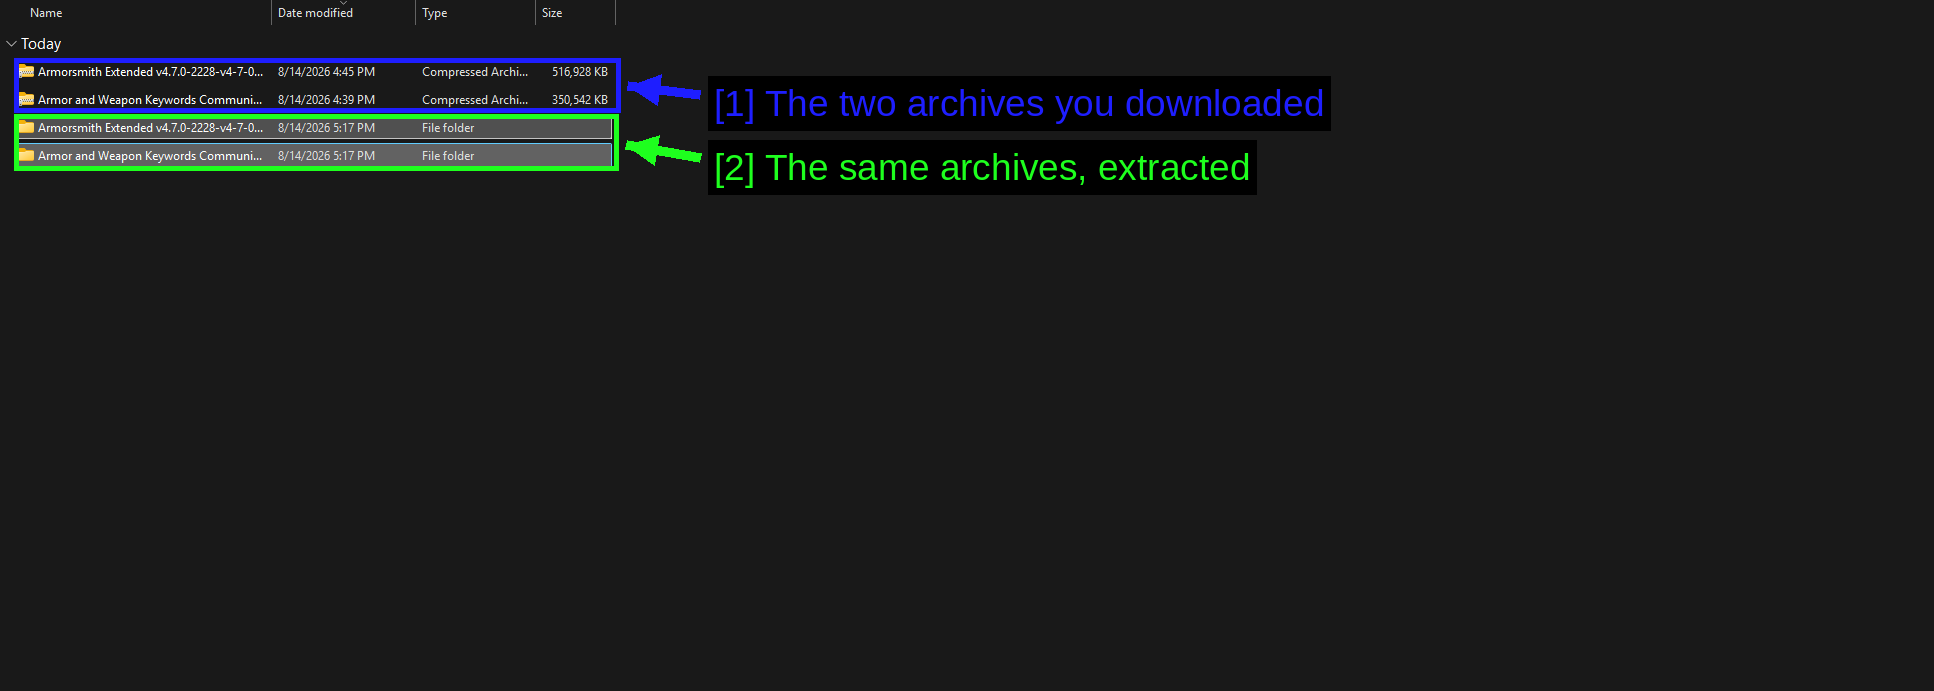
- The two archives you downloaded: Armorsmith Extended and AWKCR, as
.7zor.zipfiles. - The same archives, extracted: One folder each.
Now open each folder and look at what's inside, because Fallout 4 mods are packaged two different ways and you need to spot which is which.
Some archives put their files loose at the top level.
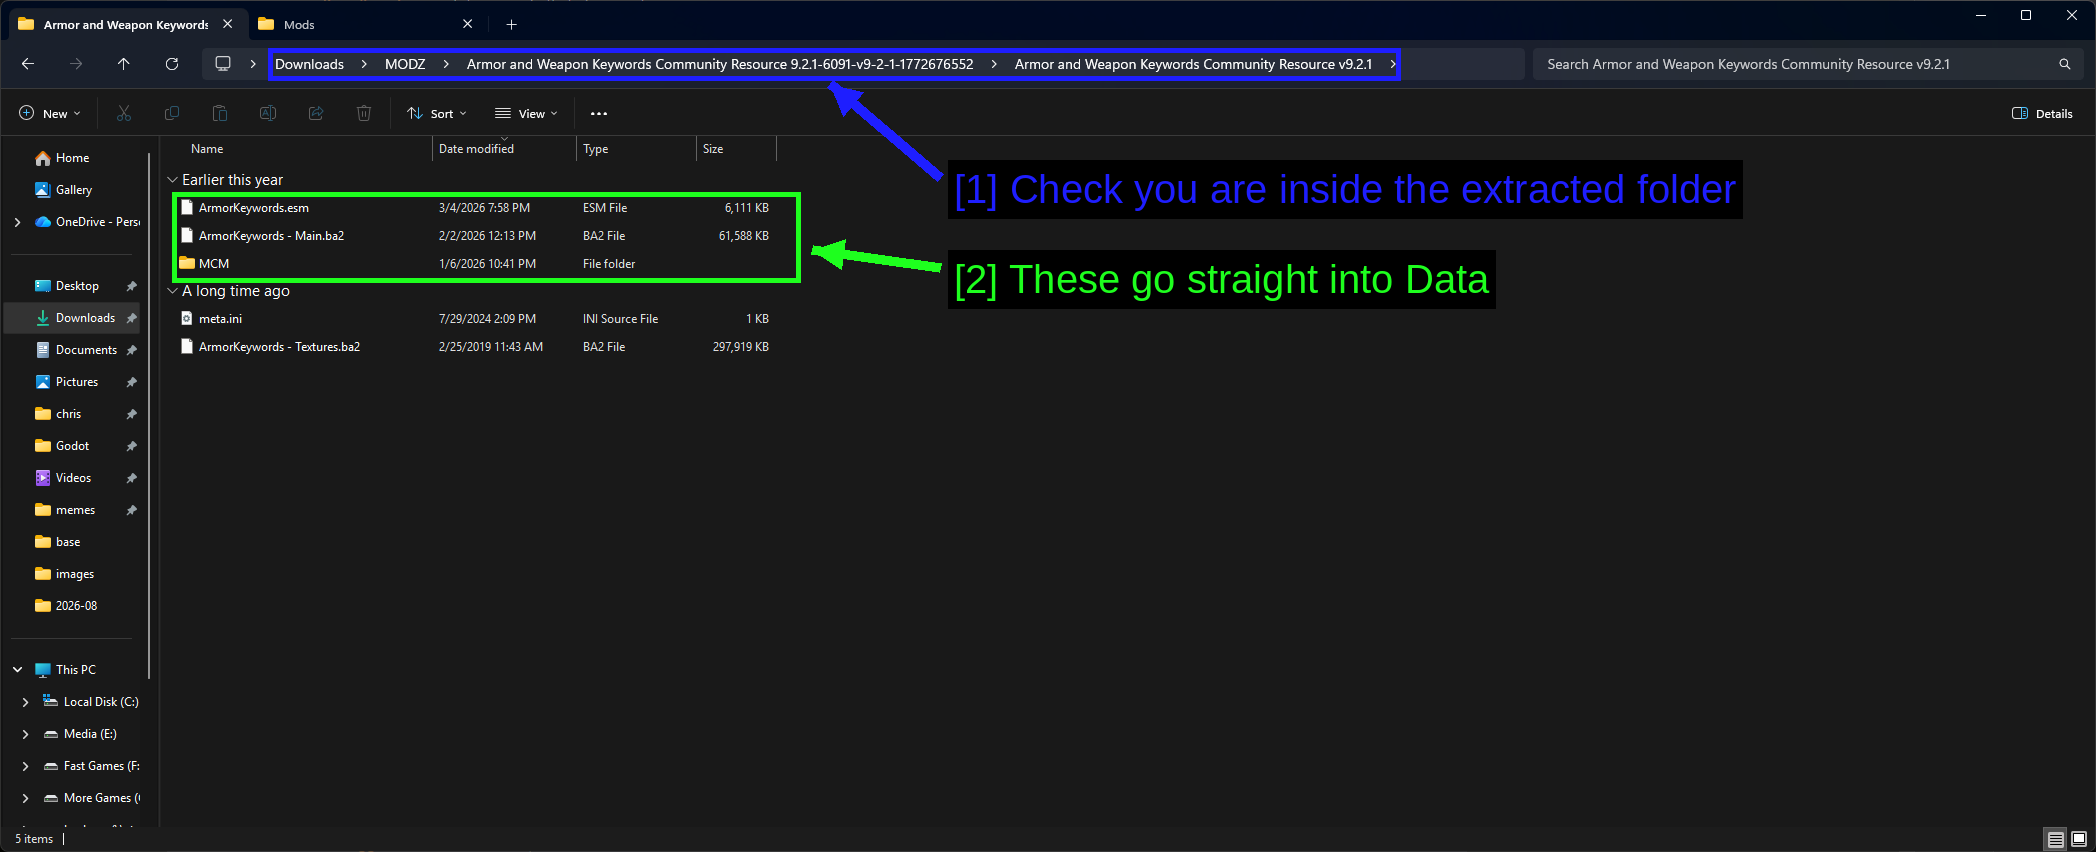
- Check you are inside the extracted folder: Follow the breadcrumb down until you can actually see the mod files. Archives often wrap everything in a folder named after the download.
- These go straight into Data:
ArmorKeywords.esm,ArmorKeywords - Main.ba2and theMCMfolder. These are the mod.
Note what else is in there. ArmorKeywords - Textures.ba2 is also part of the mod and needs copying, but meta.ini is a mod manager leftover and can be ignored.
Other archives wrap everything in a Data folder instead.
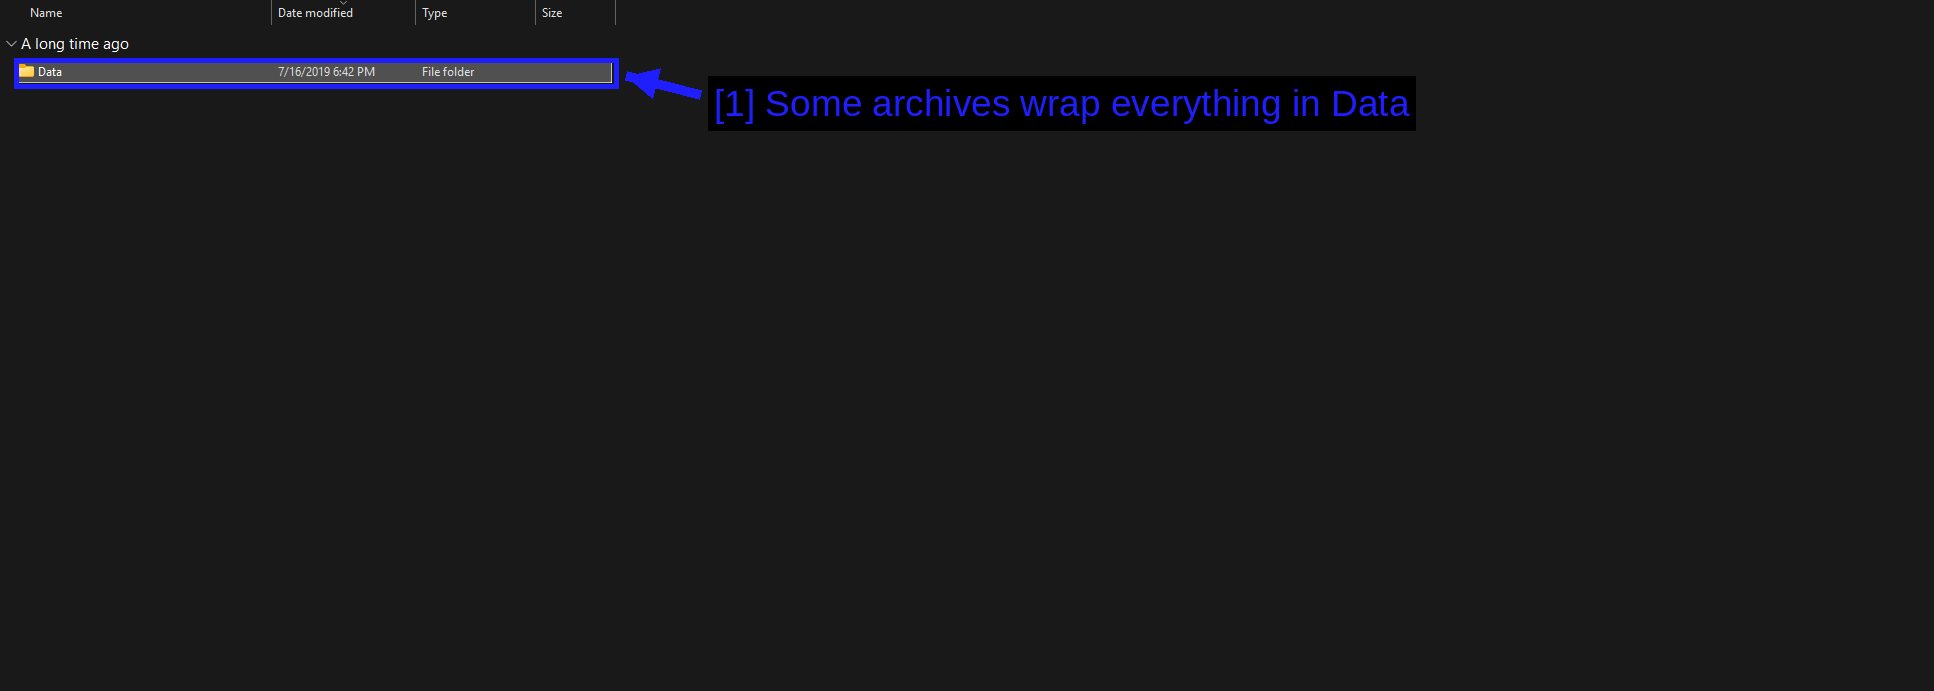
- Some archives wrap everything in Data: When you see this, you copy the contents of that
Datafolder into your game'sDatafolder - not the folder itself. Copying the folder in gives youData\Data\and a mod that does nothing.
Copying Into The Data Folder
Everything goes into one place.
C:\Program Files (x86)\Steam\steamapps\common\Fallout 4\Data
Paste the mod's files in and merge when Windows asks. A correctly installed mod ends up looking like this.
Fallout 4\Data\ArmorKeywords.esm
Fallout 4\Data\ArmorKeywords - Main.ba2
Fallout 4\Data\ArmorKeywords - Textures.ba2
Fallout 4\Data\MCM\...
Install AWKCR first and Armorsmith Extended second, so that if the two ever overlap the dependent mod wins.
NOTE - .ba2 files have to keep their exact names, because the plugin looks for archives named after itself. Renaming ArmorKeywords - Main.ba2 breaks the mod completely, with no error message.
Enabling The Plugins
Copying the files in isn't enough - the game also needs to be told to load the plugin. That list lives here.
C:\Users\<user>\AppData\Local\Fallout4\plugins.txt
Open it in Notepad and add each plugin on its own line, prefixed with an asterisk.
*ArmorKeywords.esm
*ArmorsmithExtended.esp
The asterisk marks the plugin as active. A line without one is listed but not loaded. Masters (.esm) go above the plugins that depend on them.
TIP - Launch the game once after installing a mod and quit straight from the main menu. The game rewrites plugins.txt on exit, which is a quick way to confirm your edits stuck rather than being overwritten.
Checking If Your Mods Loaded
Launch the game through f4se_loader.exe and load a save.
For Armorsmith Extended specifically, head to any armour workbench and you should see a long list of new modification options that the base game doesn't have, plus the ability to wear armour over outfits that previously blocked it.
If nothing changed, work through the following.
- Did you actually add the
[Archive]lines toFallout4Custom.ini? This is the number one cause. - Is the plugin listed in
plugins.txtwith an asterisk? - Did you install the requirement (AWKCR) before the mod?
- Did you launch through
f4se_loader.exerather thanFallout4.exe? - Does the mod support your game build? Check the Posts tab on its Nexus page.
- If you used Vortex, is the mod Enabled and have you deployed?
Other Useful Tools
LOOT - Load Order Optimisation Tool
LOOT sorts your plugin load order using a community-maintained rules database. Once you're past a handful of mods, this stops being optional.
- Download and install LOOT from loot.github.io.
- Launch it and pick Fallout 4 from the game drop-down.
- Click Sort Plugins.
- Read the warnings it raises, then click Apply.
LOOT also flags missing masters, dirty plugins and known incompatibilities, which makes it worth running even when you're happy with your order.
NOTE - Vortex has its own sorting built in and will happily fight with LOOT if you use both. Pick one.
FO4Edit & Wrye Bash
- FO4Edit (also called xEdit) lets you open plugins and see exactly which records they change. It's how you find out why two mods conflict rather than just that they do. It also cleans dirty edits out of the official DLC masters, which is a standard early step in any big load order.
- Wrye Bash builds a Bashed Patch that merges levelled lists from multiple mods together. Without it, only the last mod to touch a levelled list has any effect - so if you've installed three weapon mods, two of them are doing nothing.
Both show up automatically on Vortex's Tools page once installed.
The Creation Kit
The Fallout 4 Creation Kit is Bethesda's official (free) modding toolkit. It's what you'd use to make mods rather than install them, so you don't need it for anything in this guide.
Troubleshooting
- Mods do nothing at all. Check
Fallout4Custom.inihas the[Archive]block. This accounts for a genuinely enormous share of "my mod isn't working" posts. - The game crashes immediately on launch. Usually an F4SE version mismatch or a plugin whose master is missing. Run LOOT - it names missing masters explicitly.
- F4SE mods do nothing but the game runs fine. You launched
Fallout4.exeinstead off4se_loader.exe. - Everything broke after a Steam update. The game updated and F4SE didn't. Grab the matching F4SE build, or set Steam not to auto-update the game.
- Crash on the loading screen of a save. A plugin the save depends on has been removed or disabled. Vortex's Save Games page will tell you which.
- Textures are purple. The mod's
.ba2texture archive is missing or was renamed. Reinstall it and keep the file names exactly as shipped. - Vortex says "No deployment method available". Your staging folder and game are on different drives. Fix the path in Preferences.
- Mods installed manually don't show in Vortex. Turn on Enable externally added plugins automatically in the Workarounds tab.
Notes
Creations & Bethesda.net Mods
Fallout 4 has an in-game mod browser, reached from Creations on the main menu. It's the official route, it works on console, and it needs a free Bethesda.net account.
It's worth knowing about, but it's not what most PC players use. The selection is far smaller, script extender mods aren't allowed, and mixing Creations with Nexus mods gives you two systems writing to plugins.txt and no single place to see your load order. If you're going to mod on PC, pick Nexus Mods and Vortex and stay there.
WARNING - Some Creation Club content is loaded as full .esl plugins. If you own a lot of it, that eats into your plugin budget before you've installed a single mod of your own.
The Mod Limit
Fallout 4 caps you at 254 full plugins plus 4096 light plugins. That sounds like a lot until you're running a big load order and realise a third of your slots went on patches.
Two ways around it: flag small plugins as light (.esl) in FO4Edit, which moves them into the much larger budget, or merge related plugins together. Both are more involved than this guide covers, but it's worth knowing the ceiling exists before you plan a 300 mod playthrough.
See Also!
- Nexus Mods - Fallout 4
- Armorsmith Extended
- Armor and Weapon Keywords Community Resource (AWKCR)
- Fallout 4 Script Extender (F4SE)
- LOOT - Load Order Optimisation Tool
- FO4Edit
- Wrye Bash
- How to Use Vortex & The Basics
- How to Download & Install Vortex
- ProtonDB - Fallout 4 (for Linux users)
- r/FalloutMods
Conclusion
That's it! You should now be able to install Fallout 4 mods through Vortex or by hand, and you should know why a mod that looks installed sometimes isn't doing anything.
The short version - add the [Archive] lines to Fallout4Custom.ini before anything else, match your F4SE build to your game build, always launch through f4se_loader.exe, install requirements before the mods that need them, and let LOOT handle your load order.
Guides we create are always open to edits and improvements, so if you have any suggestions or notice any issues, feel free to contribute by creating a pull request on our GitHub repository!
Please join our Discord server if you have any questions or need help with anything related to modding or our guides!