

Un guide sur comment installer des mods dans Cyberpunk 2077 sur PC. Nous couvrons les deux grands gestionnaires de mods : Vortex et Mod Organizer 2 - ainsi que l'installation de mods à la main (installation manuelle).
Ce guide se concentre sur la version Windows de Cyberpunk 2077 via Steam, GOG, ou Epic Games.
La scène du modding de Cyberpunk a pris un certain temps à se stabiliser, mais elle est aujourd'hui dans une bonne situation. Le piège, c'est que la plupart des mods s'appuient sur un framework plutôt que d'être de simples fichiers à déposer, donc l'ordre dans lequel vous installez les choses a de l'importance. Pour rester concret, nous allons installer Cyber Engine Tweaks (CET) et un petit mod appelé Better Loot Markers avec chaque méthode, puisque ce mod dépend du framework et montre exactement comment cette relation fonctionne.
Prérequis
- Une copie PC de Cyberpunk 2077 (Steam, GOG, ou Epic Games).
- 7-Zip ou tout autre logiciel d'extraction d'archives.
- Un compte Nexus Mods gratuit (facultatif, mais vous en voudrez un).
- Le Microsoft Visual C++ Redistributable - CET ne se chargera pas sans ça.
- Une compréhension basique de comment copier et déplacer des fichiers sous Windows.
Comment fonctionnent réellement les mods de Cyberpunk
Cette partie fait trébucher beaucoup de gens, donc ça vaut le coup de la couvrir avant de télécharger quoi que ce soit. La plupart des mods Cyberpunk ne sont pas autonomes - ils nécessitent un framework installé au préalable, et il y en a deux principaux qui remplissent des rôles très différents.
Cyber Engine Tweaks (CET)
Cyber Engine Tweaks est un framework de scripting et une console en jeu. Il s'injecte dans le jeu et offre aux auteurs de mods le scripting Lua, une console, un éditeur TweakDB, et un overlay sur lequel les mods accrochent leurs menus de paramètres.
Un très grand nombre de mods de confort, incluant notre mod d'exemple, sont des mods CET. Ils se trouvent dans bin\x64\plugins\cyber_engine_tweaks\mods\ et ne font absolument rien sans CET installé.
- Lisez la page d'installation officielle sur le wiki REDmodding.
- Vous avez besoin du Microsoft Visual C++ Redistributable installé.
- Lancez le jeu en mode d'affichage Sans bordure ou Fenêtré. Le mode Plein écran a des problèmes connus avec l'overlay CET qui n'apparaît pas.
- Au premier lancement, CET vous demande d'assigner une touche pour l'overlay. Les choix courants sont
`,F10, ou*.
REDmod
REDmod est l'outil de modding officiel de CD Projekt Red, distribué gratuitement en DLC avec la mise à jour 1.6. Il gère les mods qui modifient les archives du jeu, les scripts, les tweaks, les sons et les animations, et vous offre un véritable ordre de chargement.
Vous pouvez le récupérer où que vous possédiez le jeu.
NOTE - CET et REDmod ne sont pas des alternatives l'un à l'autre. De nombreuses configurations ont besoin des deux. Installez ceux que vos mods demandent réellement.
Sauvegardez vos fichiers de sauvegarde !
Avant d'installer quoi que ce soit, sauvegardez vos sauvegardes. Les mods qui touchent aux scripts ou aux tweaks peuvent s'incruster dans une sauvegarde, et les retirer plus tard n'annule pas toujours cela proprement.
Vos sauvegardes se trouvent dans le dossier suivant.
C:\Users\<username>\Saved Games\CD Projekt Red\Cyberpunk 2077
Copiez ce dossier dans un endroit sûr. Il est petit et ça ne prend que quelques secondes.
ASTUCE - Il vaut aussi le coup de noter votre répertoire de jeu avant de commencer. Sur Steam c'est généralement steamapps\common\Cyberpunk 2077, et vous pouvez le trouver rapidement en faisant un clic droit sur le jeu -> Gérer -> Parcourir les fichiers locaux.
Où télécharger des mods
- Nexus Mods - là où vit essentiellement chaque mod Cyberpunk.
- TMC - nous, mais nouveaux et rien de vraiment à montrer encore !
- Cyberpunk 2077 Modding Community Discord - la communauté REDmodding, et le meilleur endroit pour demander de l'aide.
- REDmodding Wiki - documentation pour les outils et frameworks.
ASTUCE - Lisez toute la description du mod avant l'installation, y compris la section des prérequis. Les mods Cyberpunk dépendent de frameworks bien plus souvent que les mods d'autres jeux, et « ça n'a pas marché » est presque toujours dû à un prérequis manquant.
Nos mods d'exemple : CET & Better Loot Markers
Better Loot Markers ajoute plus de détails aux marqueurs des conteneurs de butin pour que vous puissiez voir ce qu'il y a dedans avant de vous approcher. Il est petit, il est évident quand il fonctionne, et il nécessite CET - ce qui en fait une bonne démonstration de comment un framework et un mod fonctionnent ensemble.
Voici ce que dit la page du mod dans la section Installation.
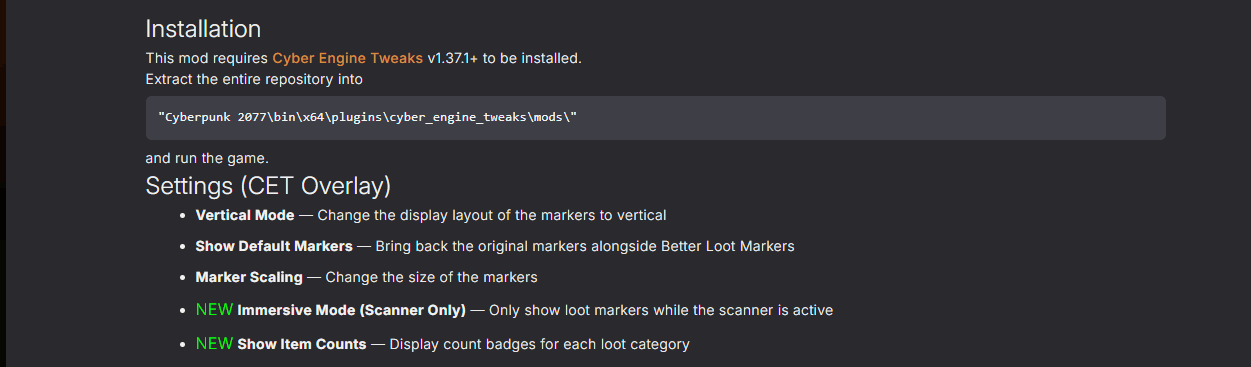
Comme on le voit ci-dessus, l'auteur note deux choses : CET v1.37.1+ est requis, et le contenu du mod va dans \path\to\Cyberpunk 2077\bin\x64\plugins\cyber_engine_tweaks\mods\. Chaque méthode ci-dessous n'est en fait qu'une manière différente d'arriver à ce même résultat.
Installer des mods via Vortex
Vortex est le gestionnaire de mods officiel de Nexus Mods et la méthode que la plupart des gens utilisent pour installer des mods dans Cyberpunk 2077.
En coulisses, il fonctionne en créant des liens durs (hard links) vers le répertoire du jeu plutôt qu'en copiant les fichiers, ce qui vous permet d'activer et désactiver des mods sans altérer votre installation de façon permanente.
Nous avons deux guides dédiés sur Vortex si vous ne l'avez pas encore configuré ou si vous voulez en savoir plus.
IMPORTANT - Vortex a besoin que son dossier de staging des mods soit sur le même disque que votre installation du jeu, car c'est ainsi que fonctionnent les hard links. Vortex m'a prévenu à ce sujet et a proposé de corriger cela automatiquement, ce qu'il a fait, mais j'ai quand même dû réinstaller mes mods ensuite avant qu'ils fonctionnent réellement, malheureusement. Si cela vous arrive, réinstallez plutôt que de supposer que le déplacement a suffi.
Gérer Cyberpunk 2077 dans Vortex
Il faut d'abord dire à Vortex de gérer le jeu.
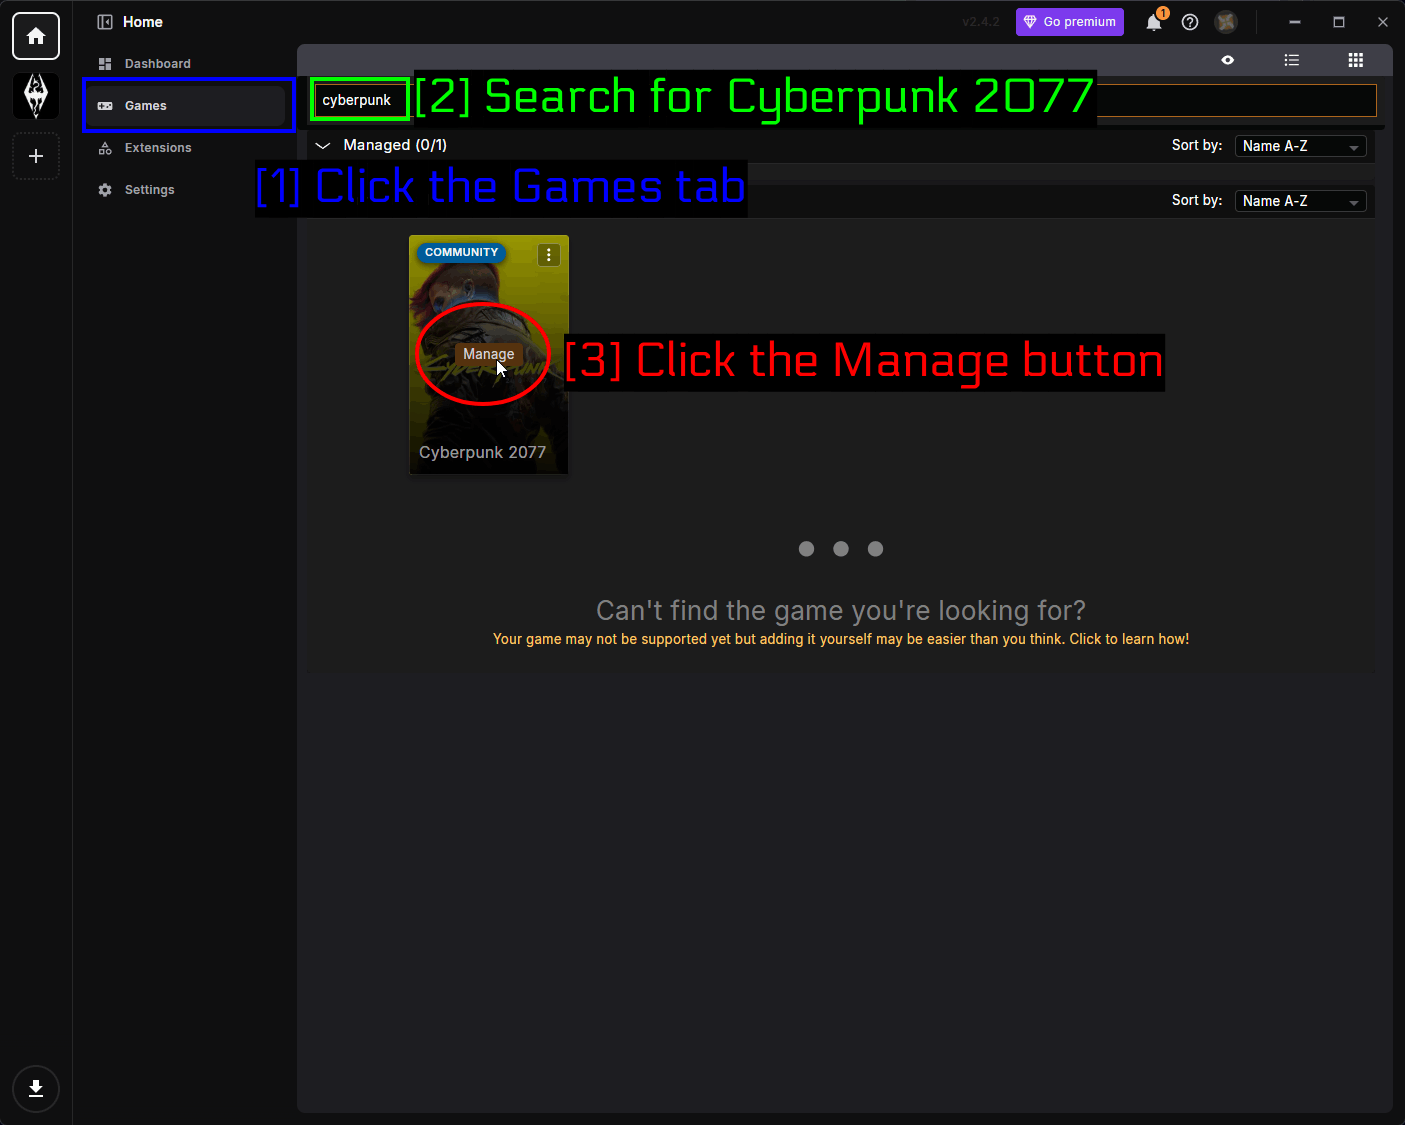
- Cliquez sur l'onglet Games : Ouvrez la page Games depuis la barre latérale.
- Recherchez Cyberpunk 2077 : Tapez
cyberpunkdans la barre de recherche. - Cliquez sur le bouton Manage : Survolez la vignette Cyberpunk 2077 et cliquez sur Manage.
Le support de Cyberpunk dans Vortex est fourni par une extension communautaire plutôt qu'intégré nativement, donc la première fois que vous faites cela, une invite apparaîtra.
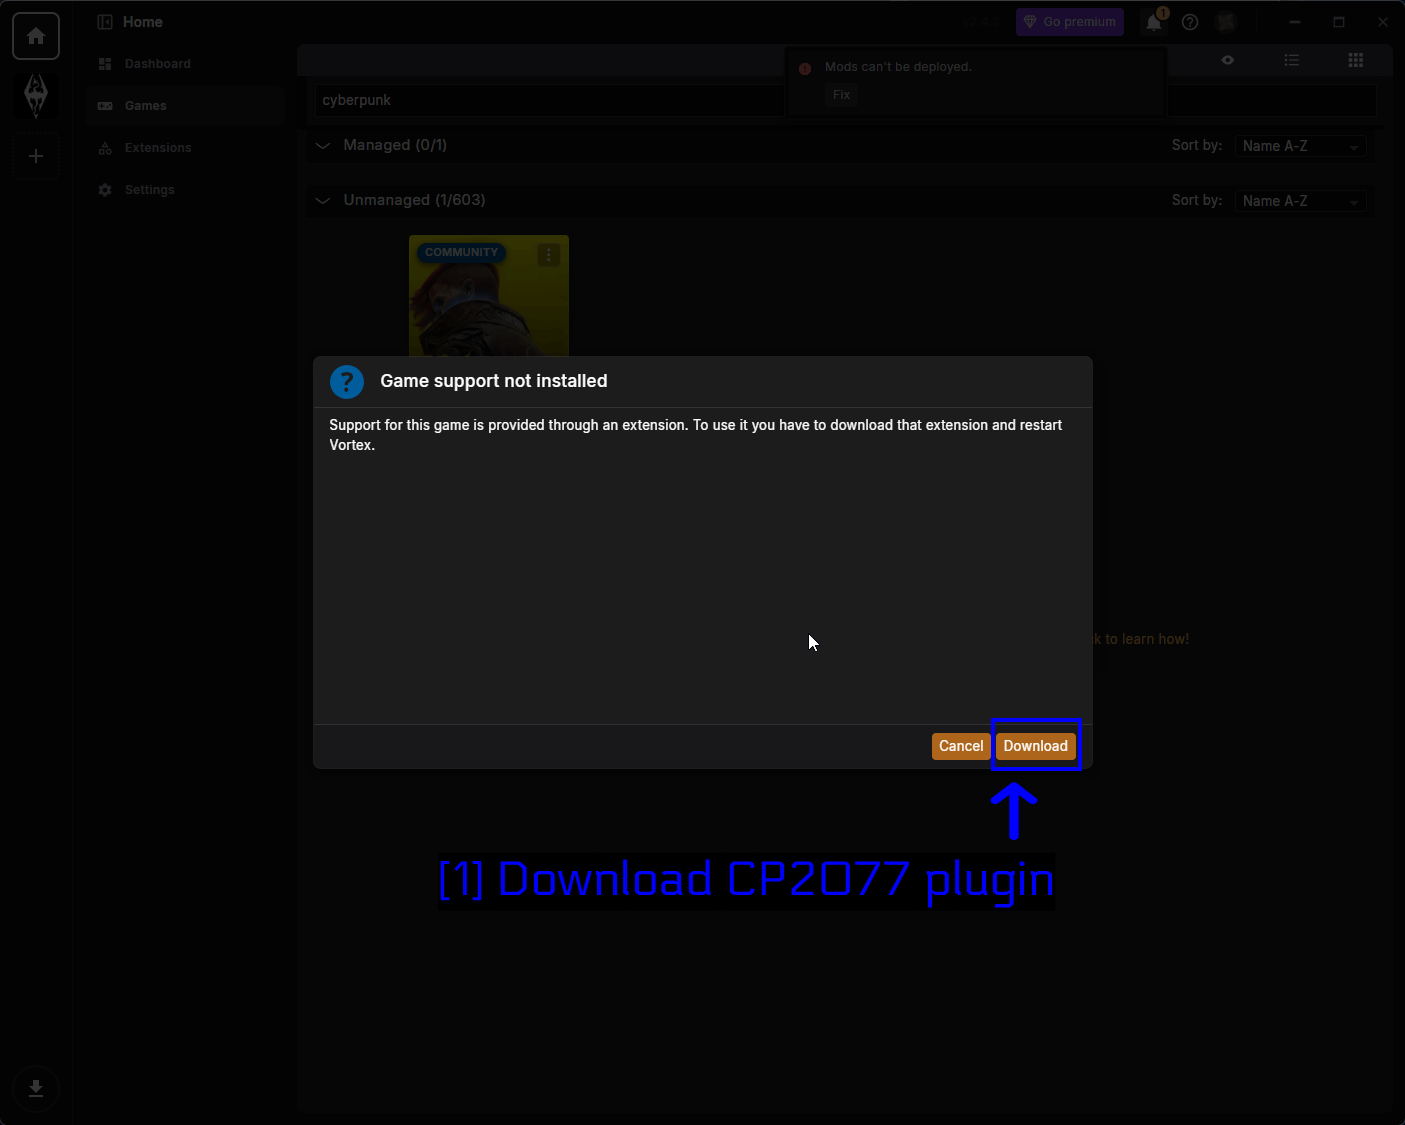
- Téléchargez le plugin CP2077 : Cliquez sur Download. Vortex récupérera l'extension et vous demandera de redémarrer, ce que vous devriez faire avant de continuer.
NOTE - La vignette Cyberpunk est marquée COMMUNITY dans Vortex, ce qui signifie simplement que l'extension est maintenue par la communauté plutôt qu'officielle. C'est la manière standard de modder Cyberpunk via Vortex et cela fonctionne très bien.
Installer le DLC REDmod
Une fois que Vortex gère le jeu, il vérifie si vous avez le DLC REDmod et vous le signale si ce n'est pas le cas.
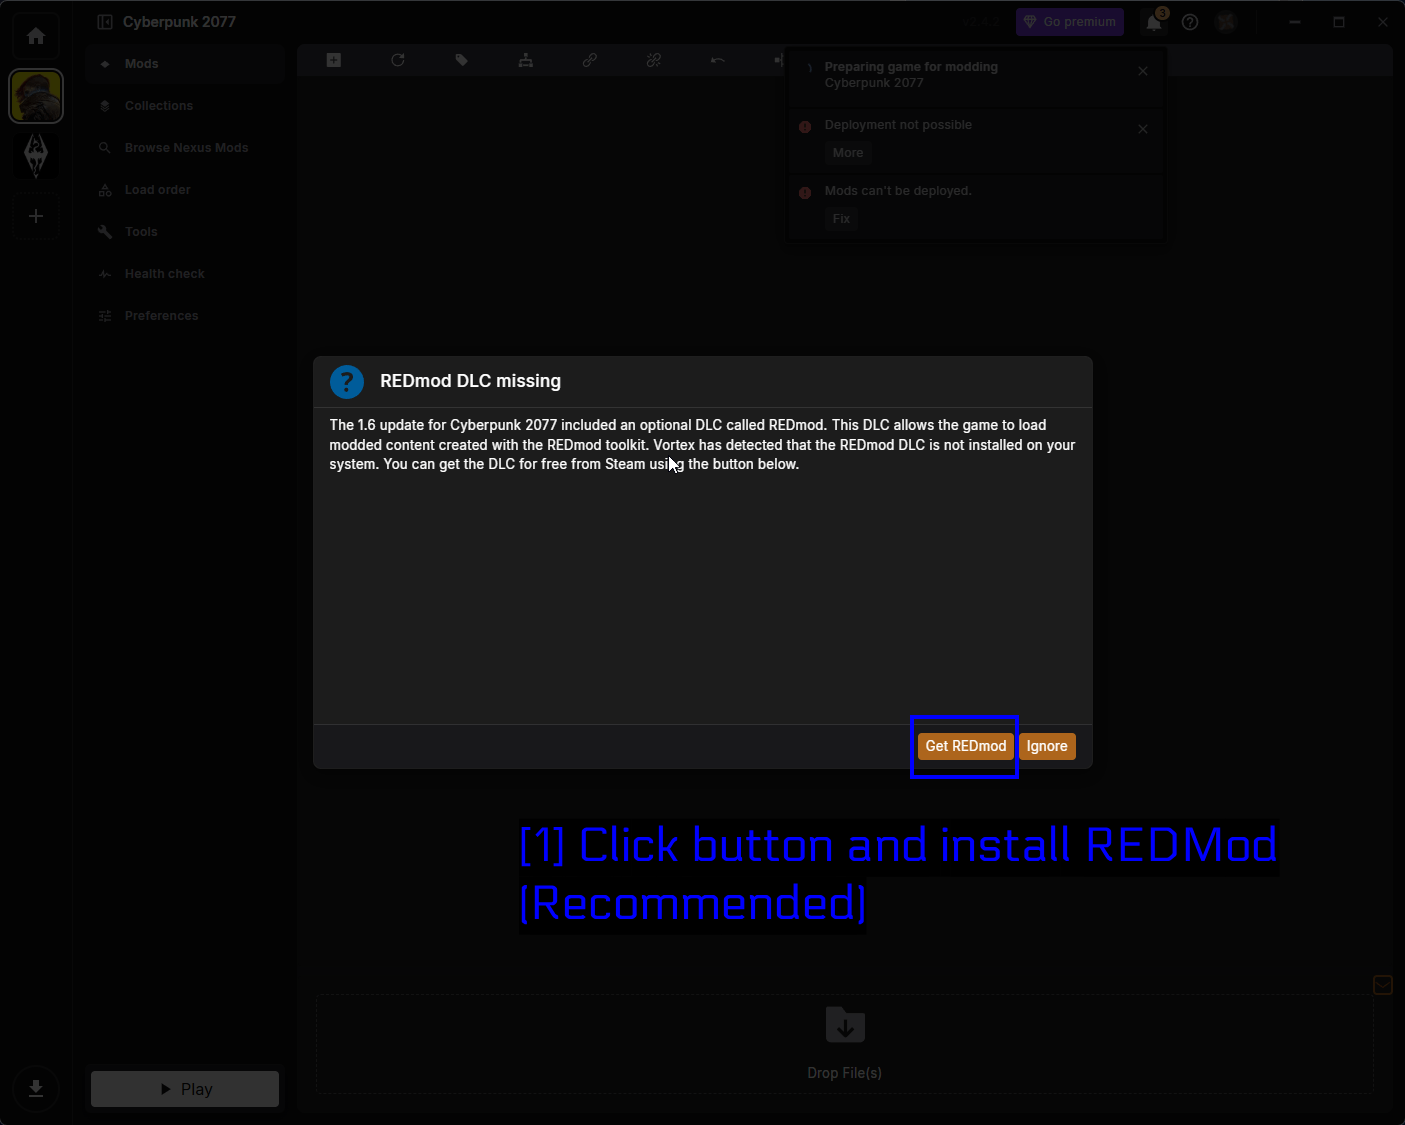
- Cliquez sur le bouton et installez REDmod (recommandé) : Cliquez sur Get REDmod. C'est gratuit, ça prend une minute, et beaucoup de mods en ont besoin. Vous pouvez cliquer sur Ignore si vous êtes certain qu'aucun de vos mods n'utilise REDmod, mais il n'y a aucun inconvénient réel à simplement l'installer.
Vous pourriez aussi voir des notifications Deployment not possible ou Mods can't be deployed à ce stade. Elles disparaissent normalement une fois l'extension installée et Vortex redémarré - si ce n'est pas le cas, cliquez sur Fix et suivez l'instruction (il s'agit généralement du problème de dossier de staging sur le même disque mentionné plus haut).
Télécharger des mods via Vortex
Rendez-vous sur la page du mod Cyber Engine Tweaks sur Nexus Mods.
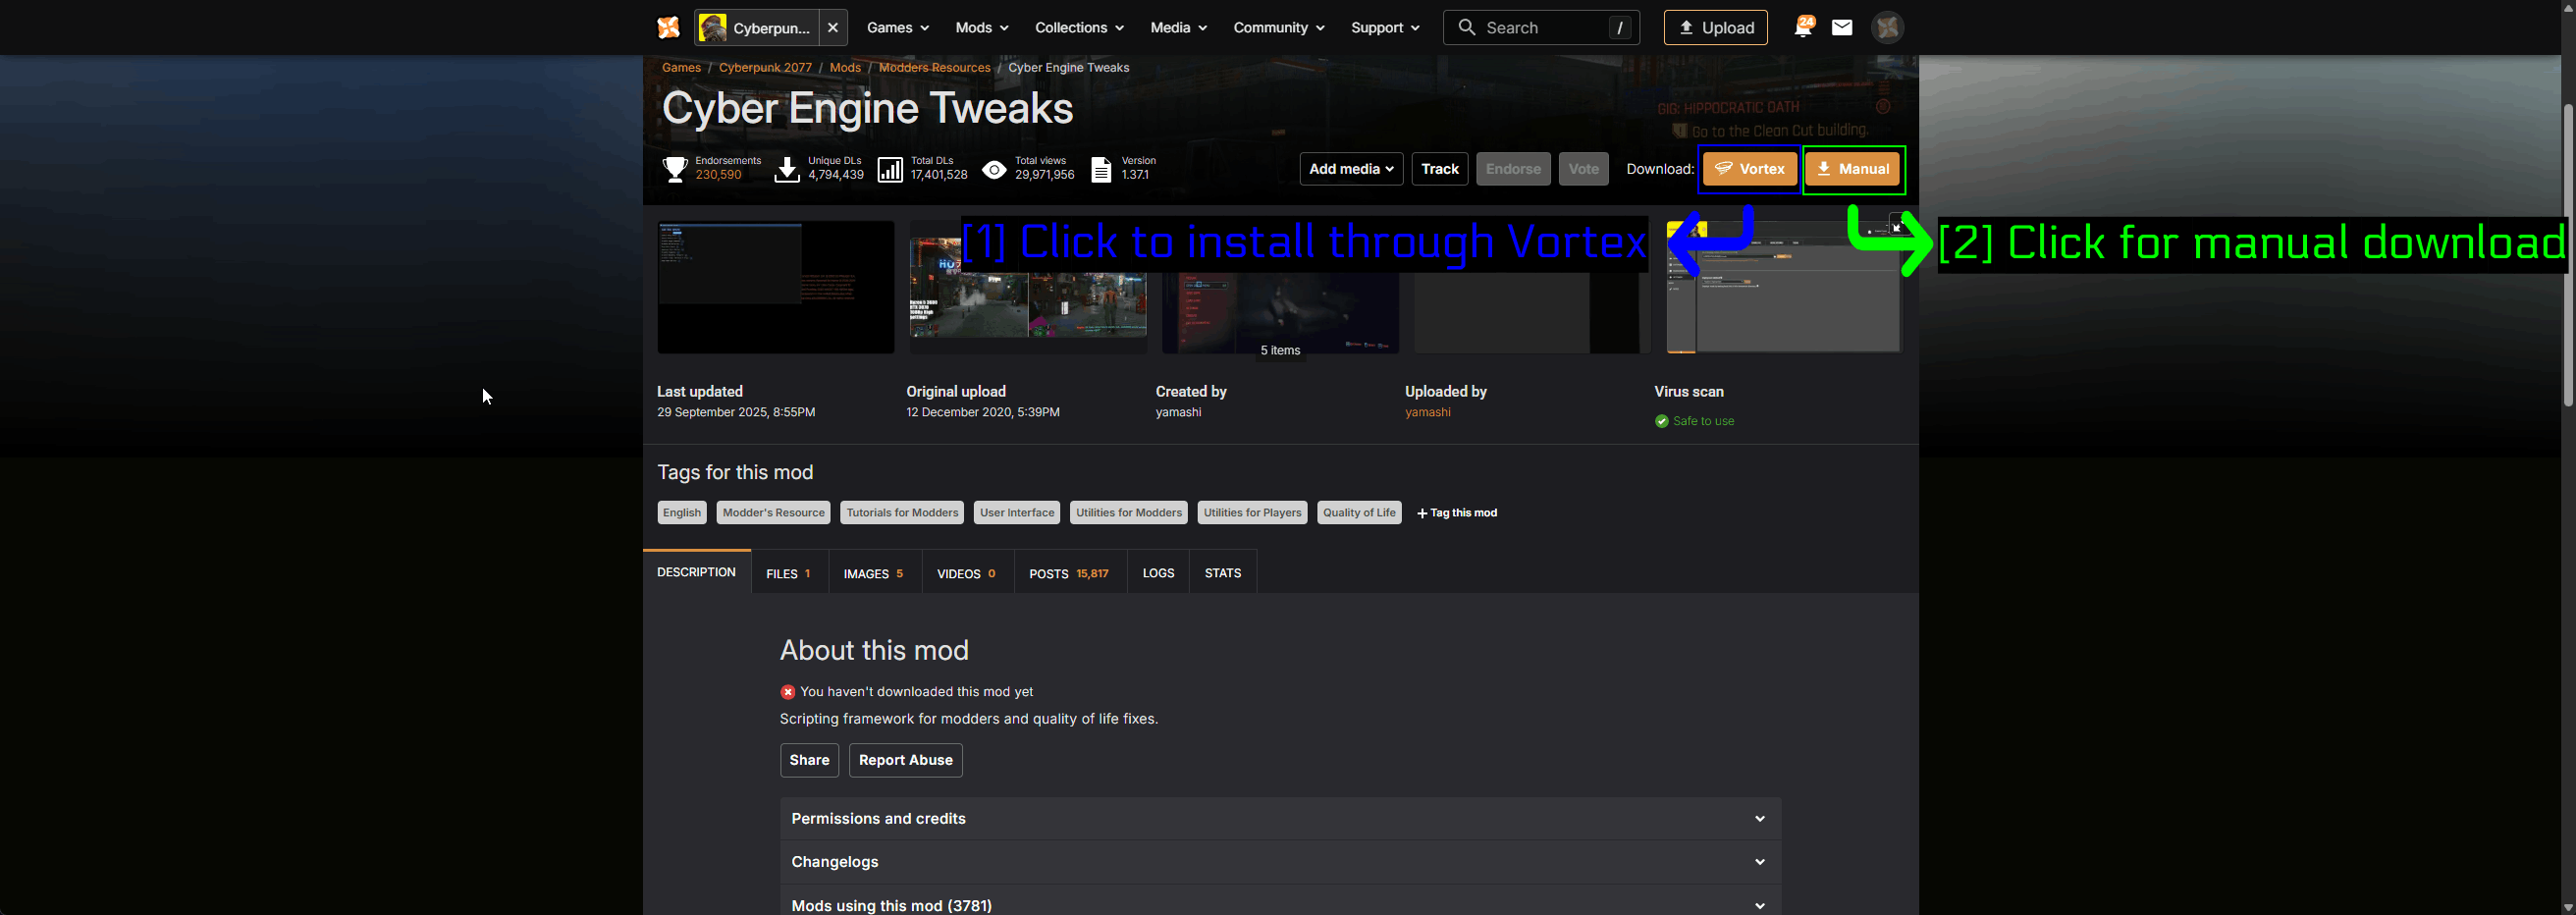
- Cliquez pour installer via Vortex : Le bouton orange Vortex transmet directement le téléchargement à l'application. C'est celui-là que vous voulez.
- Cliquez pour un téléchargement manuel : Le bouton Manual télécharge l'archive via votre navigateur à la place. Nous utiliserons celui-ci plus tard dans la section manuelle.
Votre navigateur vous demandera l'autorisation d'ouvrir Vortex.
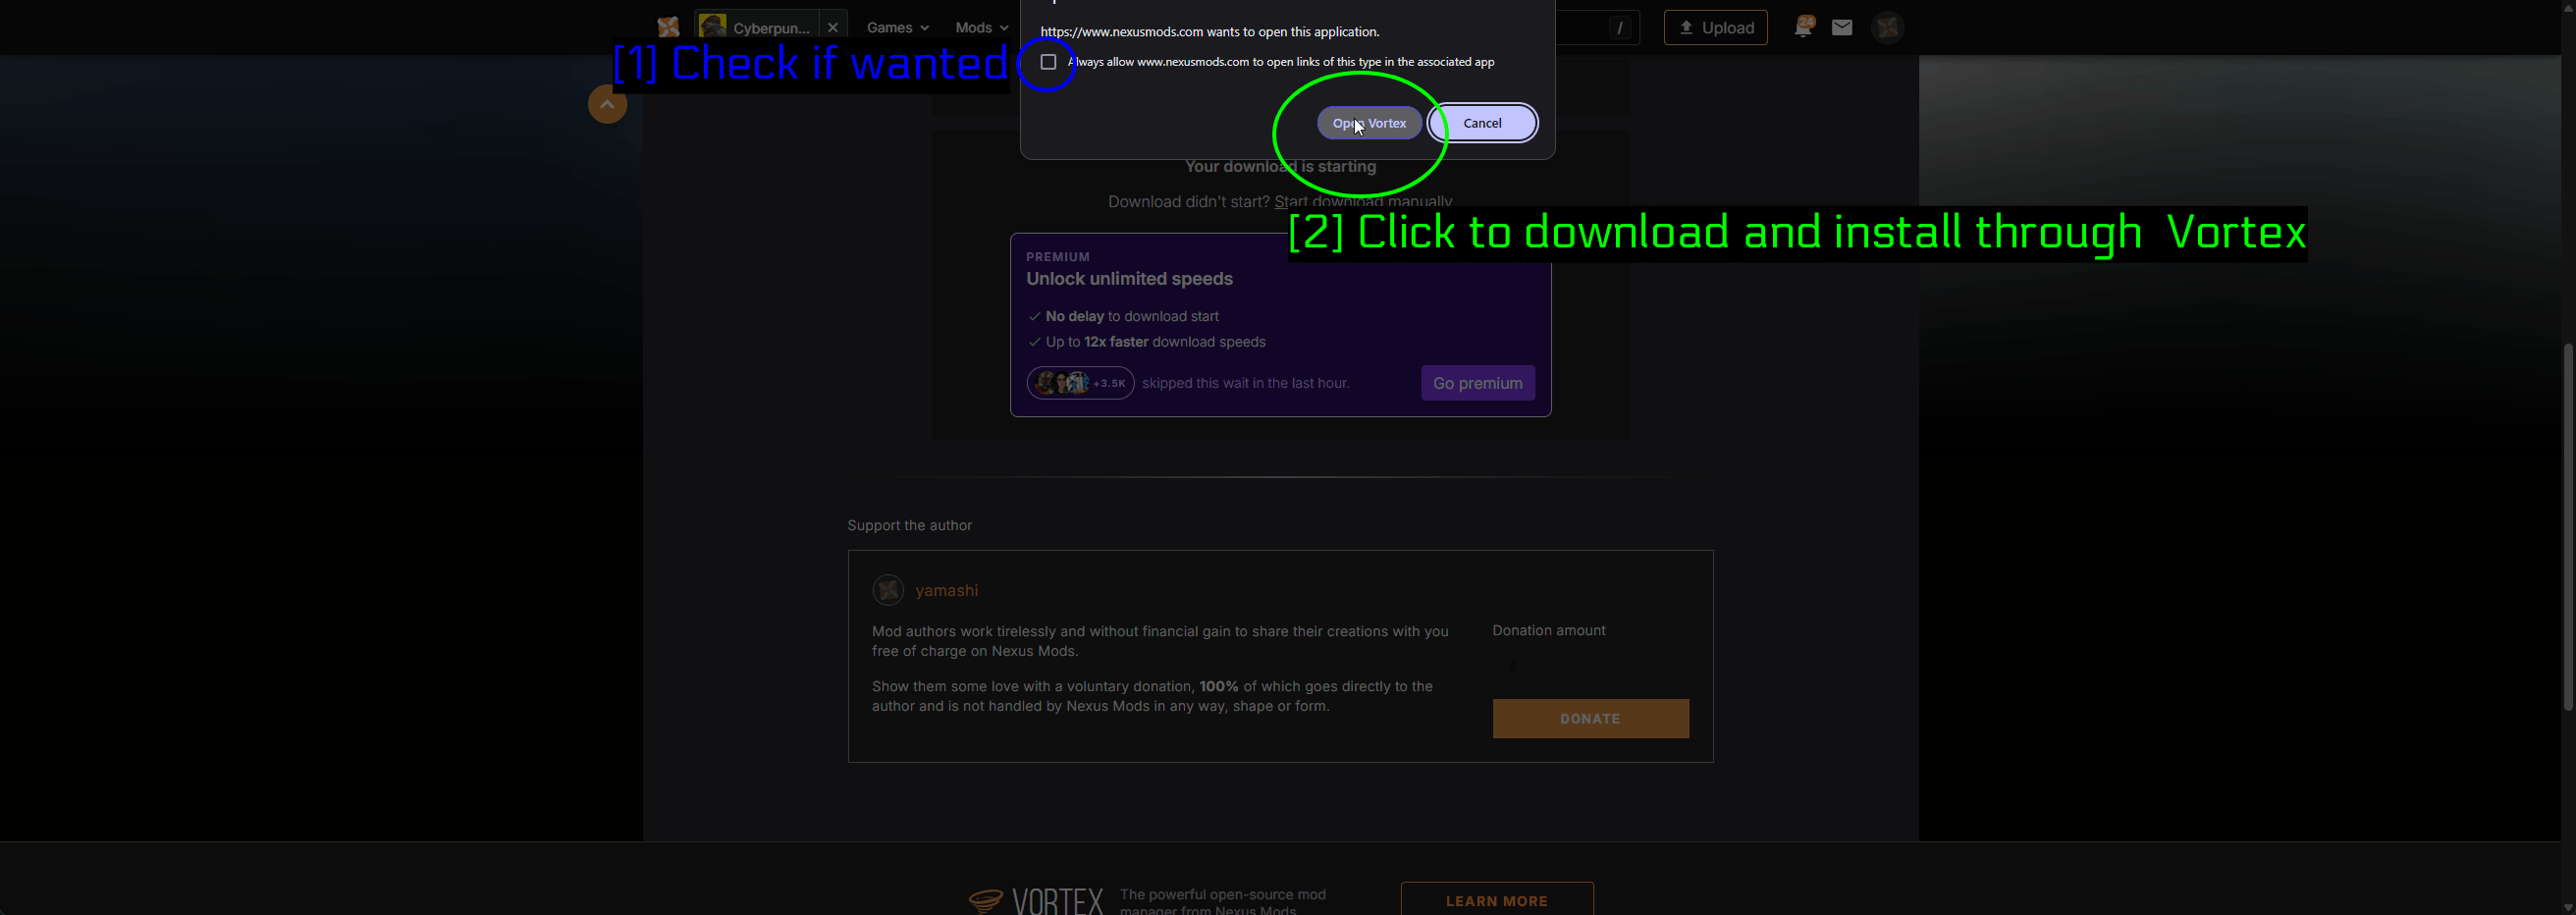
- Cochez si souhaité : Cochez Always allow pour que votre navigateur arrête de demander à chaque fois que vous téléchargez un mod.
- Cliquez pour télécharger et installer via Vortex : Cliquez sur Open Vortex.
Faites de même sur la page de Better Loot Markers. Comme le mod déclare CET comme requis, Nexus Mods propose de récupérer les deux en même temps.
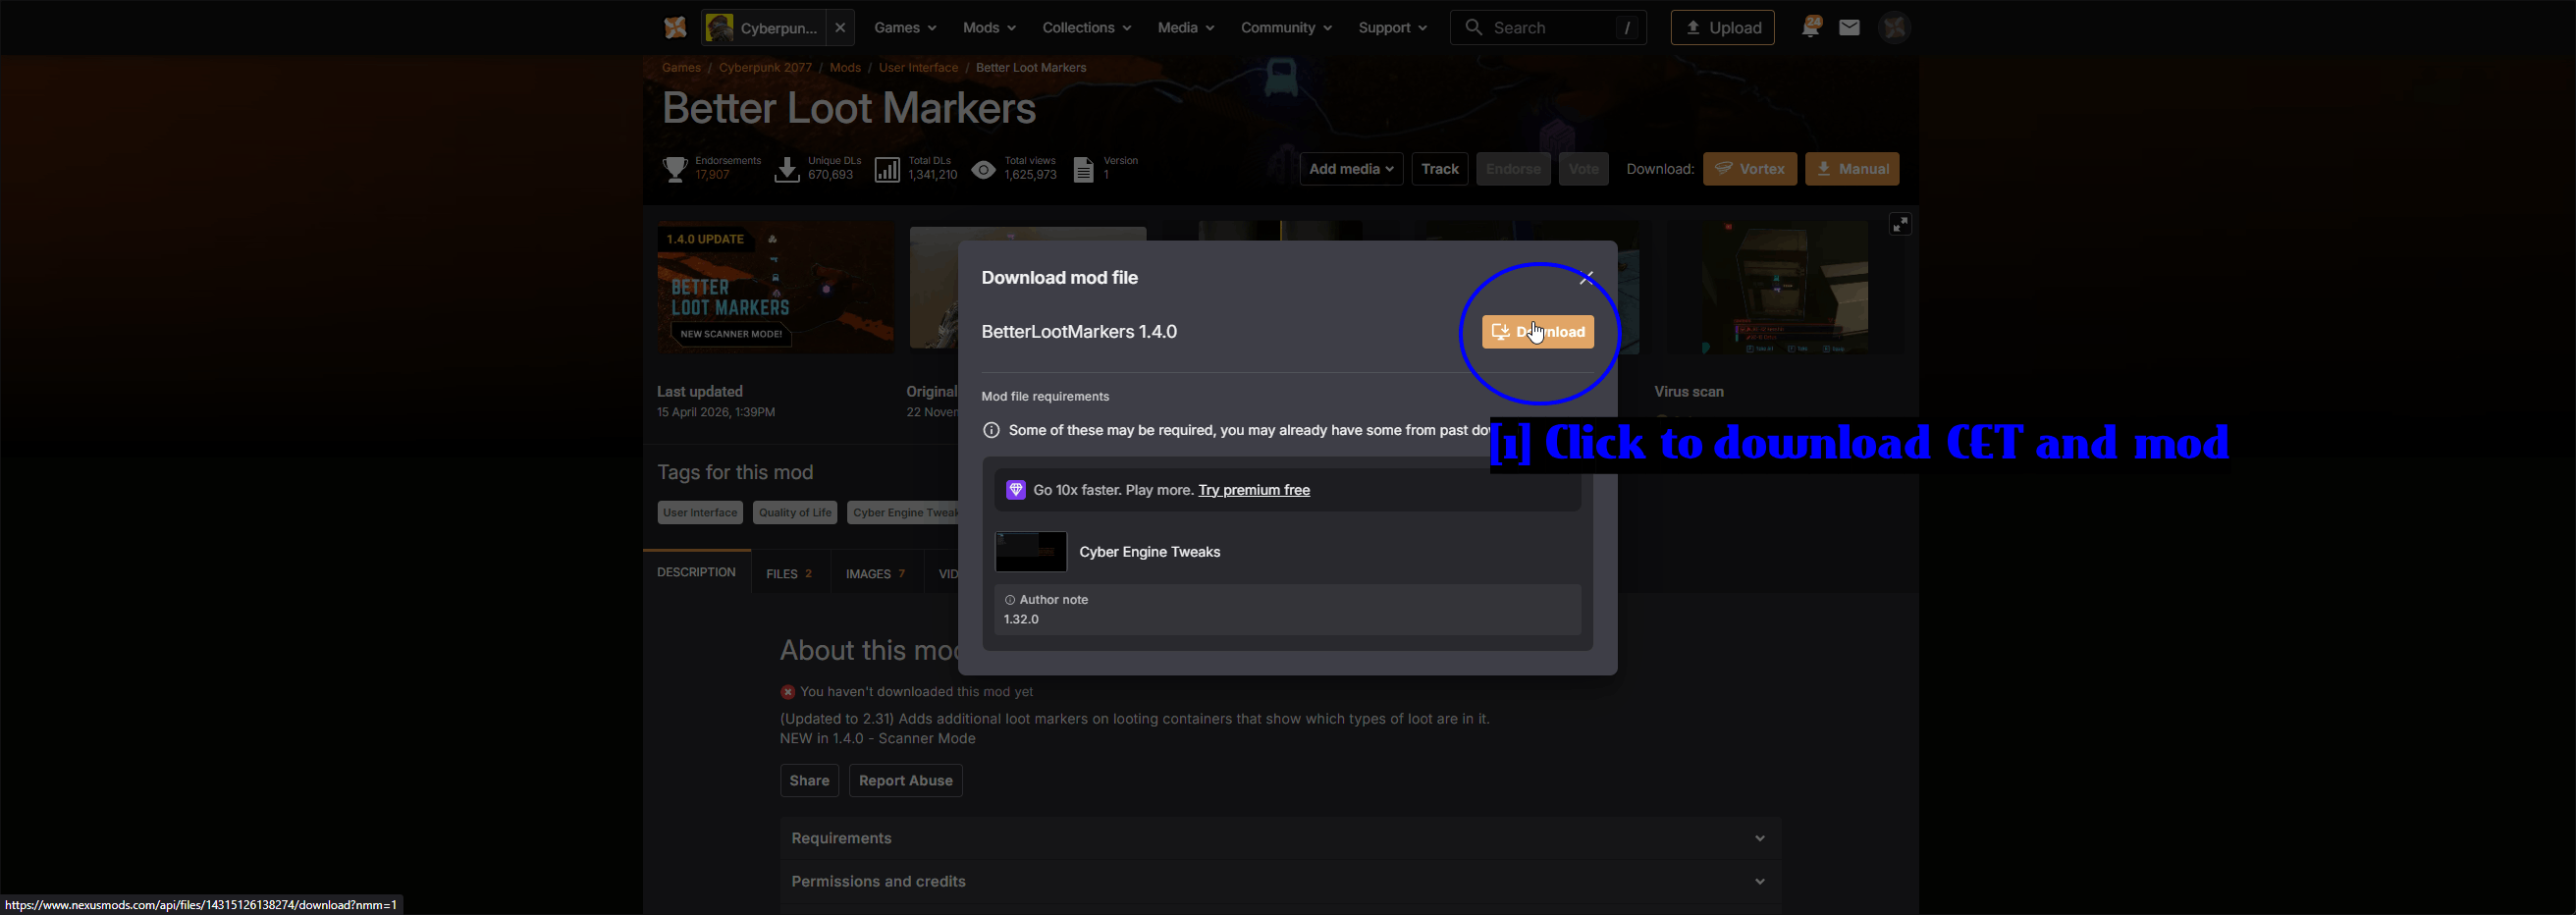
- Cliquez pour télécharger CET et le mod : Cliquez sur Download. Les prérequis sont listés en dessous - ici c'est Cyber Engine Tweaks avec une note de l'auteur indiquant
1.32.0. Si vous avez déjà installé CET à l'étape précédente, Vortex passera simplement dessus.
Gérer vos mods installés
Les deux mods apparaissent maintenant sur la page Mods.
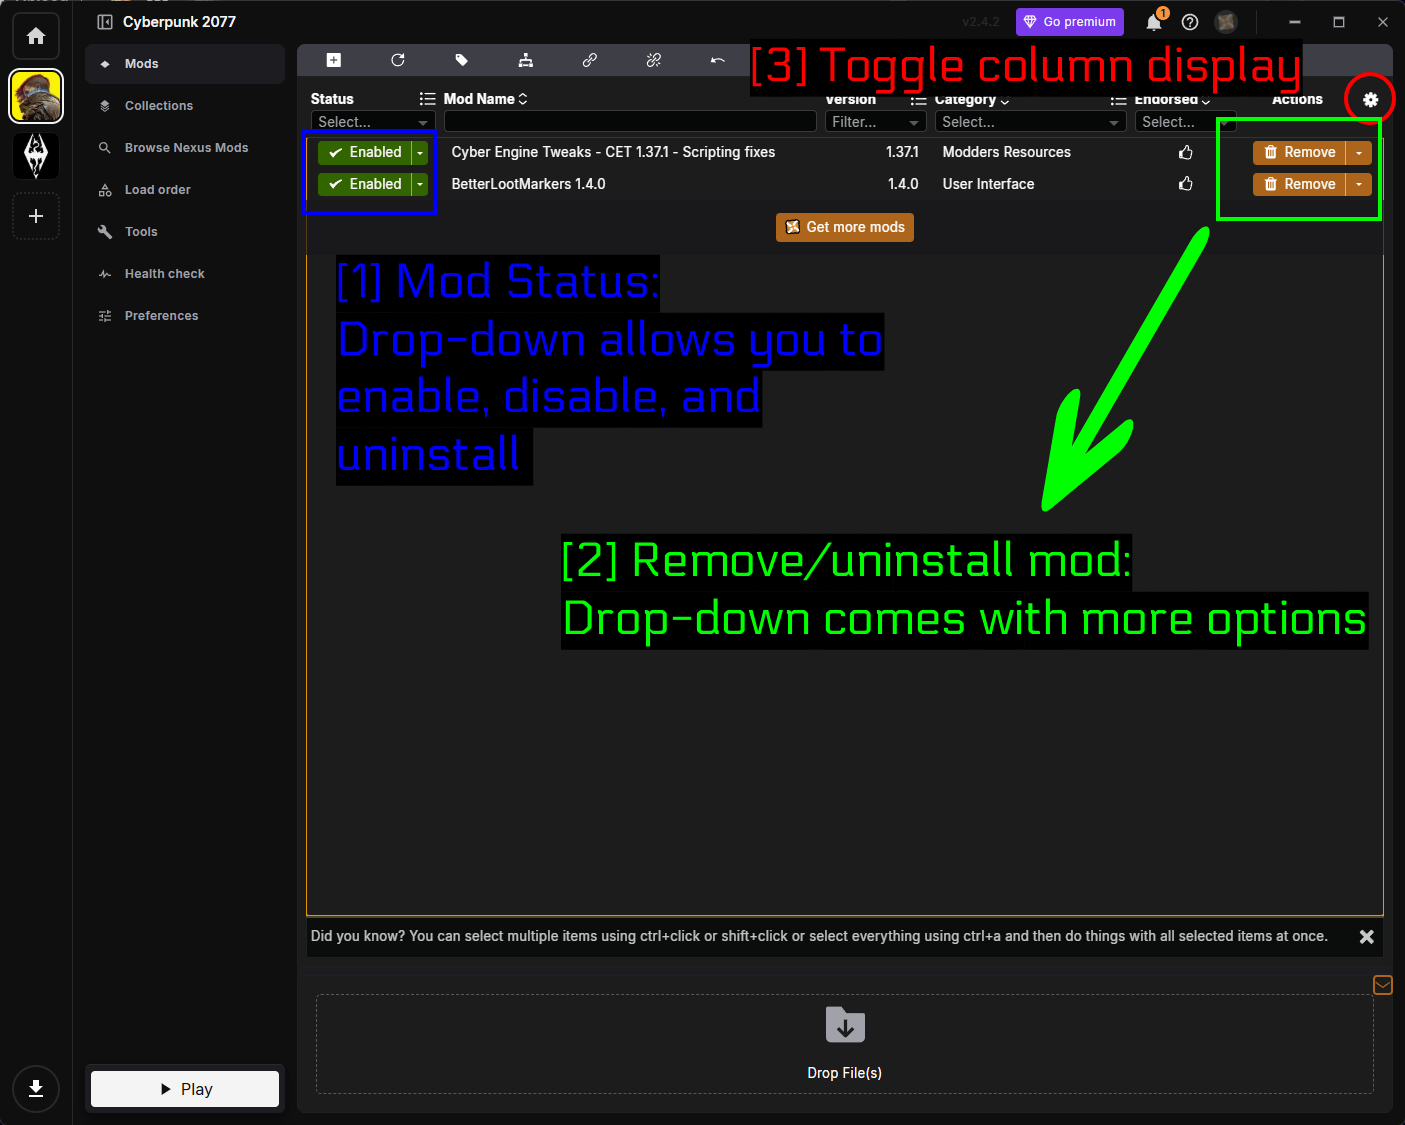
- Statut du mod : Le menu déroulant permet d'activer, désactiver et désinstaller chaque mod.
- Retirer/désinstaller un mod : La flèche à côté de Remove ouvre le menu des actions avec plus d'options.
- Basculer l'affichage des colonnes : L'icône gear contrôle quelles colonnes s'affichent dans la liste.
Le menu déroulant Status propose trois états.
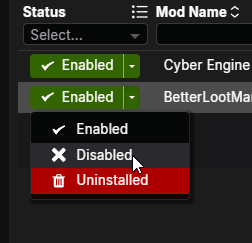
- Enabled - le mod est actif et déployé dans votre jeu.
- Disabled - le mod reste installé dans Vortex mais n'est pas déployé. C'est le moyen le plus rapide de déterminer quel mod casse votre jeu.
- Uninstalled - retire les fichiers installés mais conserve l'archive téléchargée.
Le menu des actions couvre tout le reste.
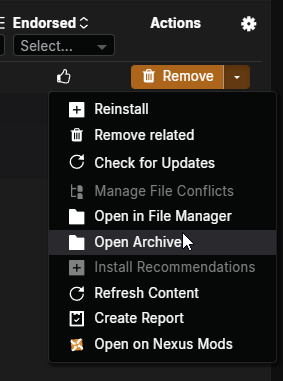
- Reinstall - relance l'installateur.
- Remove related - retire le mod ainsi que tout ce qui y est lié.
- Check for Updates - interroge Nexus Mods pour une version plus récente.
- Manage File Conflicts - résout les conflits lorsque deux mods écrivent le même fichier.
- Open in File Manager - ouvre le dossier de staging du mod. Vraiment utile pour dépanner CET.
- Open Archive - ouvre l'archive téléchargée.
- Refresh Content - relit les fichiers du mod.
- Create Report - génère un rapport sur le mod, pratique pour demander de l'aide.
- Open on Nexus Mods - ouvre la page du mod dans votre navigateur.
Ordre de chargement
La page Load order est celle où vous contrôlez quels REDmods se chargent en premier.
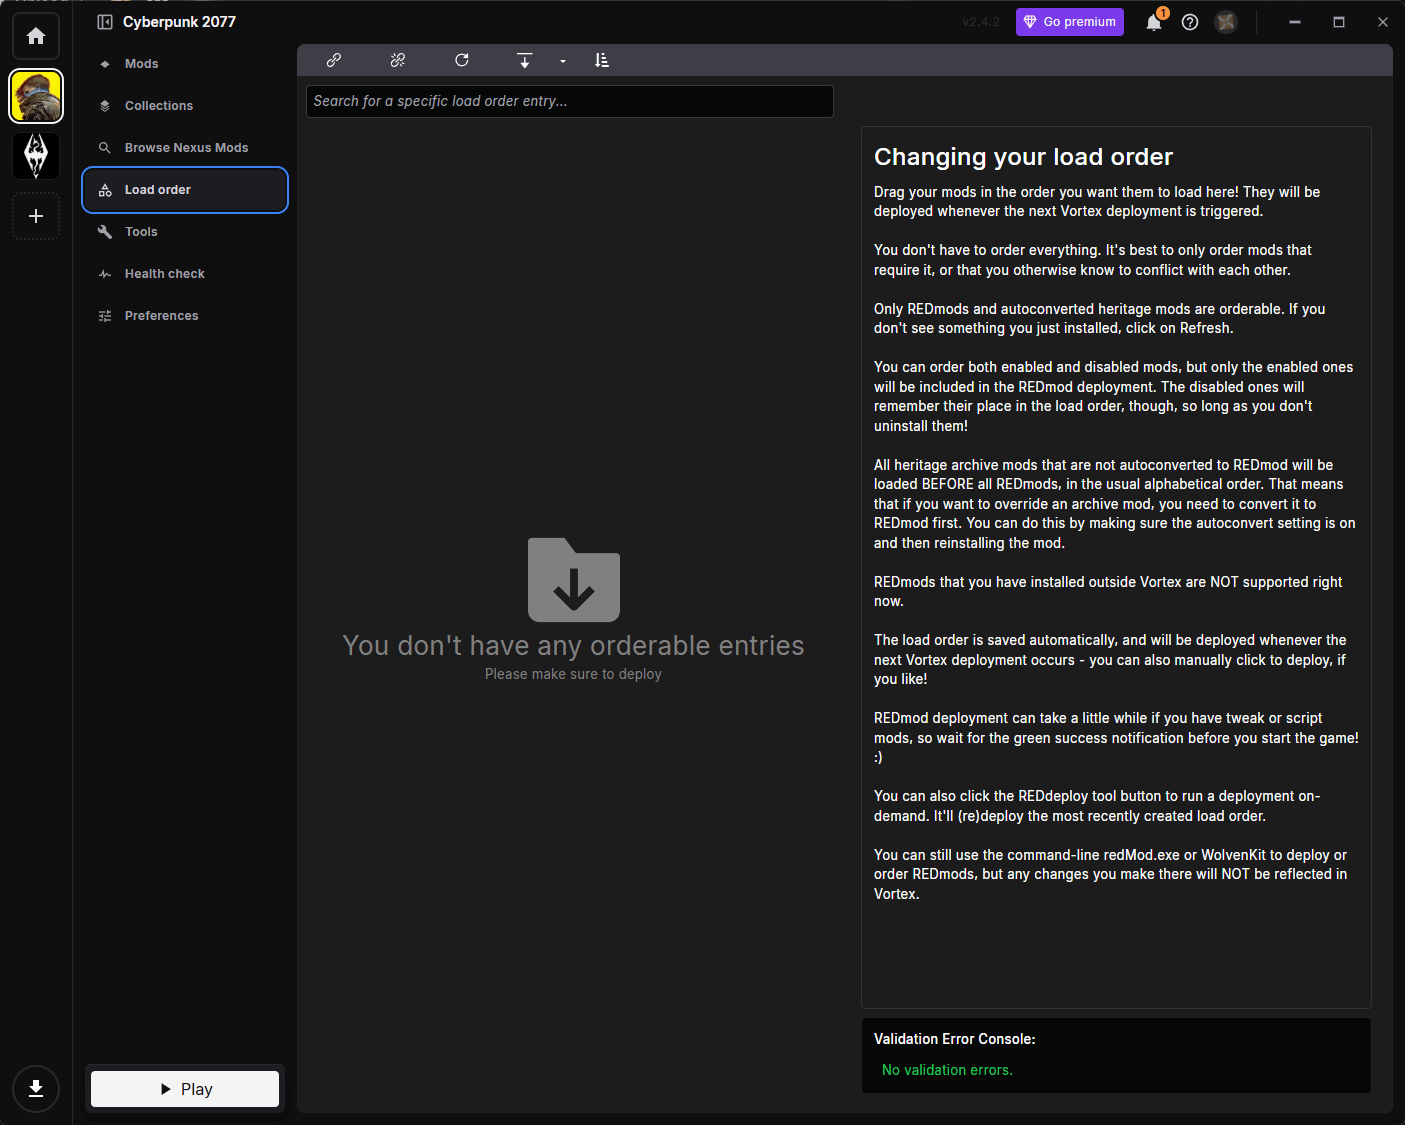
Vortex explique les règles sur le côté droit, et elles valent le coup d'être lues attentivement. Voici les points clés.
- Seuls les REDmods et les mods hérités autoconvertis sont ordonnables. Nos deux mods d'exemple sont des mods CET, c'est pourquoi la liste est vide ici.
- Vous n'avez pas besoin de tout ordonner - seulement les mods qui le nécessitent ou dont vous savez qu'ils entrent en conflit.
- Les mods hérités
.archivequi n'ont pas été autoconvertis se chargent toujours avant tous les REDmods, par ordre alphabétique. - L'ordre de chargement s'enregistre automatiquement et se déploie au prochain déploiement de Vortex.
- Le déploiement des REDmods peut prendre du temps avec des mods de tweaks ou de scripts, donc attendez la notification verte de succès avant de lancer le jeu.
NOTE - Si un mod que vous venez d'installer n'apparaît pas ici, cliquez sur Refresh. Et si vous déployez des REDmods en dehors de Vortex avec redMod.exe ou WolvenKit, Vortex ne verra pas ces changements.
Outils
La page Tools liste les programmes externes et options de lancement qui s'exécutent en parallèle du jeu.
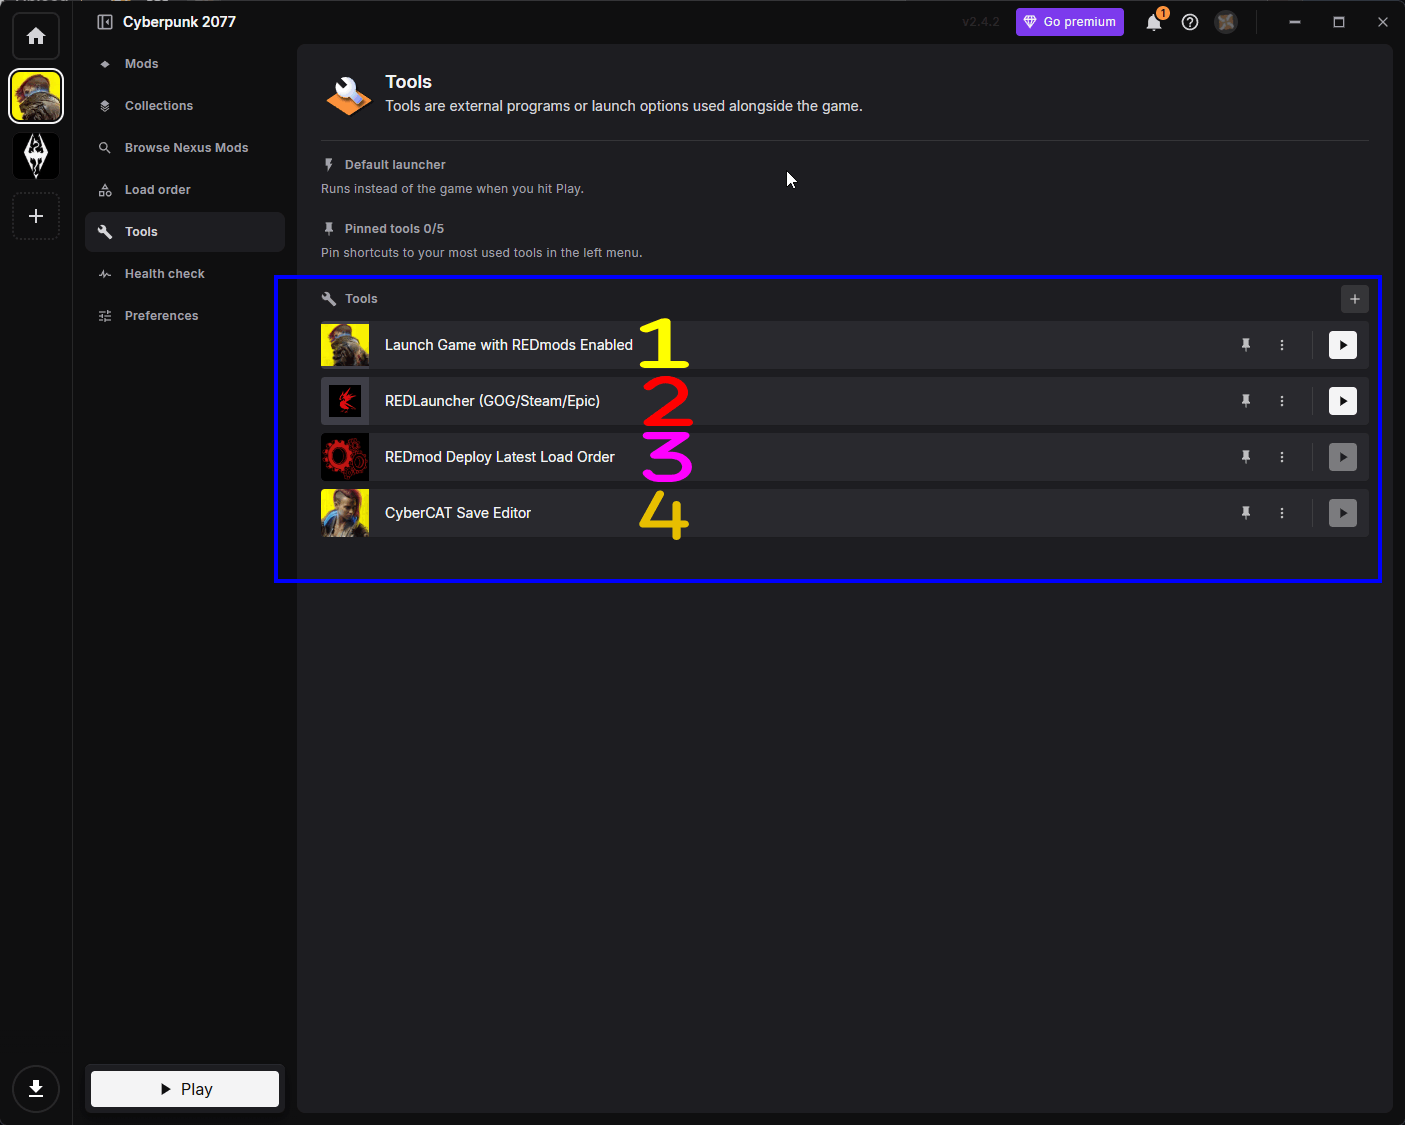
- Launch Game with REDmods Enabled - lance le jeu avec la prise en charge des REDmods activée. C'est celui que vous voudrez généralement utiliser si vous avez des REDmods.
- REDLauncher (GOG/Steam/Epic) - ouvre le launcher propre à CDPR.
- REDmod Deploy Latest Load Order - lance un déploiement REDmod à la demande sans démarrer le jeu.
- CyberCAT Save Editor - un éditeur de sauvegardes, si vous l'avez installé.
Vous pouvez épingler jusqu'à cinq outils dans le menu de gauche à l'aide de l'icône épingle, et ajouter les vôtres avec le bouton + en haut à droite de la boîte Tools.
Préférences
La page Preferences contient les réglages de Vortex spécifiques à Cyberpunk.
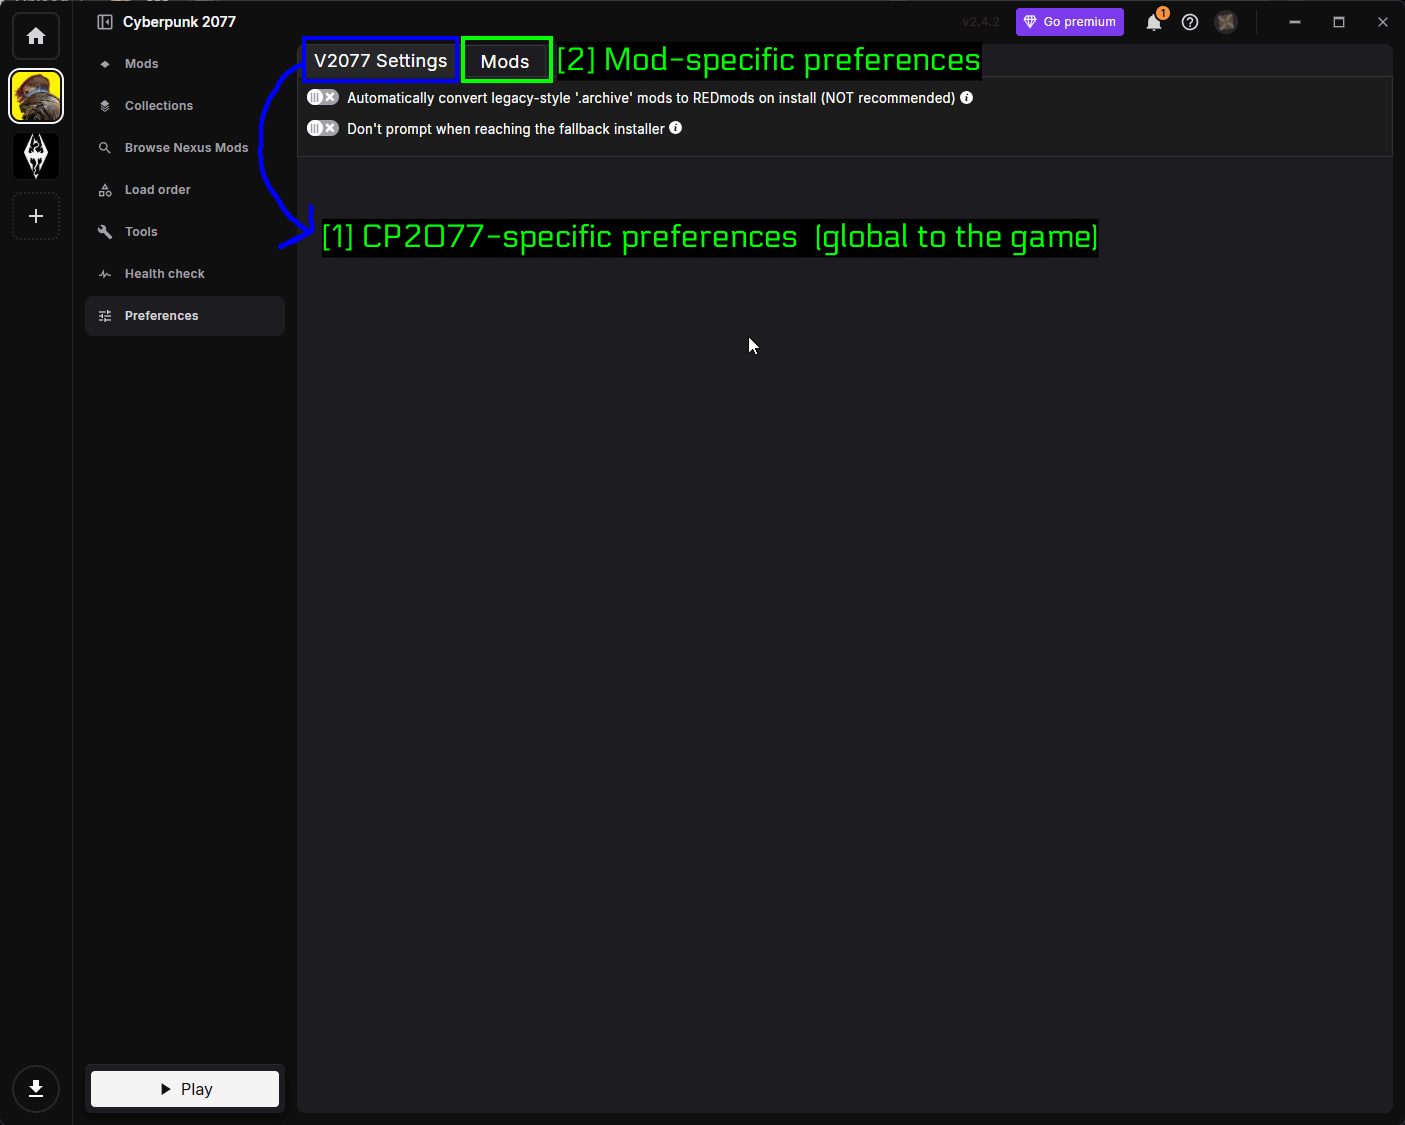
- V2077 Settings : Préférences qui s'appliquent globalement à Cyberpunk 2077.
- Mods : Préférences qui s'appliquent à des mods individuels.
Il y a deux options à connaître ici.
- Automatically convert legacy-style '.archive' mods to REDmods on install - laissez ceci désactivé sauf si vous savez que vous en avez besoin. Vortex lui-même le marque comme NOT recommended. Cela n'a vraiment d'importance que si vous avez besoin qu'un ancien mod archive override un REDmod, puisque les archives héritées se chargent toujours en premier sinon.
- Don't prompt when reaching the fallback installer - empêche Vortex de demander quoi faire quand il n'arrive pas à déterminer la structure d'un mod tout seul. Pratique une fois que vous savez ce que vous faites, moins avant.
Vérification de santé
La page Health check examine votre configuration et signale les problèmes.
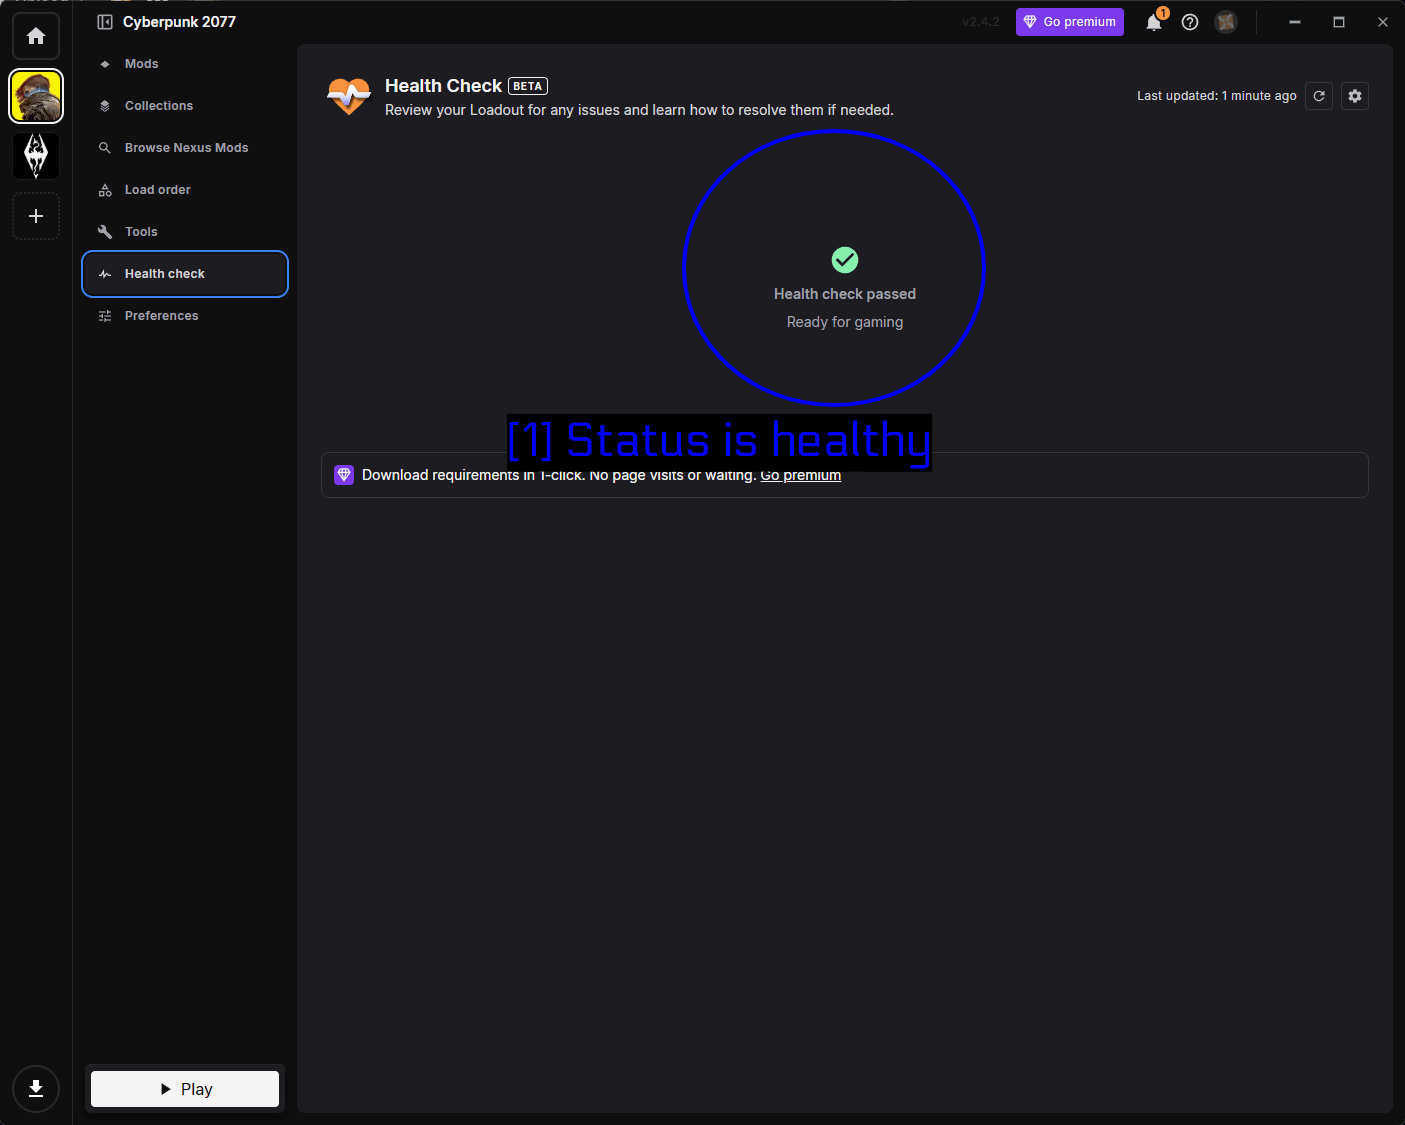
- Status is healthy : Un Health check passed en vert signifie que Vortex est satisfait de votre configuration. Si quelque chose ne va pas, il vous le dira ici et expliquera comment le résoudre, ce qui est une bonne première étape avant de fouiller dans les logs.
Installer des mods via Mod Organizer 2
Mod Organizer 2 est l'autre grand gestionnaire de mods, et il fonctionne différemment de Vortex. Au lieu de créer des liens durs vers votre dossier de jeu, MO2 utilise un système de fichiers virtuel - le jeu voit les mods mais votre dossier d'installation réel n'est jamais touché. Certaines personnes préfèrent nettement cette approche.
MO2 utilise aussi des instances, qui sont des ensembles autonomes de mods, téléchargements, profils et configurations par jeu. Vous pouvez basculer librement entre elles.
Nous n'allons pas installer nos mods d'exemple via MO2 ici - cette section sert à vous montrer que MO2 prend en charge Cyberpunk et à vous guider à travers la configuration, qui est la partie délicate.
Téléchargement de MO2
Récupérez la dernière version depuis la page des releases GitHub.
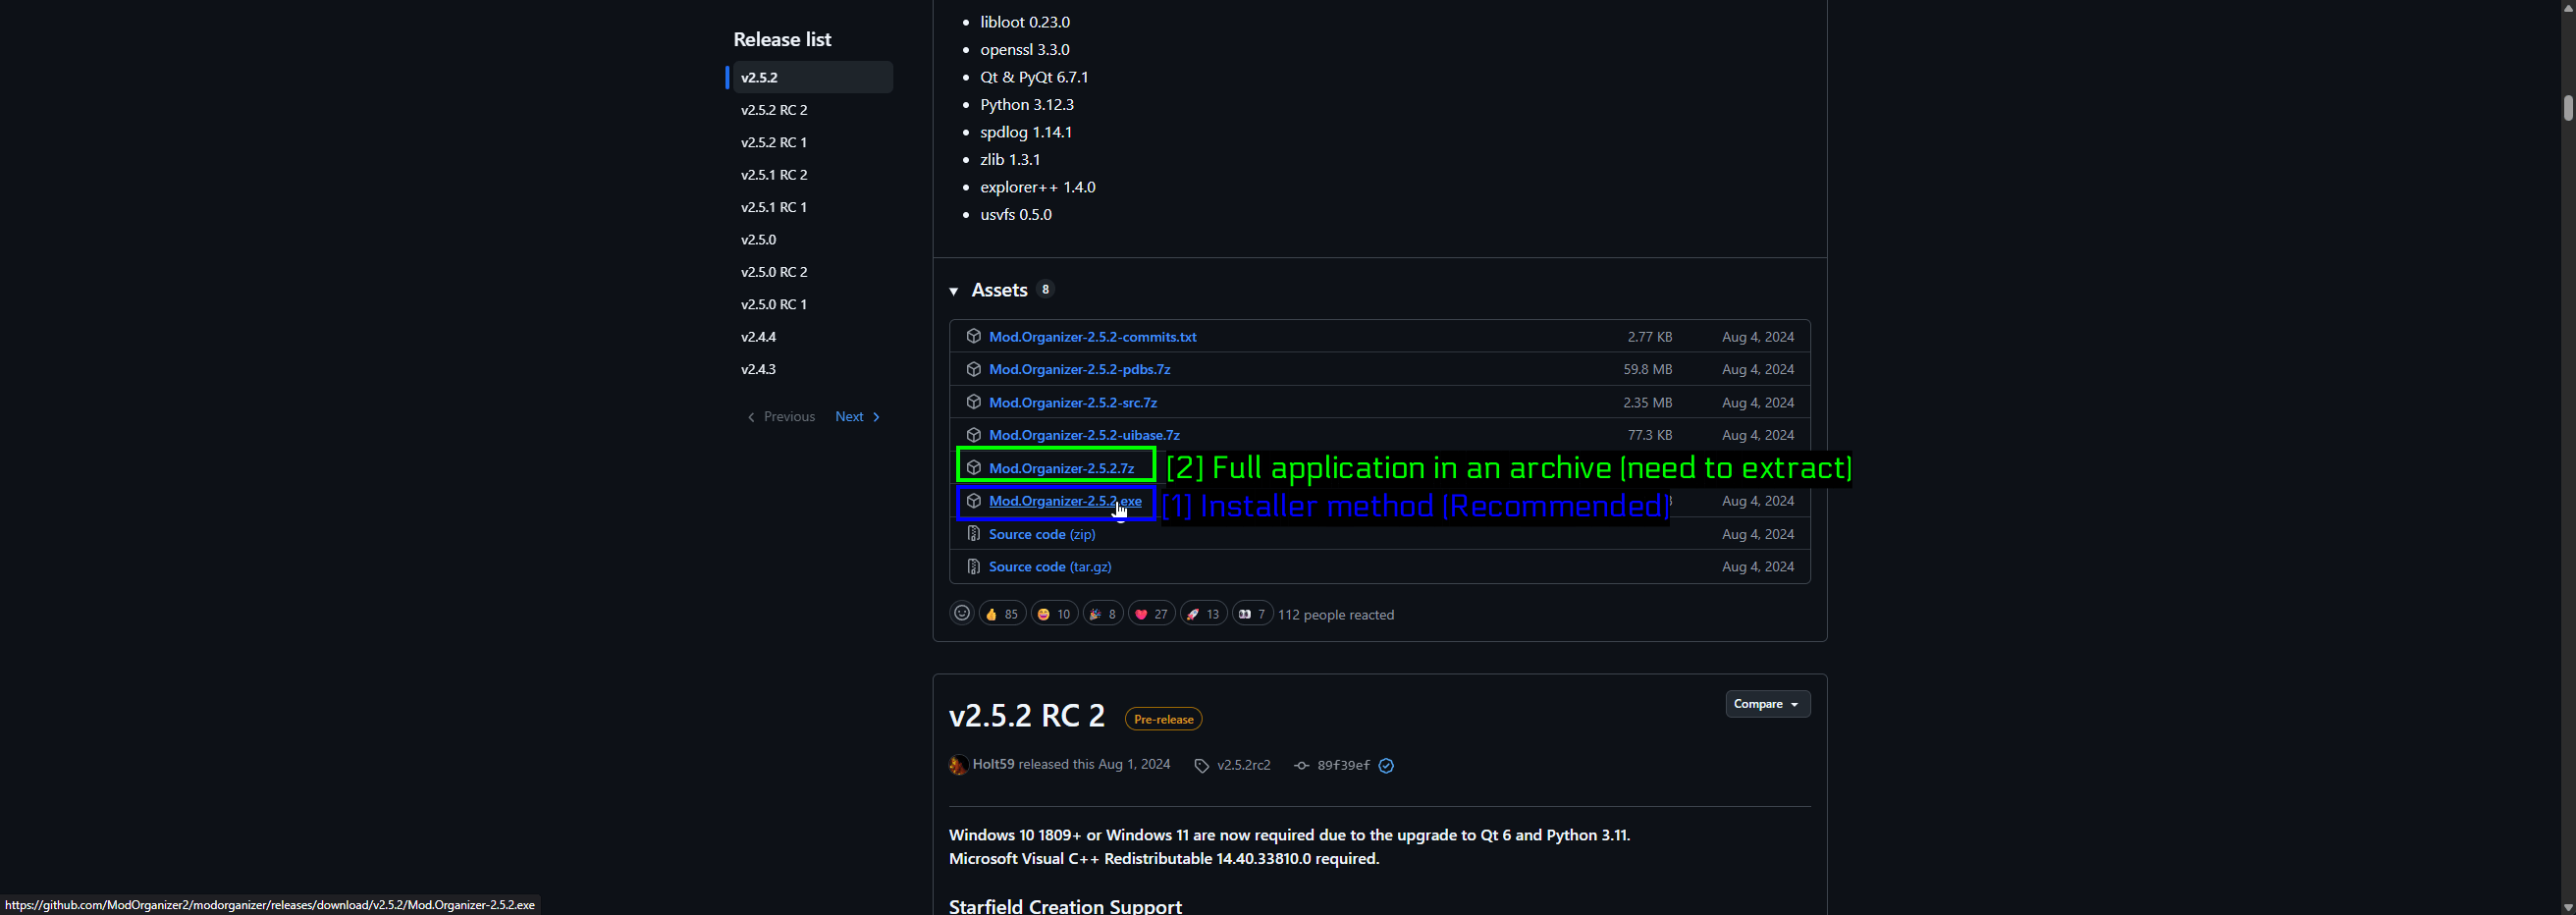
- Méthode installeur (recommandée) :
Mod.Organizer-<version>.exeest l'installeur normal et celui que la plupart des gens devraient utiliser. - Application complète en archive :
Mod.Organizer-<version>.7zest la version portable. Vous l'extrayez vous-même et la lancez depuis l'endroit où vous l'avez placée.
NOTE - MO2 se trouve aussi sur Nexus Mods, listé sous Skyrim Special Edition pour des raisons historiques. C'est la même application et elle prend en charge de nombreux jeux en plus de Skyrim.
Création d'une instance
Au premier lancement, MO2 vous guide dans la création d'une instance.
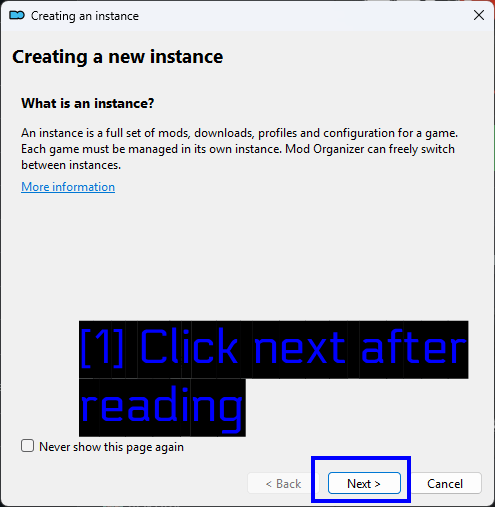
- Cliquez sur suivant après lecture : L'introduction explique ce qu'est une instance. Cliquez sur Next.
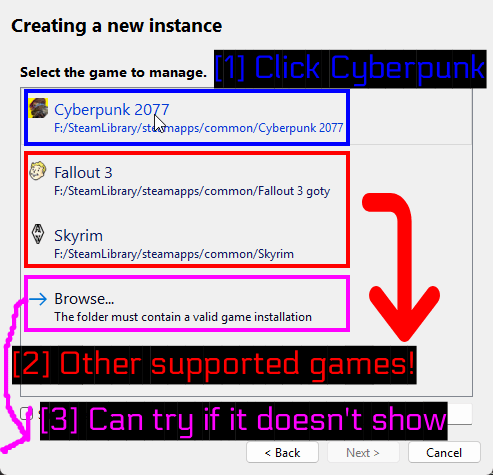
- Cliquez sur Cyberpunk : MO2 scanne les jeux installés et devrait trouver Cyberpunk 2077 tout seul, avec son chemin.
- Autres jeux pris en charge : Tout ce que MO2 a détecté d'autre.
- À essayer si rien ne s'affiche : Utilisez Browse... pour pointer MO2 manuellement vers votre dossier de jeu s'il n'a pas été détecté.
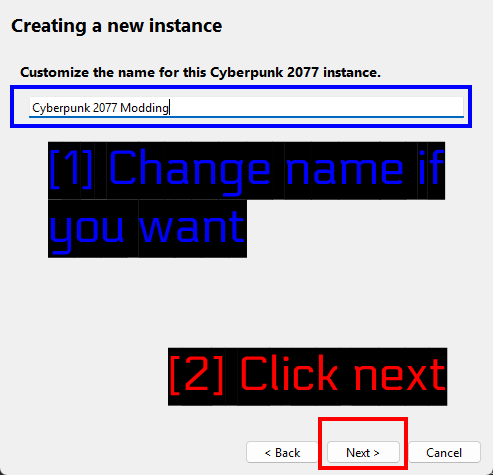
- Changez le nom si vous voulez : Donnez un nom à l'instance. Le nom par défaut convient, mais quelque chose comme
Cyberpunk 2077 Moddingest plus clair si vous prévoyez d'en avoir plusieurs. - Cliquez sur suivant : Continuez.
Lier votre compte Nexus Mods
MO2 propose ensuite de se lier à Nexus Mods, ce qui vous permet de télécharger des mods directement depuis l'application et de vérifier les mises à jour.
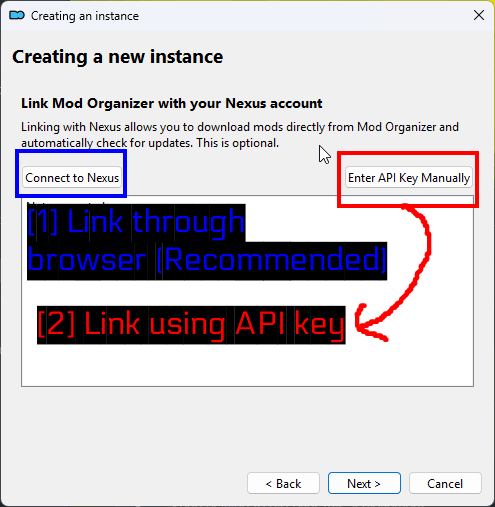
- Se connecter via le navigateur (recommandé) : Connect to Nexus ouvre votre navigateur et gère tout pour vous.
- Se connecter avec une clé API : Enter API Key Manually si vous préférez coller une clé depuis les paramètres de votre compte Nexus Mods.
La méthode par navigateur ouvre une page d'autorisation.
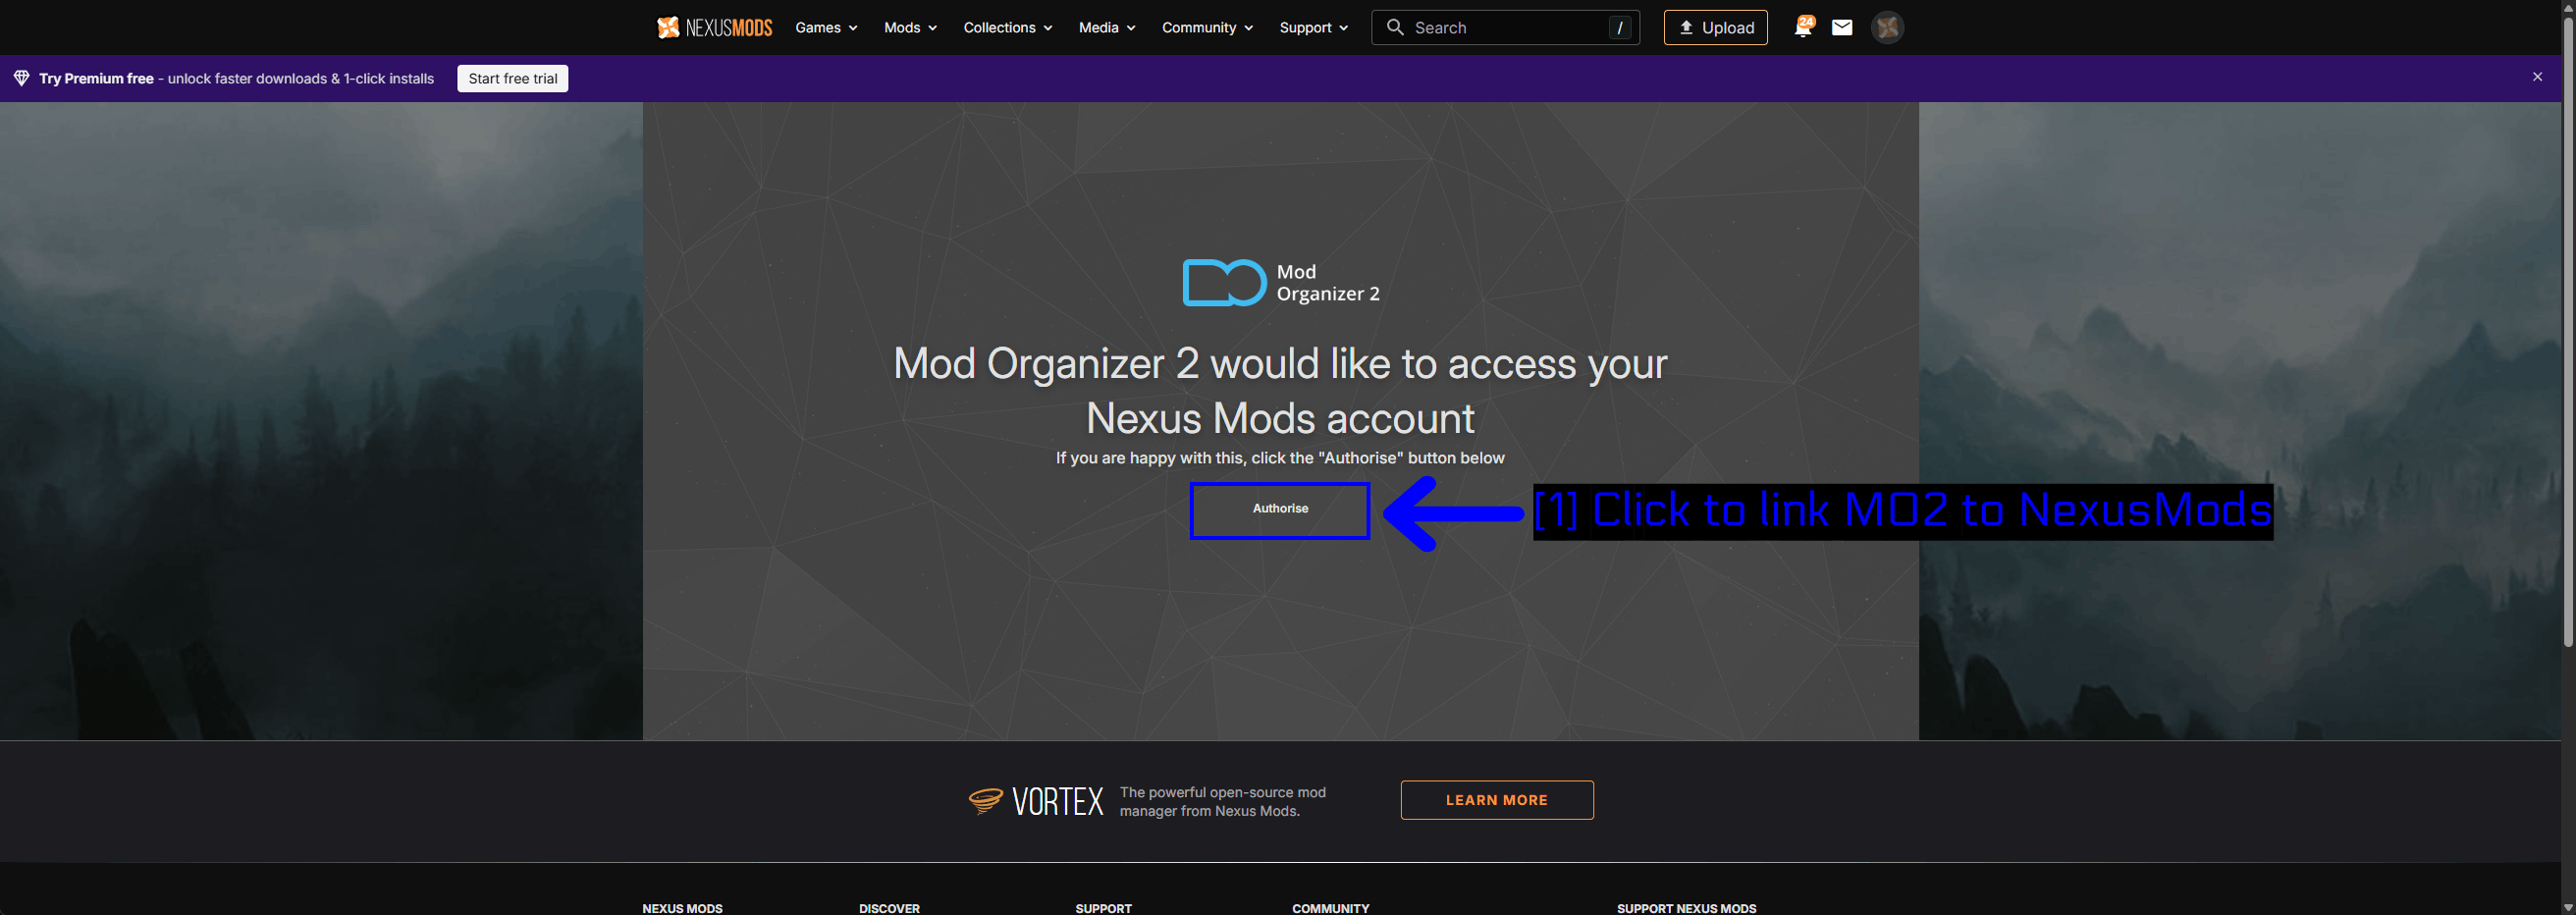
- Cliquez pour lier MO2 à NexusMods : Cliquez sur Authorise.
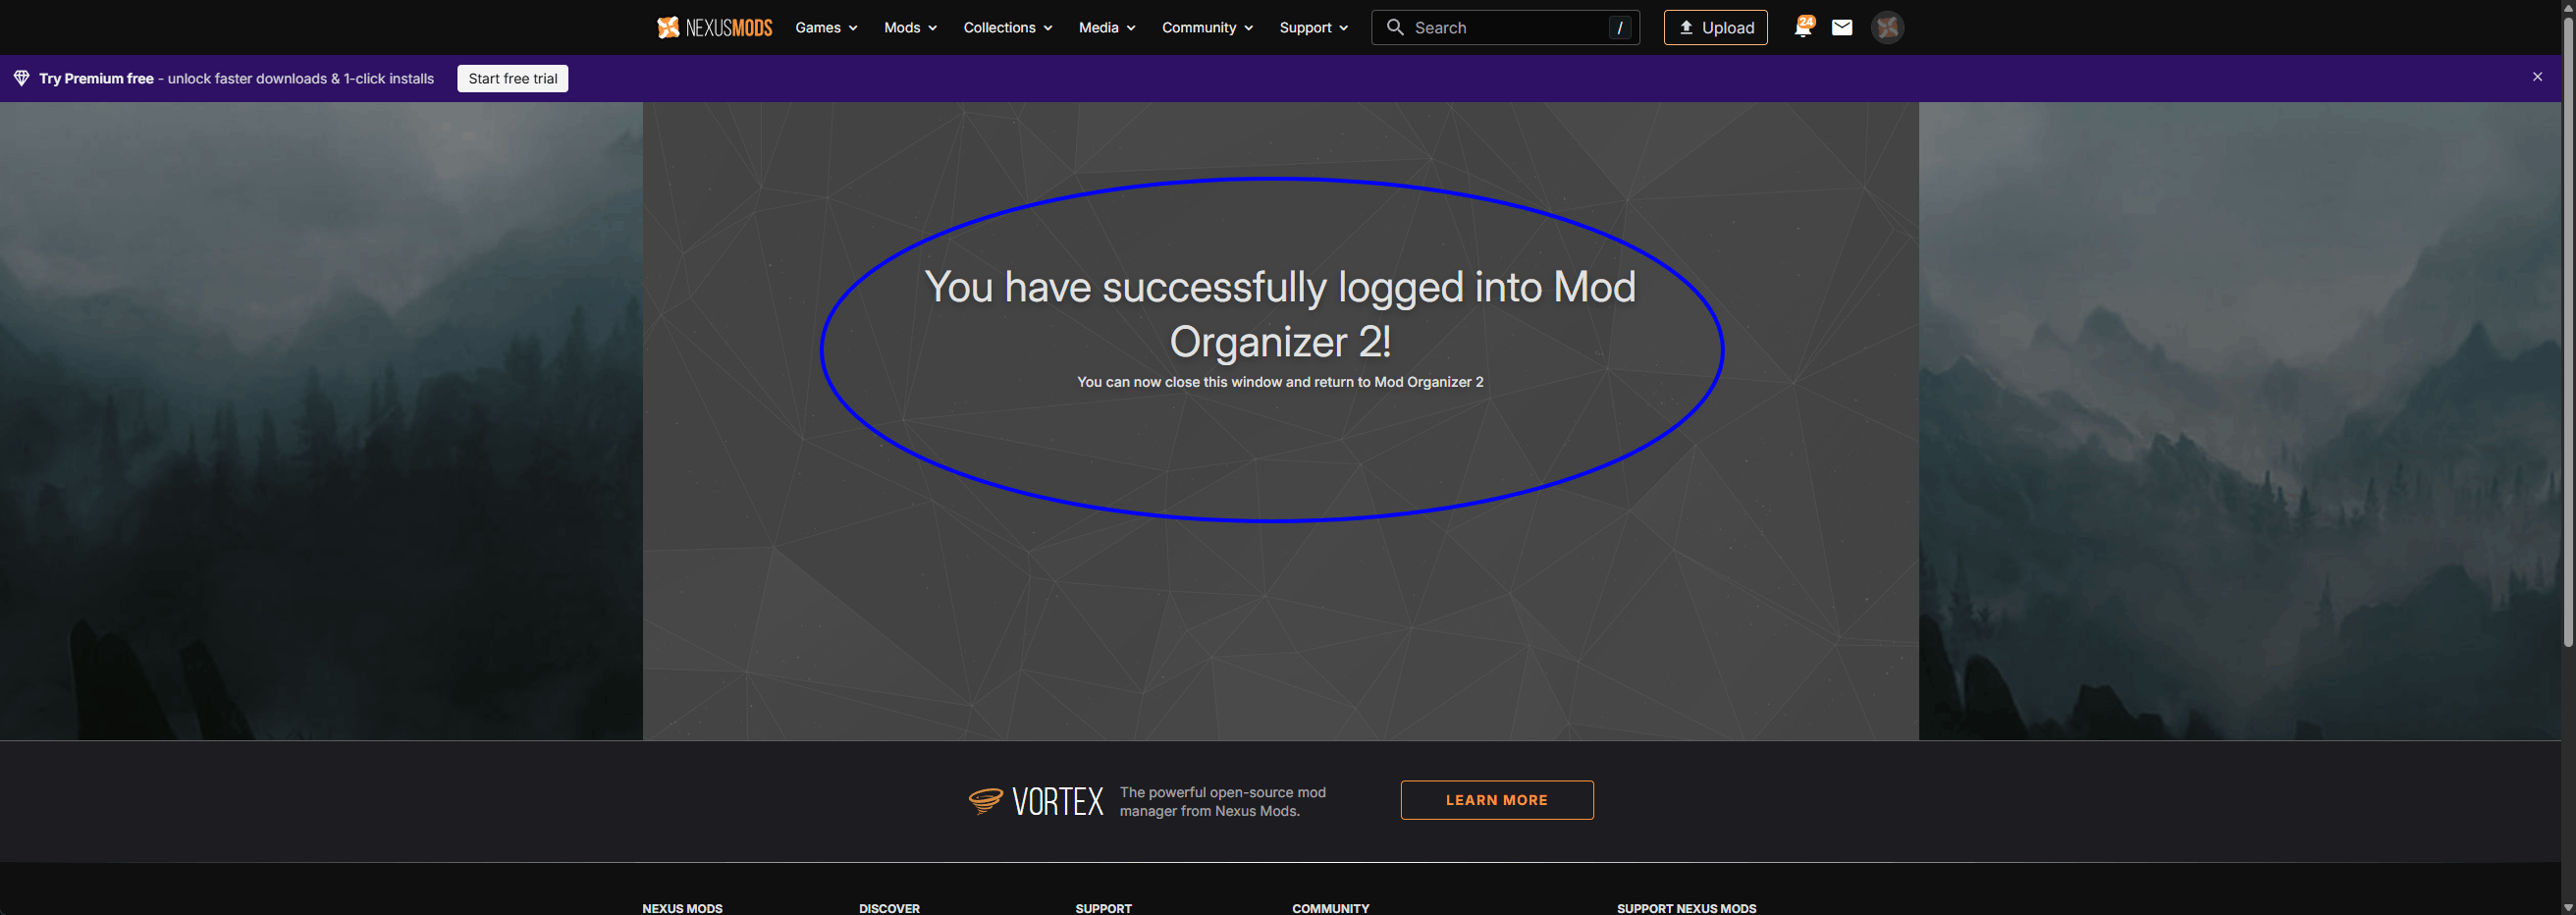
Une fois le message de succès affiché, vous pouvez fermer l'onglet du navigateur et revenir sur MO2.
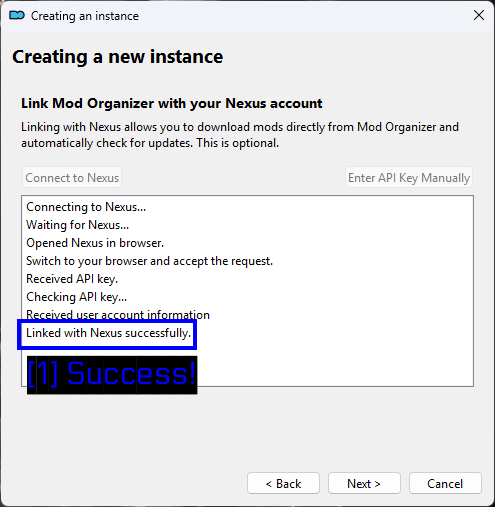
- Succès : MO2 consigne chaque étape et termine avec Linked with Nexus successfully. Cliquez sur Next.
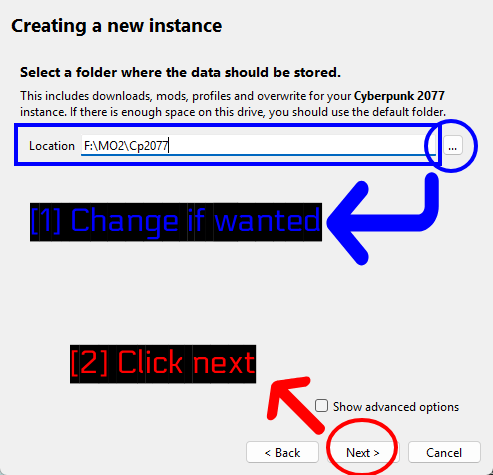
- Changez si souhaité : Ce dossier contient vos téléchargements, mods, profils et données d'overwrite pour l'instance. La valeur par défaut convient si le disque a de la place, sinon placez-le ailleurs où il y a de l'espace.
- Cliquez sur next : Continuez.
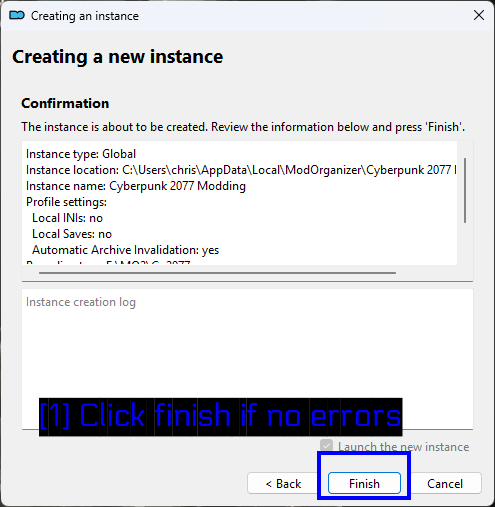
- Cliquez sur finish si aucune erreur : Vérifiez le résumé et cliquez sur Finish. Laissez Launch the new instance coché.
Dès le premier lancement, une invite de tutoriel apparaîtra également.
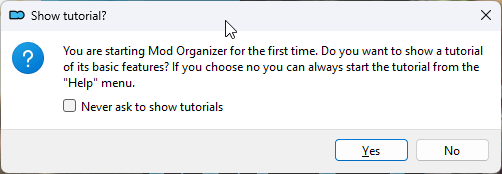
Si vous n'avez jamais utilisé MO2 auparavant, cliquez sur Yes. C'est court et cela explique l'interface mieux qu'une capture d'écran ne pourrait le faire.
L'interface de MO2
Voici à quoi ressemble MO2 une fois l'instance opérationnelle.
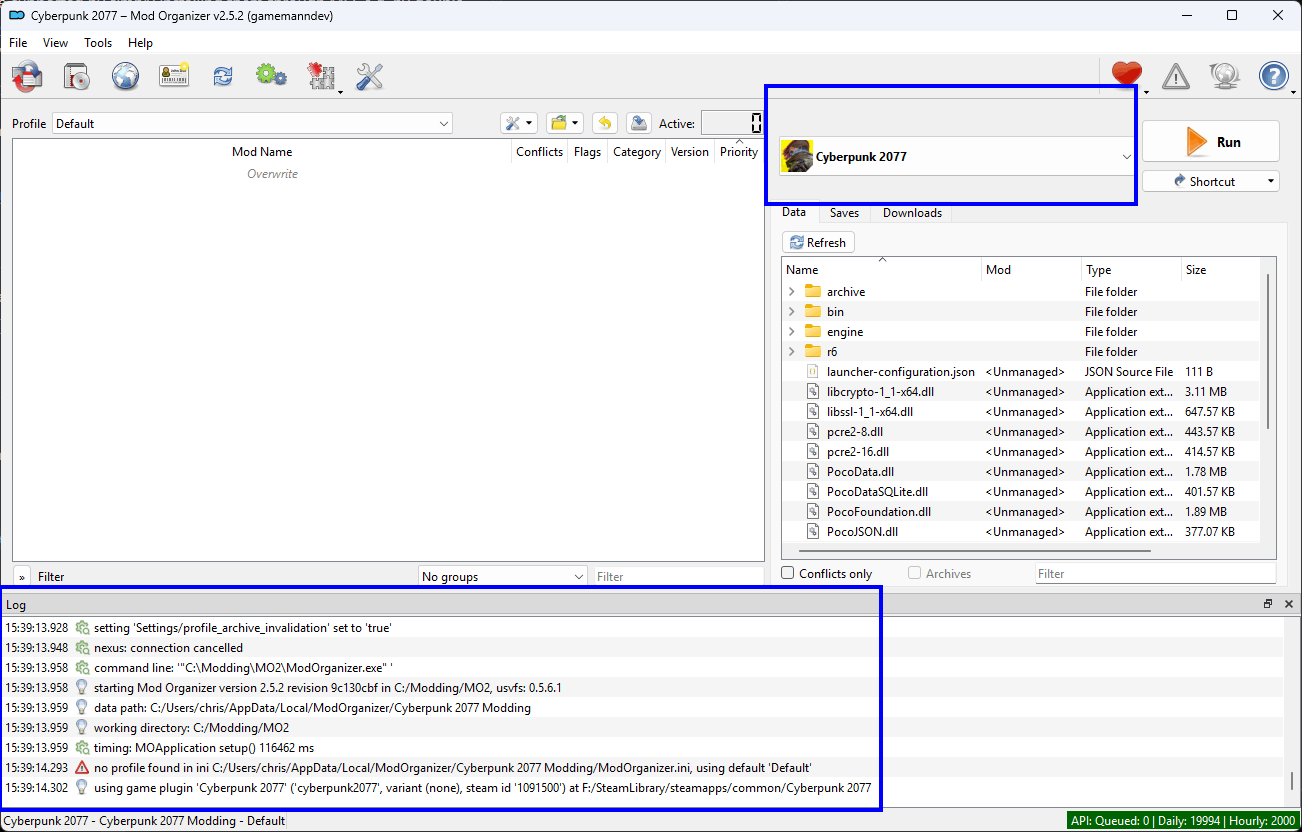
Le panneau de gauche contient votre liste de mods et leur ordre de priorité, le panneau de droite comporte les onglets Data, Saves et Downloads, et le menu déroulant en haut à droite détermine quel exécutable le bouton Run lance. Le panneau Log en bas est le premier endroit à consulter quand quelque chose ne fonctionne pas correctement - vous pouvez y voir la confirmation du plugin de jeu et du chemin d'installation.
Installer des mods manuellement (avancé)
Il vaut la peine de comprendre les installations manuelles même si vous utilisez un gestionnaire de mods. Les mods Cyberpunk sont généralement de simples dossiers qui reproduisent la structure de répertoires du jeu, donc une fois que vous l'avez fait une fois, il est difficile de se tromper.
Lisez les instructions d'installation du mod
Allez d'abord à la section Installation de la page du mod, à chaque fois.
Pour Better Loot Markers, il s'agit de CET v1.37.1+ et de tout extraire dans Cyberpunk 2077\bin\x64\plugins\cyber_engine_tweaks\mods\.
Téléchargement des fichiers
Utilisez le bouton Manual sur la page du mod plutôt que celui de Vortex.
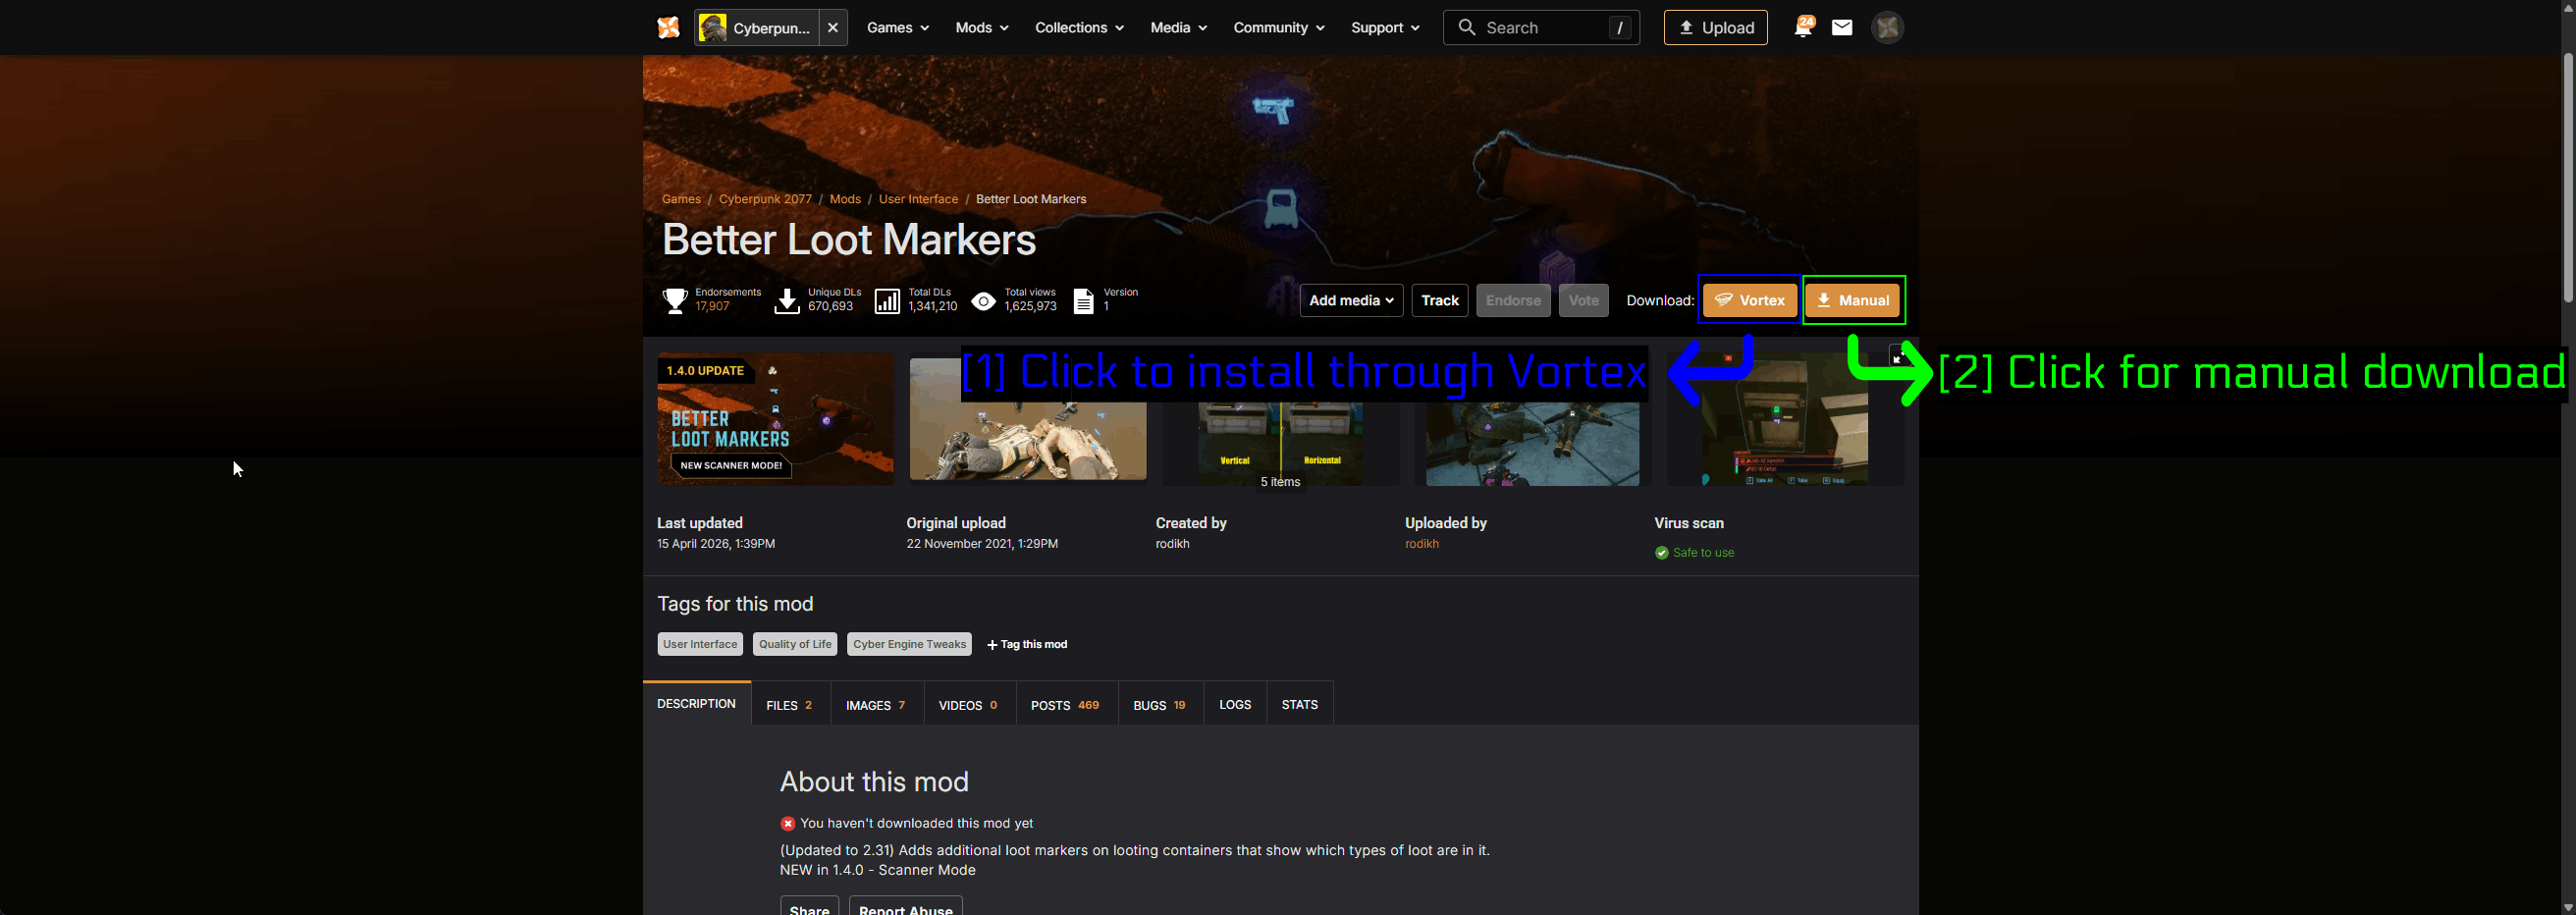
- Cliquez pour installer via Vortex : Pas celui-ci.
- Cliquez pour un téléchargement manuel : Celui-ci.
Une fenêtre de confirmation apparaîtra.
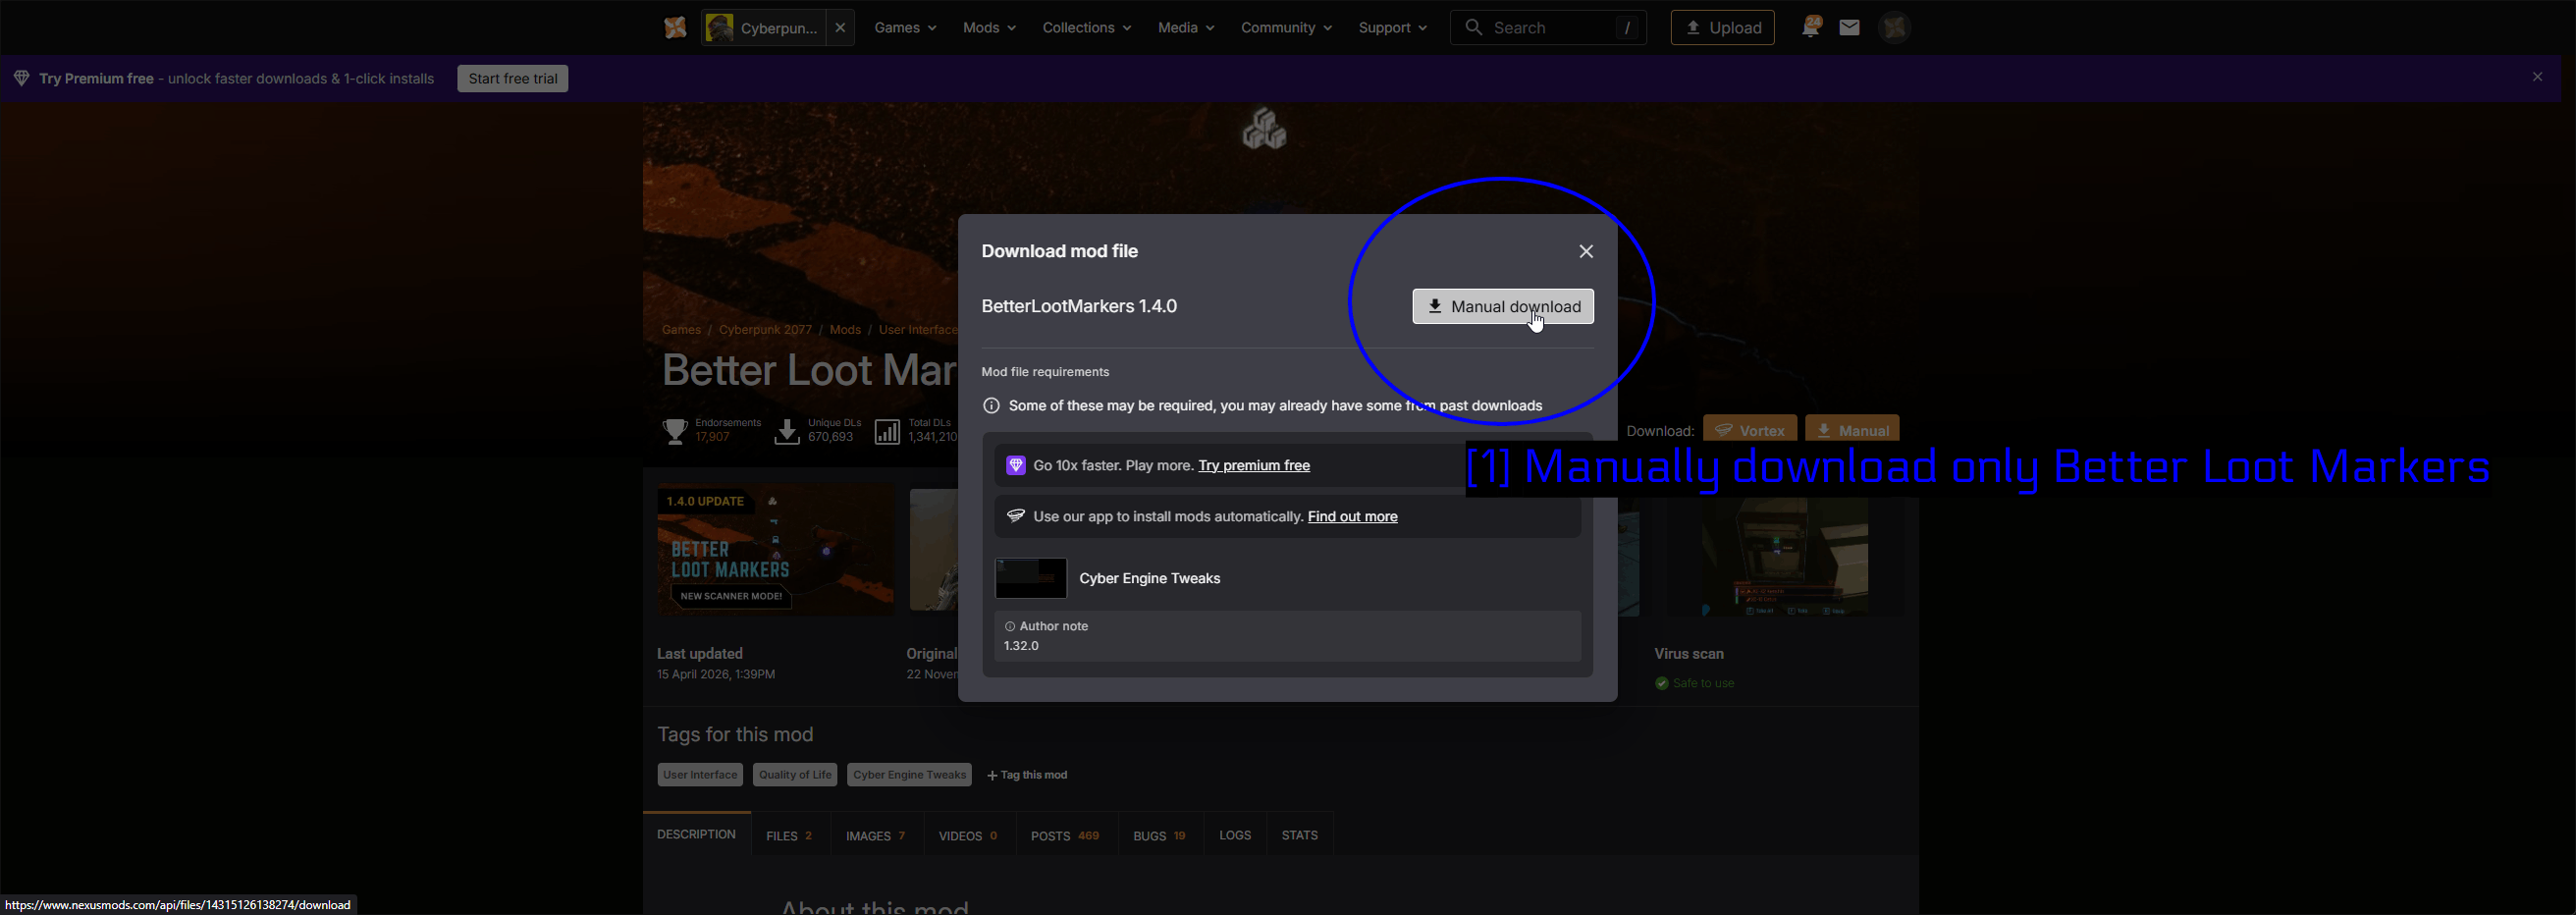
- Télécharger manuellement uniquement Better Loot Markers : Cliquez sur Manual download. Notez que cela ne télécharge que le mod lui-même - les prérequis listés en dessous ne sont pas inclus, vous devez donc télécharger CET séparément en suivant le même processus sur sa propre page de mod.
REMARQUE - Les comptes Nexus Mods gratuits ont un court délai avant le début du téléchargement et une vitesse plafonnée. C'est normal.
Copier les fichiers
Extrayez les deux archives avec 7-Zip. Vous remarquerez que chacune contient un unique dossier bin.
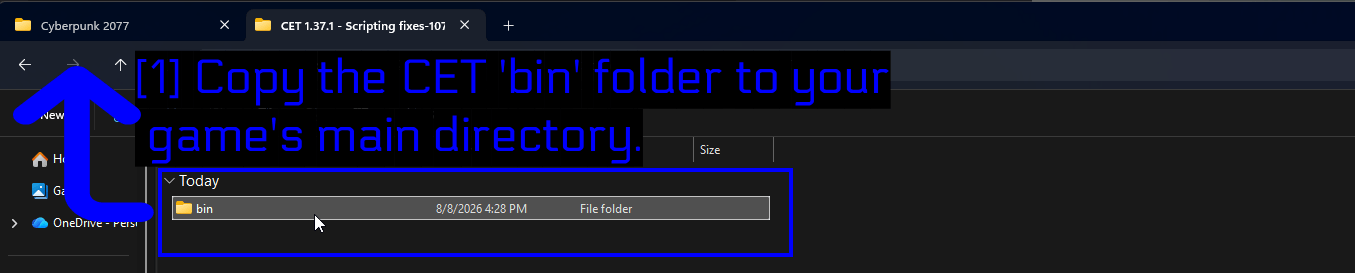
- Copiez le dossier 'bin' de CET dans le répertoire principal de votre jeu : C'est toute l'archive - juste un dossier
bin.
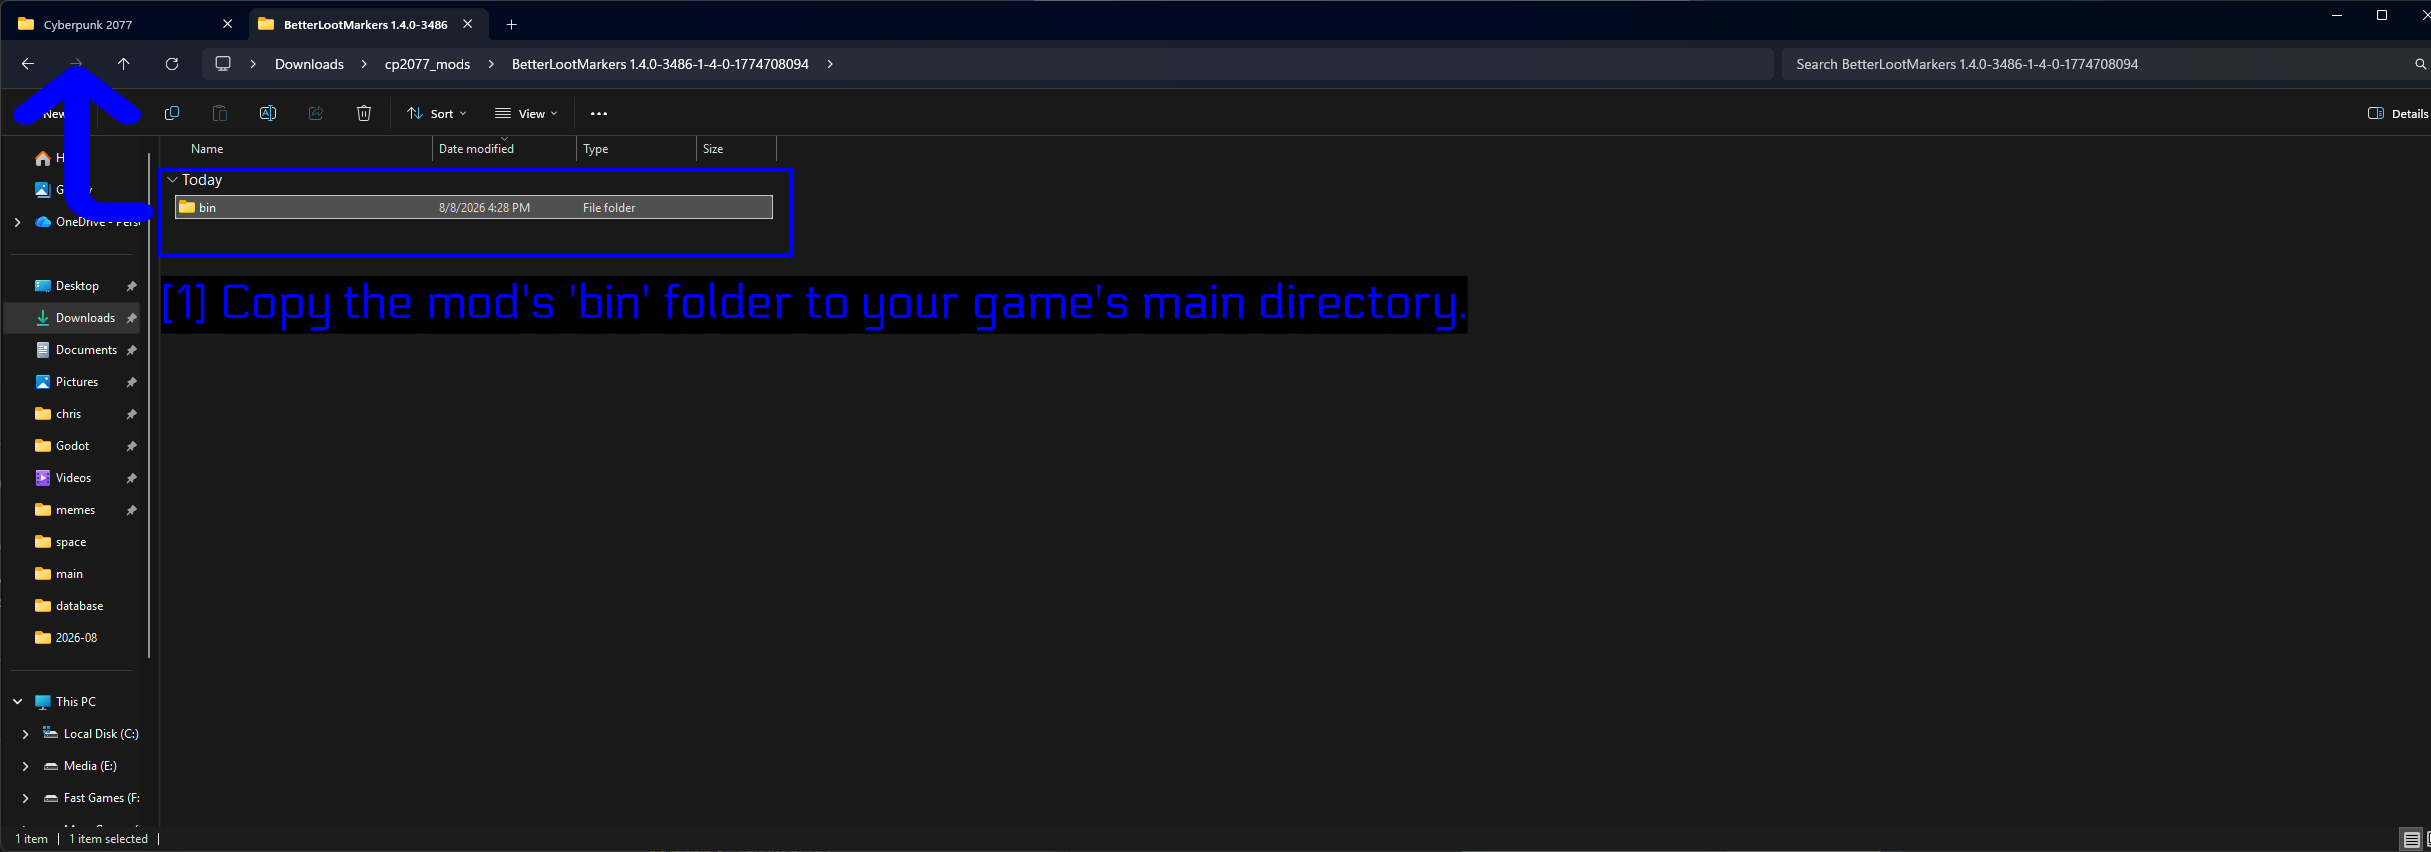
- Copiez le dossier 'bin' du mod dans le répertoire principal de votre jeu : Même procédé pour Better Loot Markers.
Ouvrez maintenant le répertoire de jeu de Cyberpunk 2077 - le dossier contenant archive, bin, engine, r6, et REDprelauncher.exe.
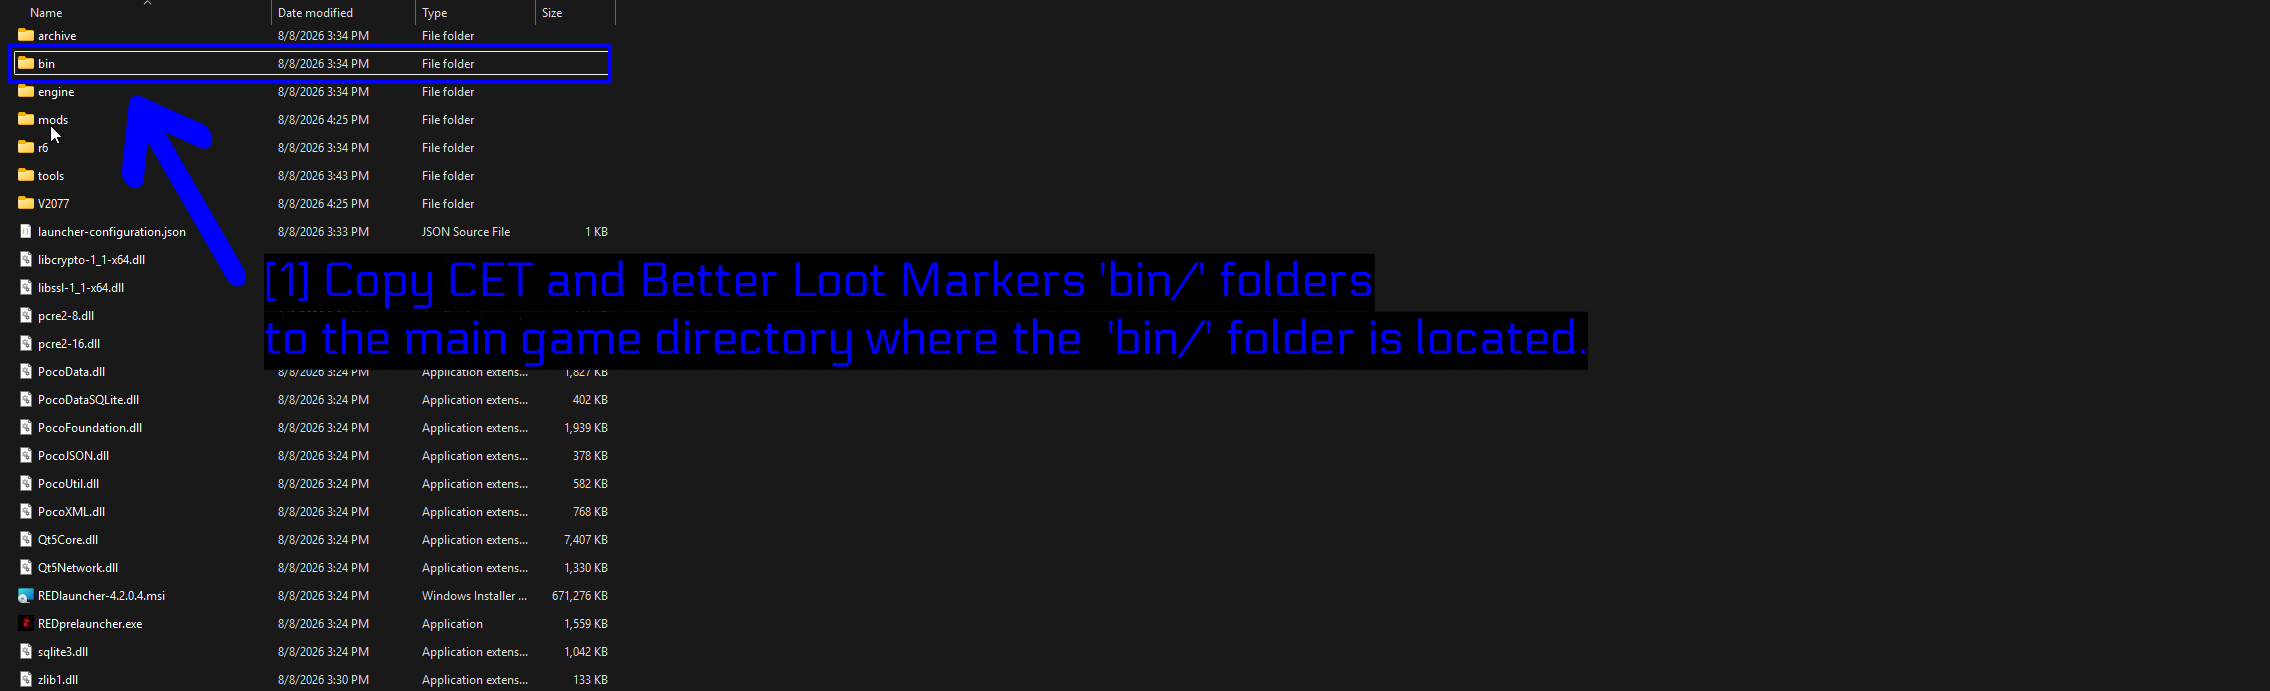
- Copiez les dossiers 'bin/' de CET et de Better Loot Markers dans le répertoire principal du jeu là où se trouve le dossier 'bin/' : Collez les deux dossiers
binici et laissez Windows les fusionner. Il vous demandera de confirmer le remplacement/la fusion du dossierbinexistant, ce qui est exactement ce que vous voulez.
ASTUCE - C'est pour cela que les archives sont structurées de cette façon. L'arborescence du mod reproduit celle du jeu, donc les fusionner place chaque fichier exactement là où il doit être. Ne renommez rien et n'essayez pas de faire les choses différemment - contentez-vous de fusionner.
Installez d'abord CET, lancez le jeu une fois pour que CET génère ses dossiers, puis ajoutez le mod. Cela fonctionnera dans les deux cas, mais cet ordre rend beaucoup plus évident quelle étape a posé problème si quelque chose ne va pas.
Vérifier que les fichiers sont bien arrivés
Après la fusion, vérifiez que CET est bien arrivé dans bin\x64\plugins\.
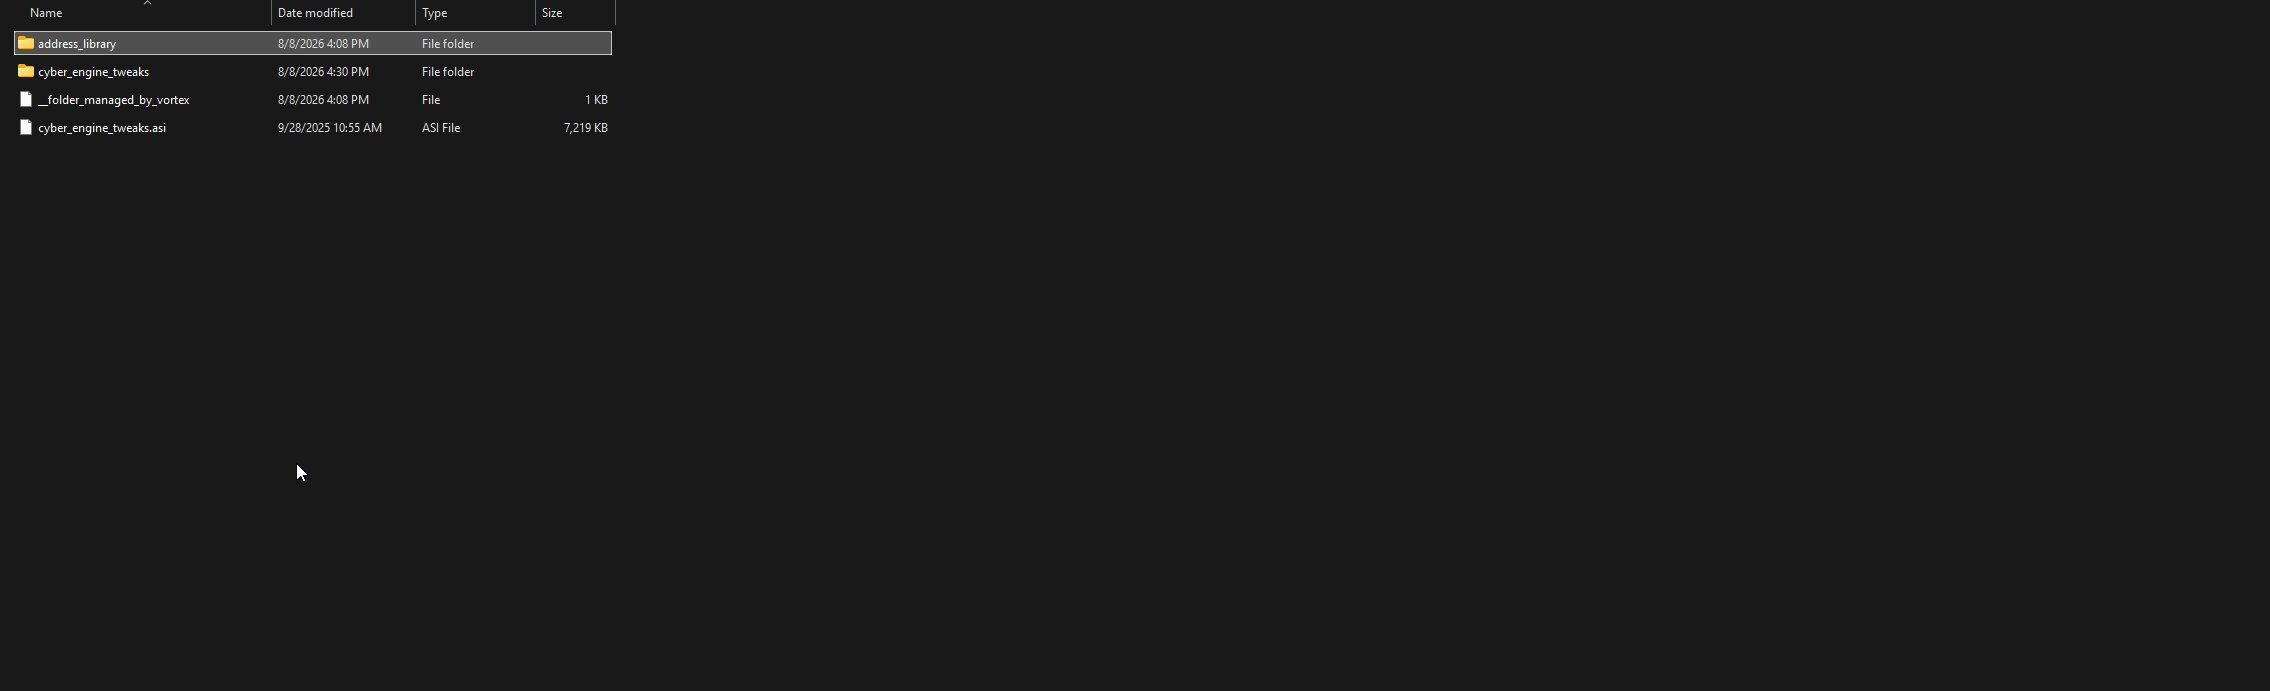
Vous devriez voir cyber_engine_tweaks.asi à côté d'un dossier cyber_engine_tweaks. Si le fichier .asi n'est pas là, CET ne se chargera pas, point final.
Vérifiez ensuite le mod lui-même.
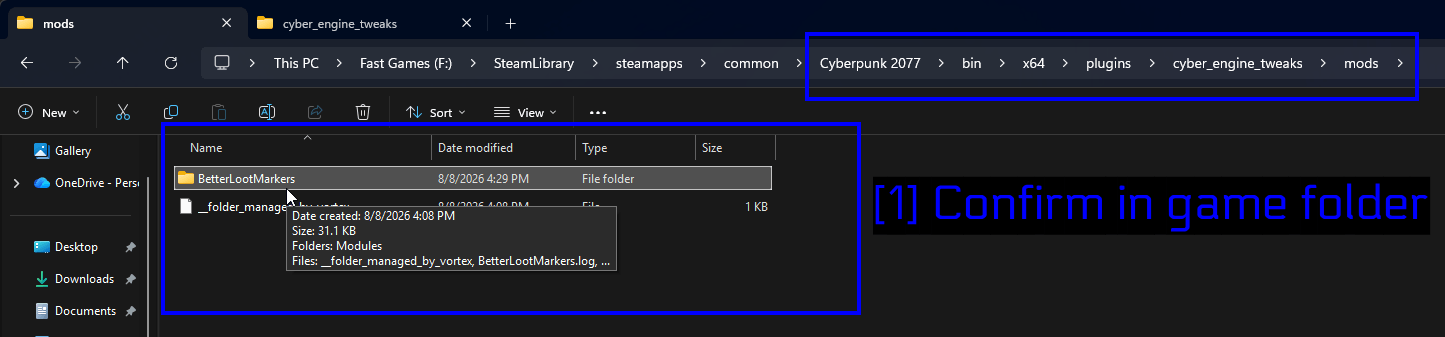
- Confirmer dans le dossier du jeu: Vous voulez un dossier
BetterLootMarkersà l'intérieur debin\x64\plugins\cyber_engine_tweaks\mods\. Notez le chemin complet dans la barre d'adresse - si votre mod s'est retrouvé ailleurs, il ne se chargera pas.
NOTE - Sur cette capture d'écran, vous pouvez également voir un fichier __folder_managed_by_vortex, qui indique simplement que Vortex gère ce dossier. Vous n'aurez pas ça sur une installation purement manuelle.
Activer les mods dans le REDlauncher
Quelle que soit la méthode utilisée, il y a un interrupteur qui piège beaucoup de monde. Le REDlauncher de CDPR possède une bascule pour les mods, et si elle est désactivée, vos mods ne se chargeront pas, peu importe à quel point ils sont correctement installés.
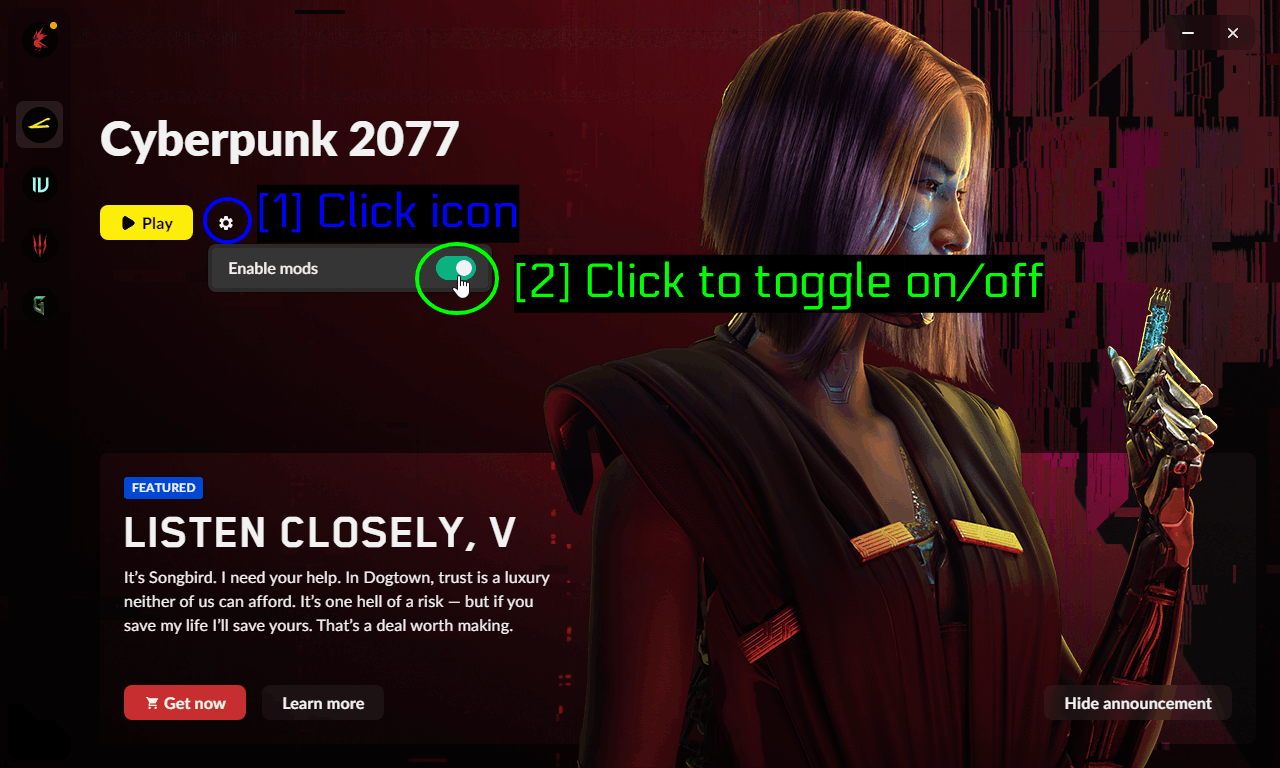
- Cliquez sur l'icône: Cliquez sur l'icône en forme d'engrenage à côté du bouton Play.
- Cliquez pour activer/désactiver: Assurez-vous que Enable mods est activé.
NOTE - Si vous lancez le jeu via l'outil Launch Game with REDmods Enabled de Vortex, cela est géré automatiquement pour vous.
Vérifier si vos mods se sont bien chargés
Lancez le jeu et appuyez sur votre raccourci CET une fois au menu principal ou en jeu.
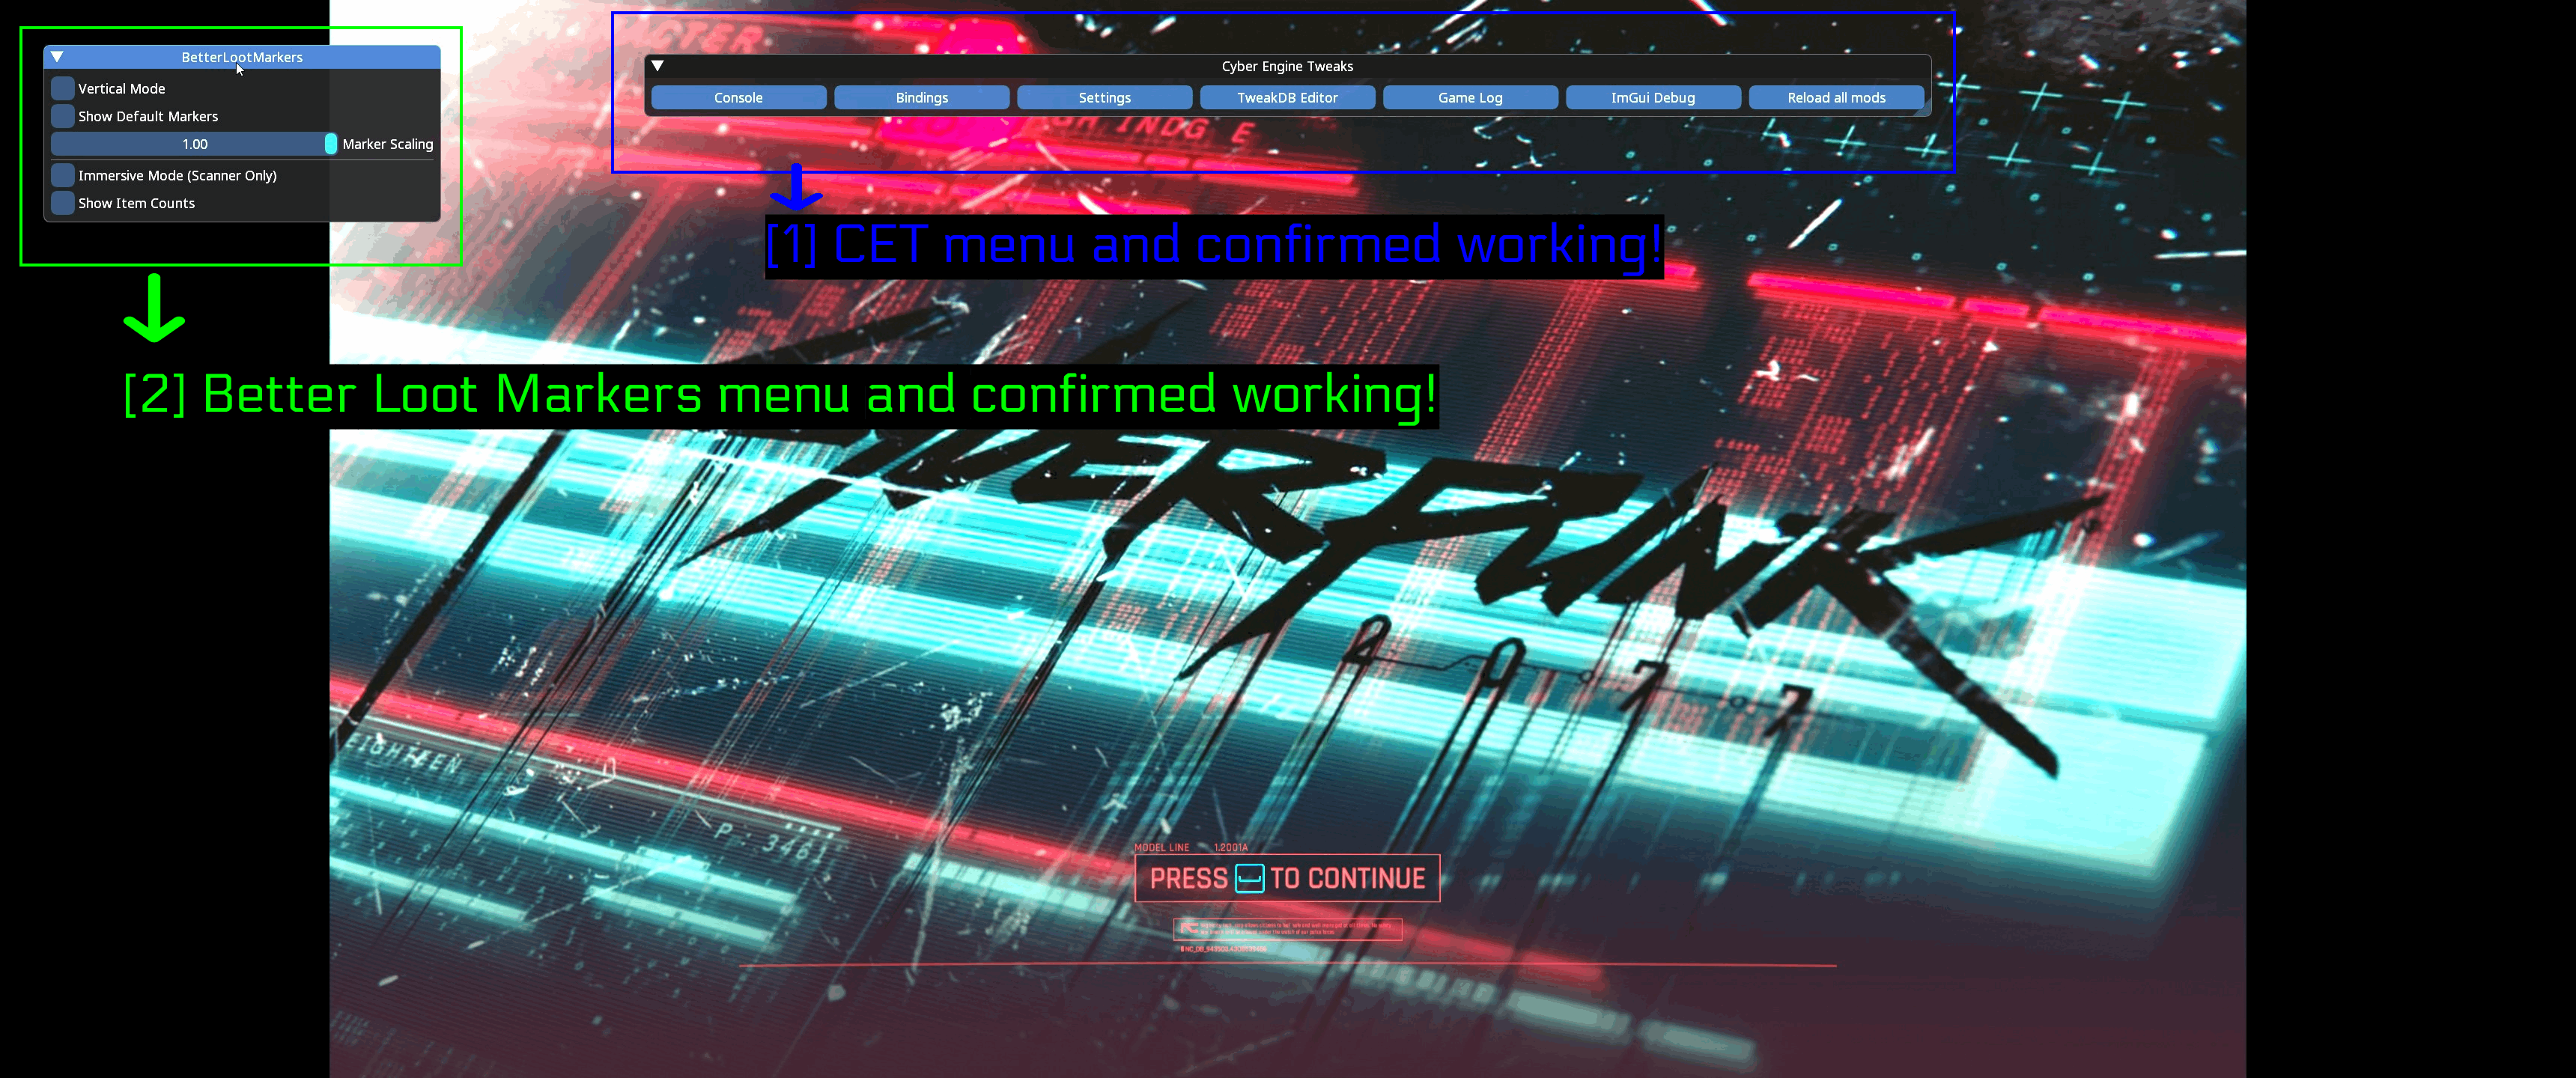
- Menu CET confirmé fonctionnel: La barre de Cyber Engine Tweaks apparaît avec Console, Bindings, Settings, TweakDB Editor, Game Log, ImGui Debug, et Reload all mods.
- Menu Better Loot Markers confirmé fonctionnel: La fenêtre de paramètres propre au mod apparaît dans un panneau séparé, avec les options listées sur la page du mod (Vertical Mode, Show Default Markers, Marker Scaling, Immersive Mode, Show Item Counts).
Cette seconde fenêtre est la véritable confirmation. Le chargement de CET prouve seulement que le framework fonctionne - voir apparaître le panneau du mod signifie que le mod lui-même a bien été trouvé et chargé.
Dépannage
Le menu CET ne s'ouvre pas
C'est le problème le plus courant, et il s'agit généralement de l'une de ces causes.
- Vous jouez en mode Plein écran. Passez en Sans bordure ou Fenêtré.
- Vous n'avez jamais assigné de raccourci, ou vous en avez assigné un que votre disposition de clavier ne produit pas. Les choix par défaut habituels sont
`,F10, et*. - Le Microsoft Visual C++ Redistributable n'est pas installé.
- Une overlay bloque les entrées. Steam, Discord et GeForce Experience sont les suspects habituels.
Pour l'overlay Steam en particulier, faites un clic droit sur le jeu dans votre bibliothèque.
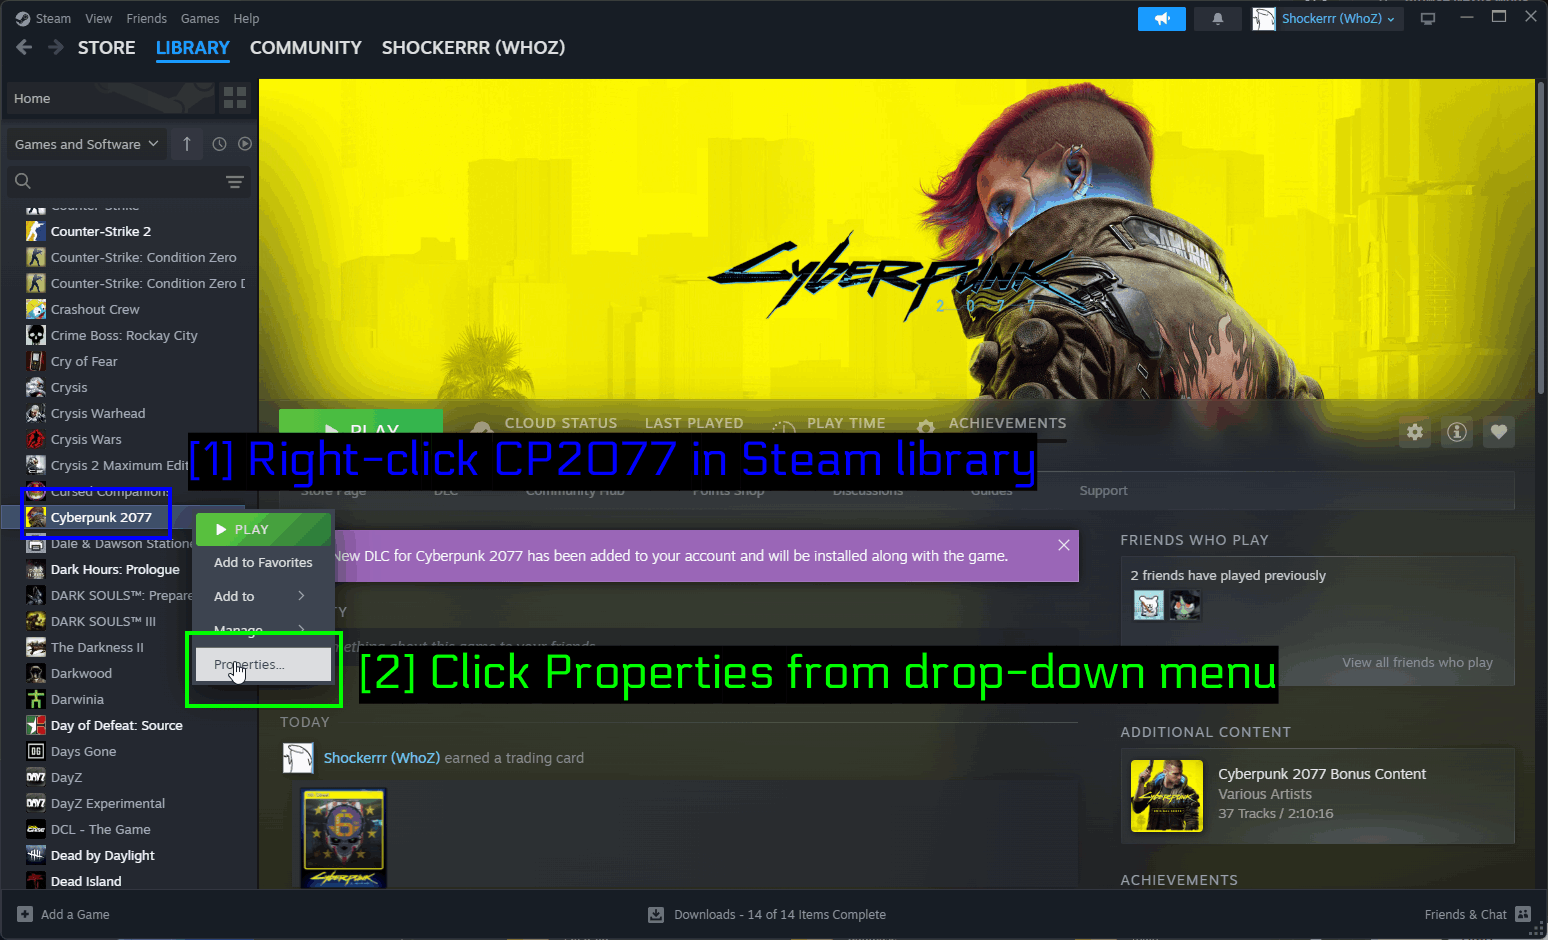
- Clic droit sur CP2077 dans la bibliothèque Steam: Trouvez Cyberpunk 2077 et faites un clic droit dessus.
- Cliquez sur Propriétés dans le menu déroulant: Choisissez Propriétés.
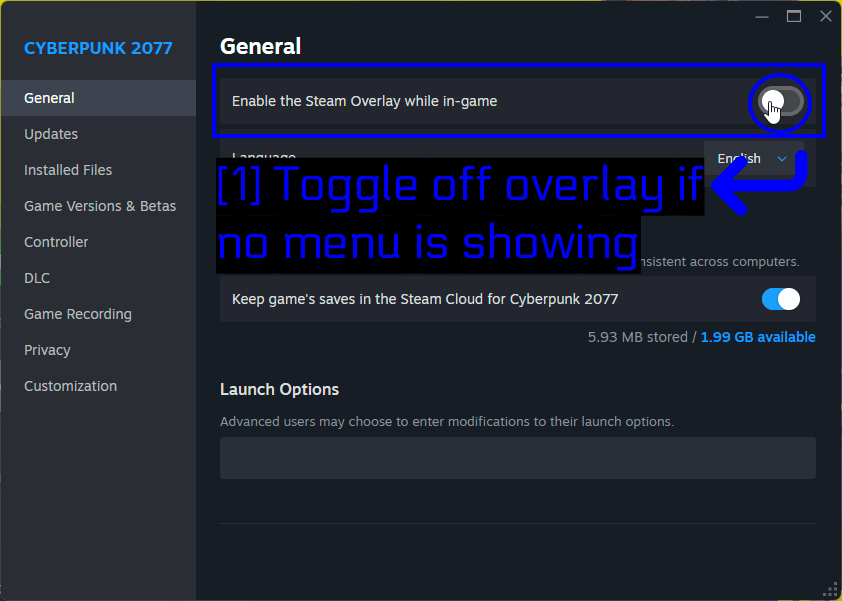
- Désactivez l'overlay si aucun menu ne s'affiche: Désactivez Enable the Steam Overlay while in-game sous General.
Personnellement, je n'ai pas eu besoin de désactiver d'overlay pour faire fonctionner CET, mais suffisamment de gens y ont été confrontés pour que ça vaille le coup d'essayer si vous êtes bloqué.
Lire les logs de CET
Si CET refuse toujours de coopérer, allez consulter ses logs. Dans Vortex, vous pouvez faire un clic droit sur le mod CET et choisir Open in File Manager, ou naviguer vous-même jusqu'à bin\x64\plugins\cyber_engine_tweaks\.
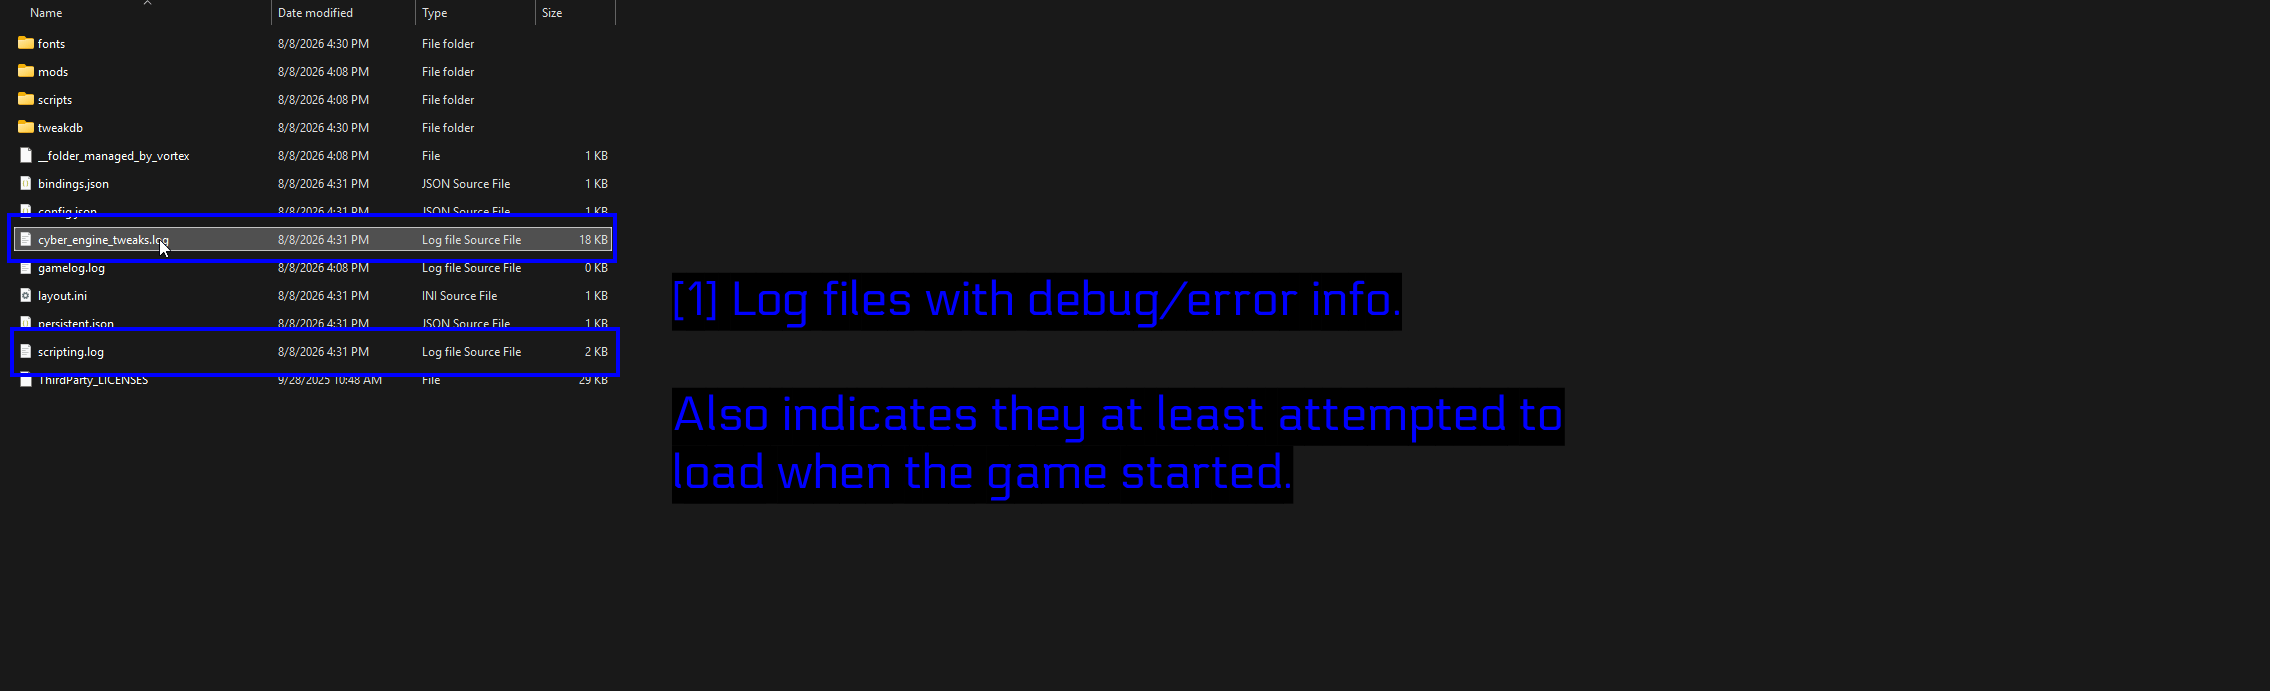
- Fichiers de logs avec infos de debug/erreurs:
cyber_engine_tweaks.logetscripting.logsont les deux fichiers à consulter. Ouvrez-les dans n'importe quel éditeur de texte et cherchez les erreurs.
L'astuce utile ici, c'est que l'existence même des logs vous apprend quelque chose. S'ils sont présents et récemment modifiés, CET a au moins tenté de se charger au démarrage du jeu, ce qui pointe vers un problème de configuration plutôt qu'un CET qui ne s'exécute jamais. S'il n'y a aucun fichier de log, CET n'est pas injecté - retournez vérifier que cyber_engine_tweaks.asi se trouve bien dans bin\x64\plugins\.
Problèmes généraux
- Le jeu plante au démarrage. Désactivez vos mods les plus récemment ajoutés et réactivez-les un par un. Le statut Disabled de Vortex rend cela facile.
- Tout a cassé après une mise à jour du jeu. Les patchs de Cyberpunk cassent régulièrement CET et les mods de scripts. Attendez que les frameworks se mettent à jour, puis mettez à jour vos mods.
- Un mod ne fait rien. Revérifiez ses prérequis, puis vérifiez la bascule Enable mods du REDlauncher.
- Les mods fonctionnent via Vortex mais plus après avoir déplacé votre dossier de staging. Réinstallez-les. Déplacer le dossier ne suffit pas toujours à lui seul.
- Vous avez besoin d'aide. Le REDmodding Discord est actif et serviable. Apportez vos logs.
Notes
- Nous ne sommes pas affiliés à Nexus Mods, CD Projekt Red, ni à l'équipe de Cyber Engine Tweaks. Ce guide a été réalisé de manière indépendante pour aider les gens à démarrer.
- Tout ce qui est présenté ici était exact au moment de la rédaction. Cyberpunk, Vortex, MO2 et CET sont tous mis à jour régulièrement, donc une capture d'écran ou deux peuvent devenir obsolètes.
- Ne mélangez pas les gestionnaires de mods. Choisissez Vortex ou MO2 et tenez-vous-y - avoir les deux qui gèrent la même installation est le moyen le plus rapide de casser votre jeu.
Voir aussi !
- Nexus Mods - Cyberpunk 2077
- Cyber Engine Tweaks
- Better Loot Markers
- REDmodding Wiki
- REDmod (Support de Modding Officiel)
- Mod Organizer 2 sur GitHub
- Comment Télécharger & Installer Vortex
- Comment Utiliser Vortex & Les Bases
- Discord de Modding Cyberpunk 2077
Conclusion
C'est tout ! Vous devriez maintenant avoir CET qui fonctionne, Better Loot Markers installé via la méthode qui vous convient, et une bonne compréhension de pourquoi les mods Cyberpunk sont structurés de cette façon.
En résumé - utilisez Vortex à moins d'avoir une raison spécifique de ne pas le faire, installez les frameworks que vos mods demandent avant les mods eux-mêmes, et n'oubliez pas que le bouton Enable mods du REDlauncher existe.
Les guides que nous créons sont toujours ouverts aux modifications et améliorations, donc si vous avez des suggestions ou remarquez des problèmes, n'hésitez pas à contribuer en créant une pull request sur notre dépôt GitHub !
Rejoignez notre serveur Discord si vous avez des questions ou besoin d'aide concernant le modding ou nos guides !