

Un guide complet sur comment télécharger et installer des mods dans Grand Theft Auto V (GTA V) sur PC. Le guide est écrit pour Windows, même si j'ai réussi à faire charger des mods sur mon portable Linux via Proton et Wine. Nous n'avons inclus des instructions détaillées avec captures d'écran que pour l'édition legacy du jeu. Cependant, nous avons aussi ajouté des notes pour Enhanced, que vous pouvez retrouver ici !
Pour être honnête, je n'ai jamais vraiment été fan des missions solo de GTA. Ce qui m'a réellement fait revenir ces 13-14 dernières années, c'est de m'amuser dans le monde ouvert avec des mods, aussi bien sur GTA IV que sur GTA V. Rentrer du lycée et lancer les jeux avec des mods reste l'un de ces souvenirs qui m'est resté. J'ai même fait quelques vidéos de mods à l'époque qui ont plutôt bien marché, dont une sur un mod Zombie Infection.
Prérequis
- Une copie PC de GTA V (Steam, Epic Games, ou Rockstar Games Launcher).
- 7-Zip ou tout autre logiciel d'extraction d'archives.
- .NET Framework 4.8 - nécessaire pour ScriptHookV .NET (couvert plus bas).
- Microsoft Visual C++ Redistributable (x64).
- Une compréhension basique de comment copier et déplacer des fichiers sous Windows.
ATTENTION - Ne chargez jamais de mods dans GTA Online. Rockstar bannit pour ça et ils ne se soucient pas que vous ayez seulement voulu les utiliser en solo. Script Hook V ferme d'ailleurs automatiquement le jeu s'il détecte le mode Online, ce qui est un bon filet de sécurité, mais ne comptez pas dessus - gardez votre installation moddée pour le solo uniquement.
NOTE - Depuis mars 2025, il existe deux versions PC distinctes de GTA V - Legacy (l'originale) et Enhanced. Ce guide cible Legacy, qui est celle que la grande majorité des mods ciblent encore. Nexus Mods les sépare même en pages de jeu distinctes, donc vérifiez bien sous quelle version un mod est listé avant de le télécharger. Consultez Legacy vs Enhanced pour savoir ce qui change si vous êtes sur Enhanced.
Sauvegardez vos fichiers
Avant de toucher à quoi que ce soit, sauvegardez votre dossier de jeu et vos sauvegardes. Le modding de GTA V implique de placer des fichiers .dll et .asi directement dans le répertoire du jeu, et un mauvais fichier peut empêcher le jeu de se lancer complètement.
Voici les chemins courants vers le dossier du jeu.
- Steam :
C:\Program Files (x86)\Steam\steamapps\common\Grand Theft Auto V - Epic Games :
C:\Program Files\Epic Games\GTAV - Rockstar :
C:\Program Files\Rockstar Games\Grand Theft Auto V
Vos sauvegardes solo se trouvent ici.
C:\Users\<user>\Documents\Rockstar Games\GTA V\Profiles
ASTUCE - Plutôt que de copier tout le dossier du jeu de plus de 100 Go, copiez simplement les fichiers isolés à la racine (les fichiers .dll, .asi, .exe et .txt). Ce sont ceux que les mods modifient, et Steam/Epic peuvent vérifier l'installation du jeu pour vous si quelque chose tourne vraiment mal.
Script Hook V
Script Hook V est une bibliothèque qui permet aux utilisateurs de créer et d'utiliser des mods via les fonctions de script natives de GTA V dans des plugins ASI personnalisés. C'est la bibliothèque la plus populaire d'après ce que j'ai pu constater pour les mods GTA V. Elle ferme aussi automatiquement GTA V si elle détecte le mode GTA V Online, pour éviter de le lancer accidentellement avec des mods activés, ce qui est pratique.
De nombreux mods, y compris ceux que nous allons installer dans ce guide, nécessitent Script Hook V, c'est pourquoi nous abordons ce point avant d'en installer aucun. Beaucoup de mods dépendent de Script Hook V et de ses fonctions pour fonctionner correctement.
Comment installer ScriptHookV
Rendez-vous sur la page officielle de Script Hook V.
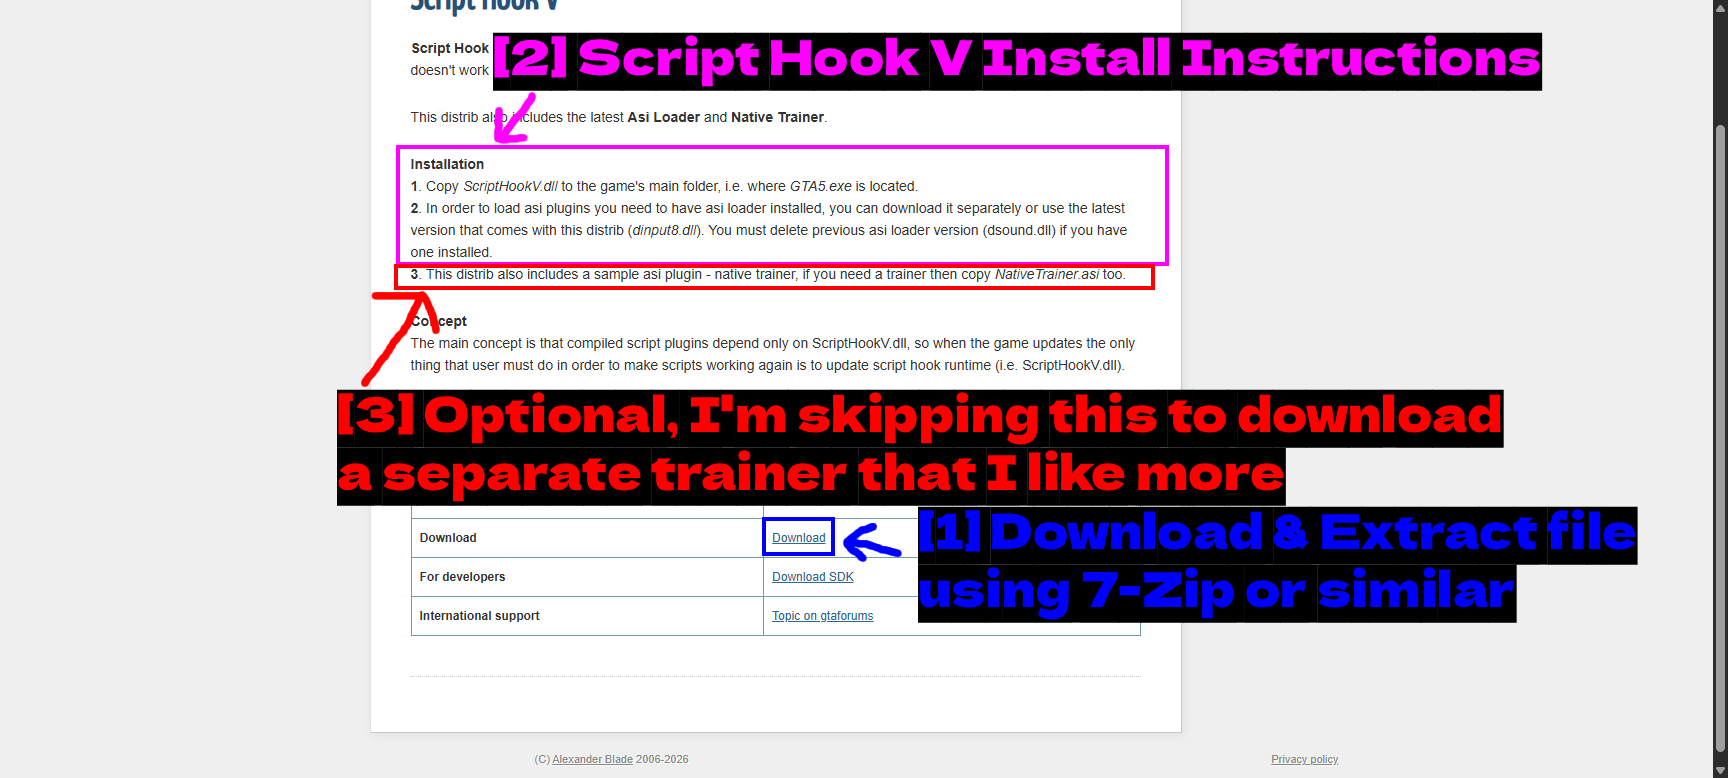
- Téléchargez et extrayez le fichier avec 7-Zip ou similaire : Prenez le lien Download en bas de la page et extrayez l'archive.
- Instructions d'installation de Script Hook V : Les étapes d'installation de l'auteur lui-même, qui valent la lecture. Copiez
ScriptHookV.dlldans le dossier principal du jeu (là où se trouveGTA5.exe), et utilisez ledinput8.dllinclus comme chargeur ASI. Si vous avez déjà un ancien chargeur ASI (dsound.dll), supprimez-le d'abord. - Native Trainer : Je vais installer un trainer séparé appelé « Simple Trainer », que je préfère à celui intégré.
- Techniquement vous pouvez installer les deux, mais ils utilisent les mêmes raccourcis clavier (si je me souviens bien), ce qui fait que les deux menus s'ouvrent et se superposent.
- Vous pouvez changer les raccourcis clavier dans le fichier de configuration du trainer si nécessaire.
- ATTENTION : Si vous comptez changer les raccourcis clavier, vous devrez rechercher le code de touche virtuel de la touche voulue et définir ce numéro dans le fichier de configuration. Lisez Virtual Keys pour plus d'infos !
Une fois extraits, copiez les fichiers dans votre dossier GTA V.
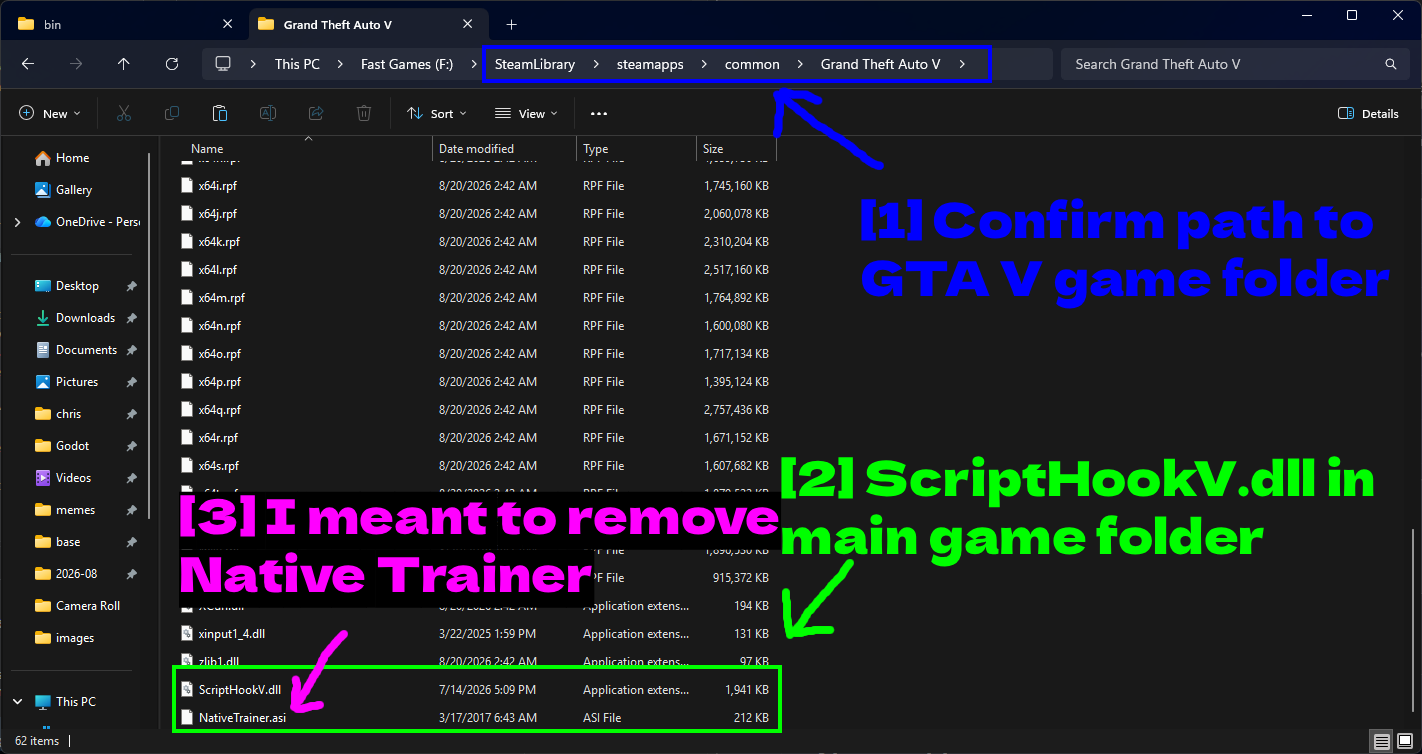
- Confirmez le chemin vers le dossier du jeu GTA V : Assurez-vous d'être à la racine du dossier du jeu, celui contenant tous les fichiers
.rpfetGTA5.exe. - ScriptHookV.dll dans le dossier principal du jeu : La bibliothèque elle-même, placée aux côtés des fichiers du jeu.
- Je voulais retirer Native Trainer, oups :
NativeTrainer.asia aussi été copié ici. Si vous prévoyez d'utiliser un autre trainer (comme nous le faisons), vous pouvez supprimer celui-ci sans risque pour éviter que deux trainers ne se disputent les mêmes raccourcis.
NOTE - Script Hook V doit correspondre à la version de votre jeu. Après une mise à jour de GTA V, il cessera de fonctionner jusqu'à ce qu'Alexander Blade publie une nouvelle version, et tous vos mods de script cesseront alors de fonctionner avec lui. C'est normal et c'est la raison la plus fréquente pour laquelle les mods cassent.
Autres plugins
Script Hook V seul ne gère que les plugins ASI écrits en C++. La plupart des mods que vous voudrez réellement utiliser nécessitent aussi un ou plusieurs des plugins ci-dessous, il vaut donc mieux les installer dès le départ.
Script Hook V Nightly
Quand Rockstar met à jour GTA V, la version officielle de Script Hook V casse et vous devez attendre une mise à jour. Les builds Nightly sont des versions maintenues par la communauté qui sont mises à jour beaucoup plus rapidement, et c'est ce que beaucoup de gens utilisent aujourd'hui, surtout depuis l'arrivée de BattlEye.
Comment installer ScriptHookV Nightly
Les builds Nightly sont fournies avec leur propre readme, et ça vaut le coup de le lire car l'installation diffère légèrement de celle officielle.
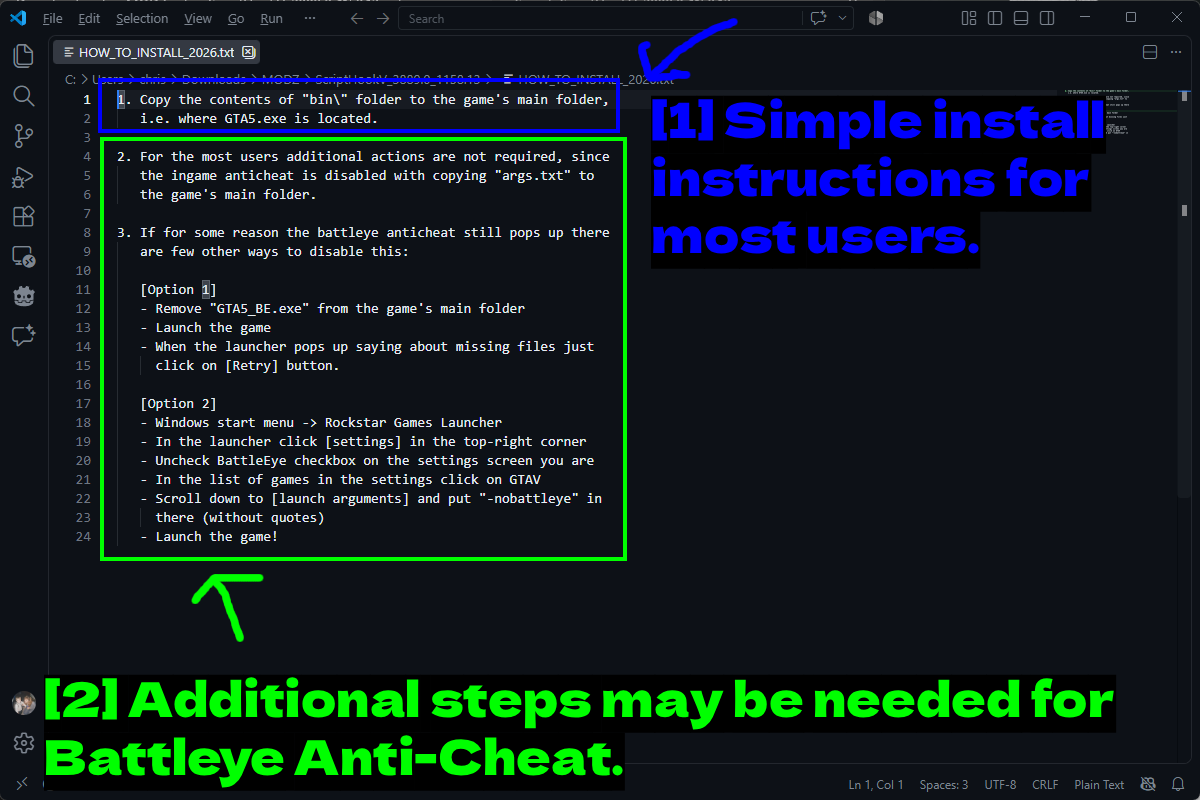
- Instructions d'installation: Copiez le contenu du dossier
bin\dans le dossier principal du jeu (là où se trouveGTA5.exe). Pour la plupart des gens, c'est tout. L'anticheat en jeu est généralement désactivé par le fichierargs.txtinclus. - Si l'anti-triche BattlEye est activé: Si BattlEye apparaît quand même, le readme vous donne deux options. Soit retirer
GTA5_BE.exedu dossier du jeu et cliquer sur Réessayer quand le launcher se plaint de fichiers manquants, soit ouvrir le Rockstar Games Launcher, aller dans Paramètres, décocher la case BattlEye sous GTA V, et ajouter-nobattleyeaux arguments de lancement.
NOTE - Les builds Nightly remplacent le ScriptHookV.dll officiel plutôt que de coexister avec lui. N'essayez pas de faire tourner les deux.
ScriptHookV DotNet
Community Script Hook V .NET (généralement abrégé en SHVDN) est un plugin ASI qui permet d'écrire des mods en C# et dans d'autres langages .NET. Un très grand nombre des mods GTA V les plus populaires sont des mods .NET, y compris le mod Crazy Drivers que nous installerons plus tard.
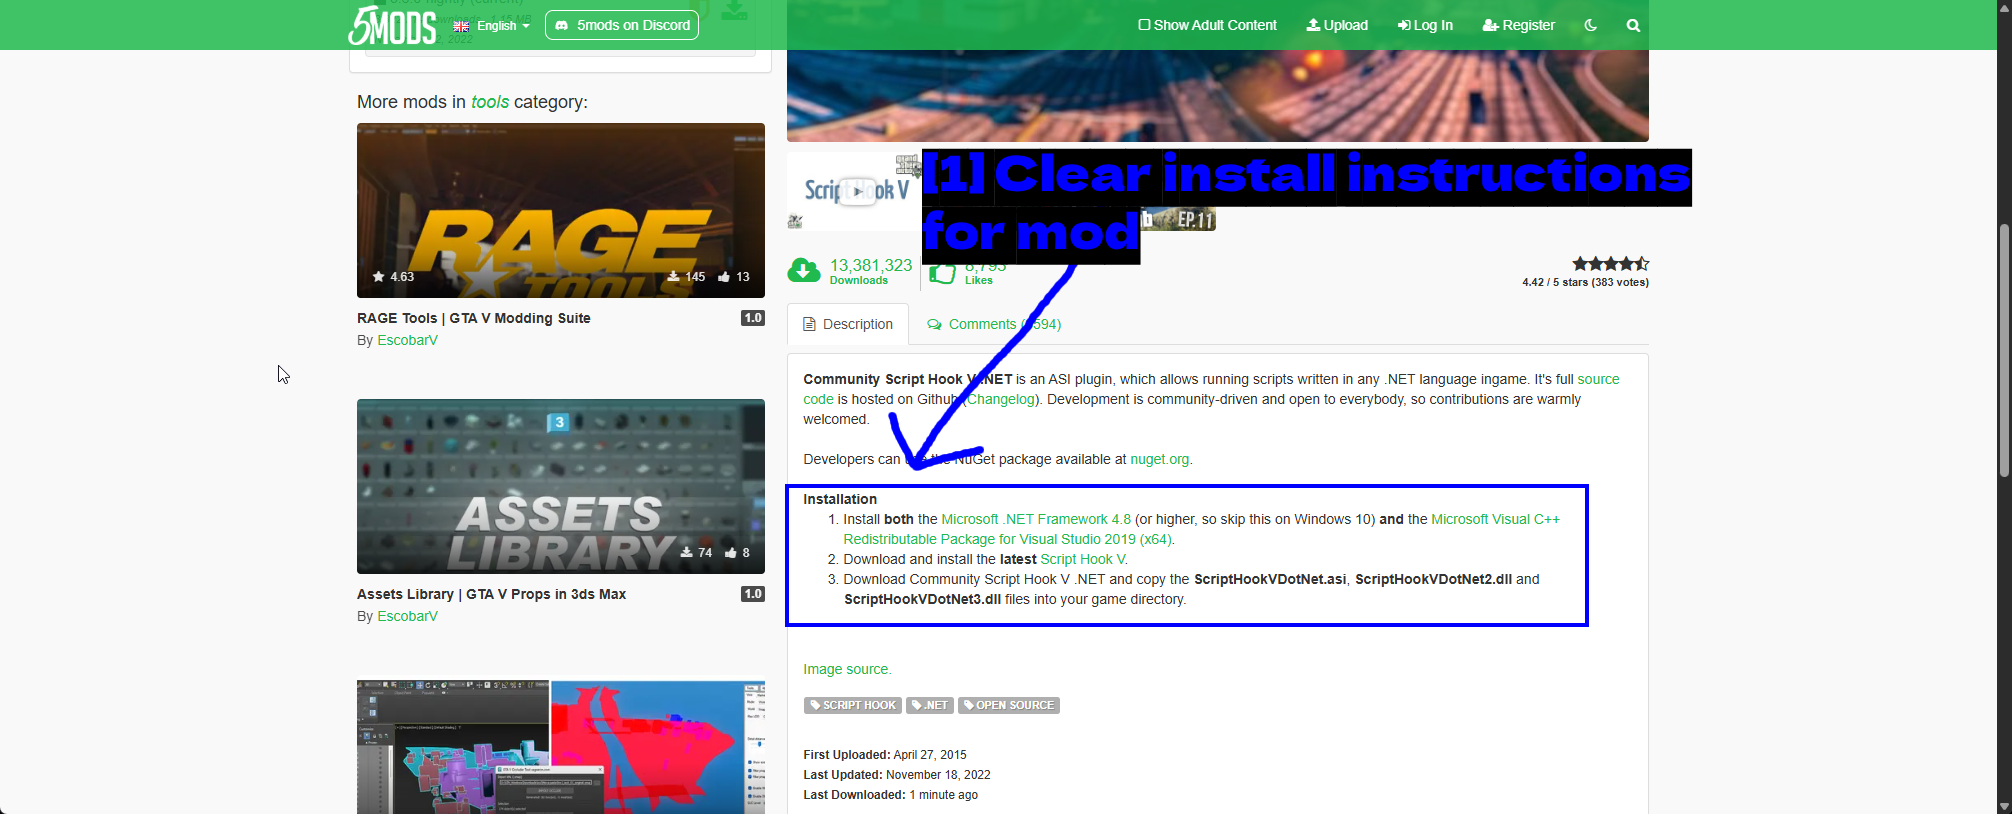
- Instructions d'installation: La page 5mods détaille les trois prérequis - .NET Framework 4.8, le Visual C++ Redistributable pour Visual Studio 2019 (x64), et la dernière version de Script Hook V. Ensuite, vous copiez
ScriptHookVDotNet.asi,ScriptHookVDotNet2.dlletScriptHookVDotNet3.dlldans le dossier de votre jeu.
Si vous n'avez pas déjà .NET Framework 4.8, récupérez-le d'abord chez Microsoft.
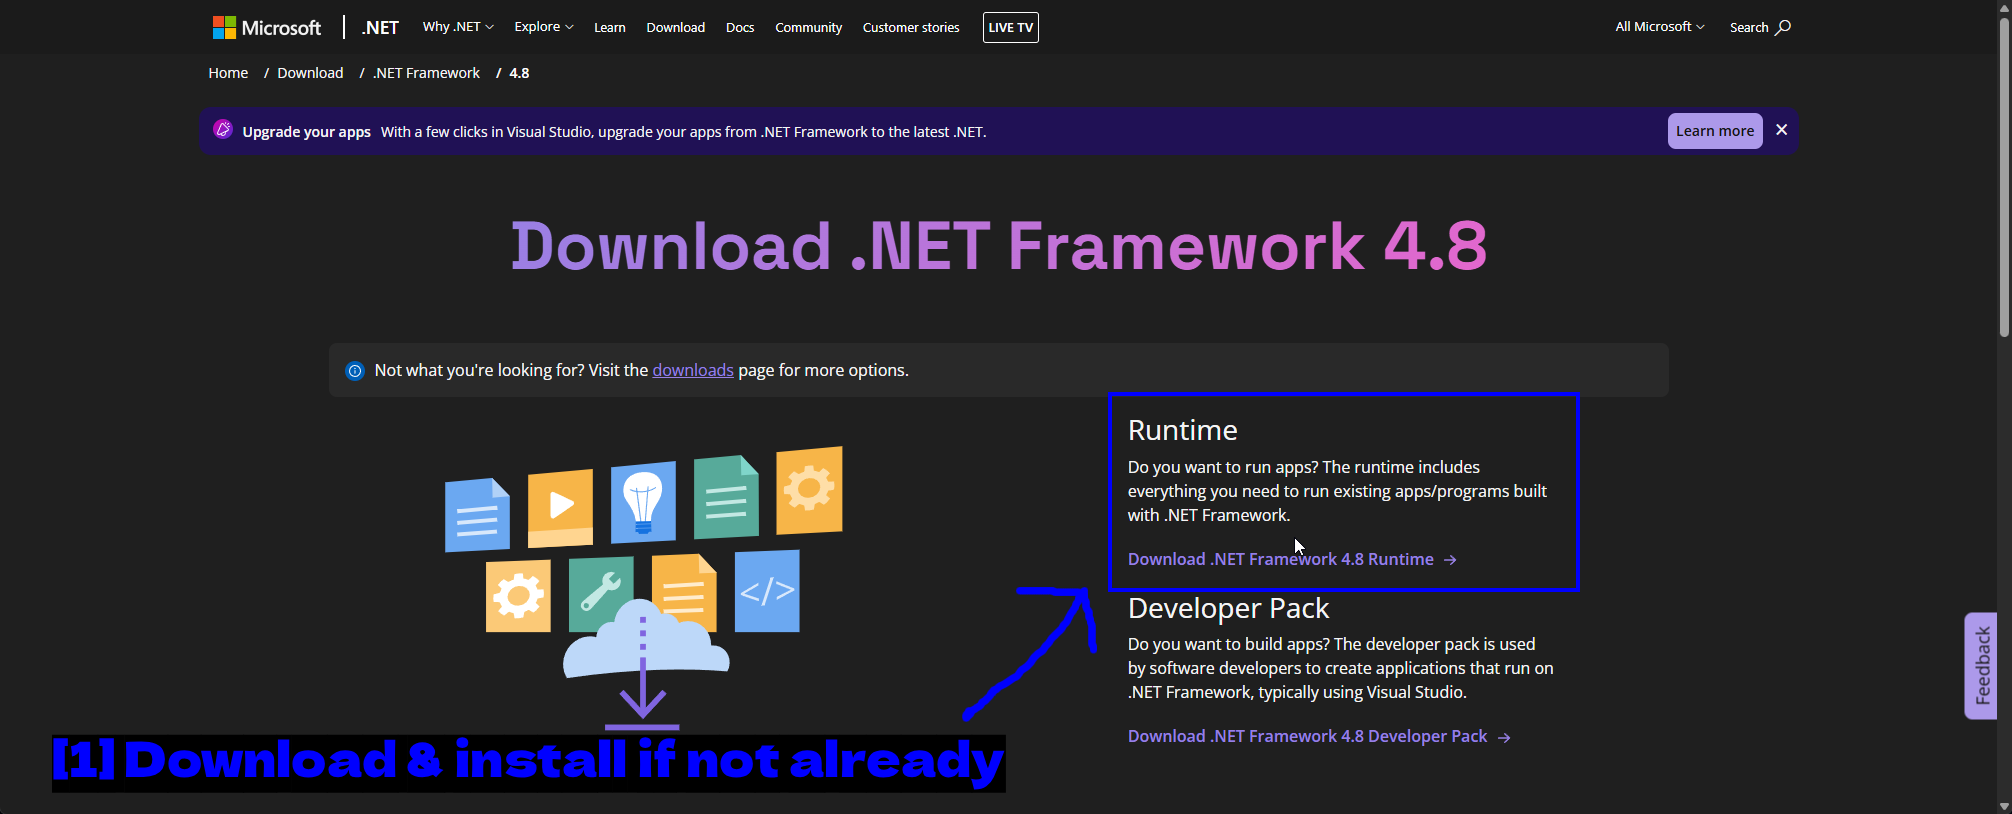
- Téléchargez et installez si ce n'est pas déjà fait: Vous voulez le Runtime, pas le Developer Pack. Le Developer Pack sert à créer des applications et vous n'en avez pas besoin.
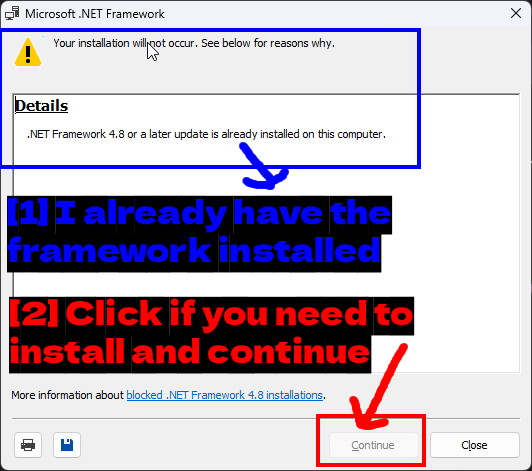
- J'ai déjà le framework installé: Si vous êtes sur une installation Windows 10 ou 11 raisonnablement à jour, vous verrez probablement ce message indiquant que la version 4.8 ou ultérieure est déjà présente. C'est très bien, fermez simplement la fenêtre.
- Cliquez si vous devez installer et continuer: Sinon, cliquez sur Continuer et laissez l'installation se faire.
Comment installer ScriptHookV DotNet
Les builds Nightly de SHVDN sont hébergées sur GitHub et c'est ce que la plupart des gens utilisent, car elles suivent le rythme des mises à jour du jeu.
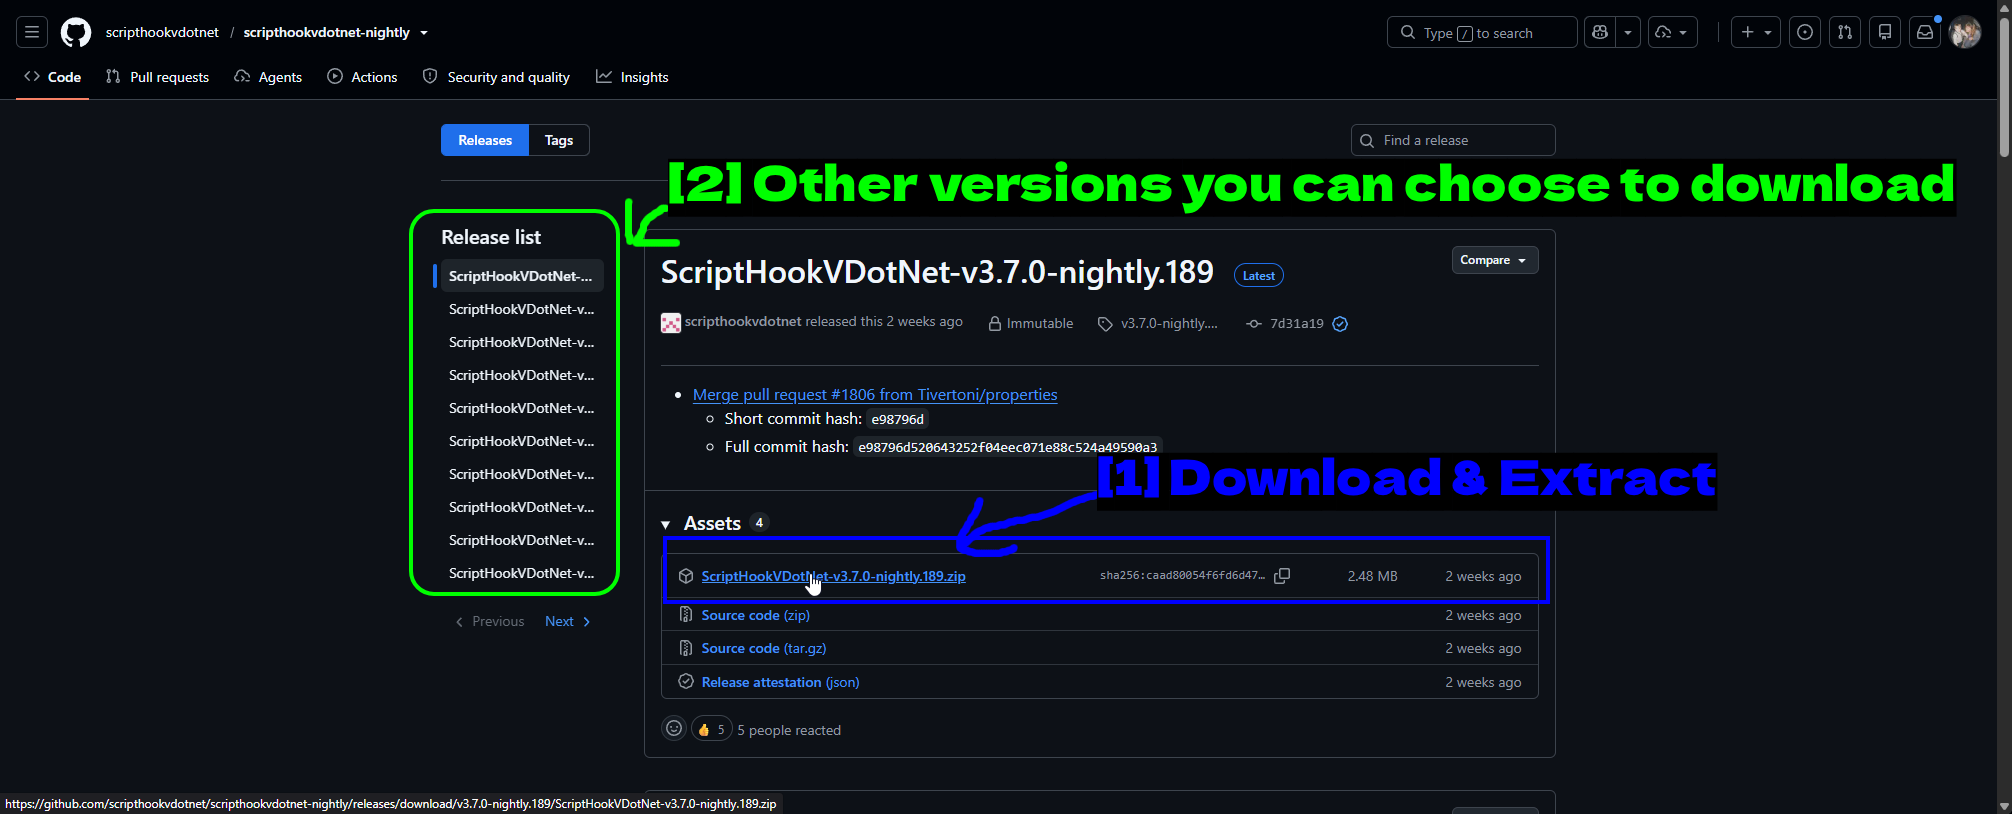
- Téléchargez et extrayez: Récupérez le
.zipdans la section Assets de la dernière version. Vous voulez le zip de la release, pas le code source. - Autres versions que vous pouvez télécharger: La liste des Releases à gauche vous permet de revenir à une build plus ancienne, ce qui est pratique si la dernière nightly pose problème.
Extrayez-la et vous obtiendrez plus de fichiers que ce dont vous avez réellement besoin.
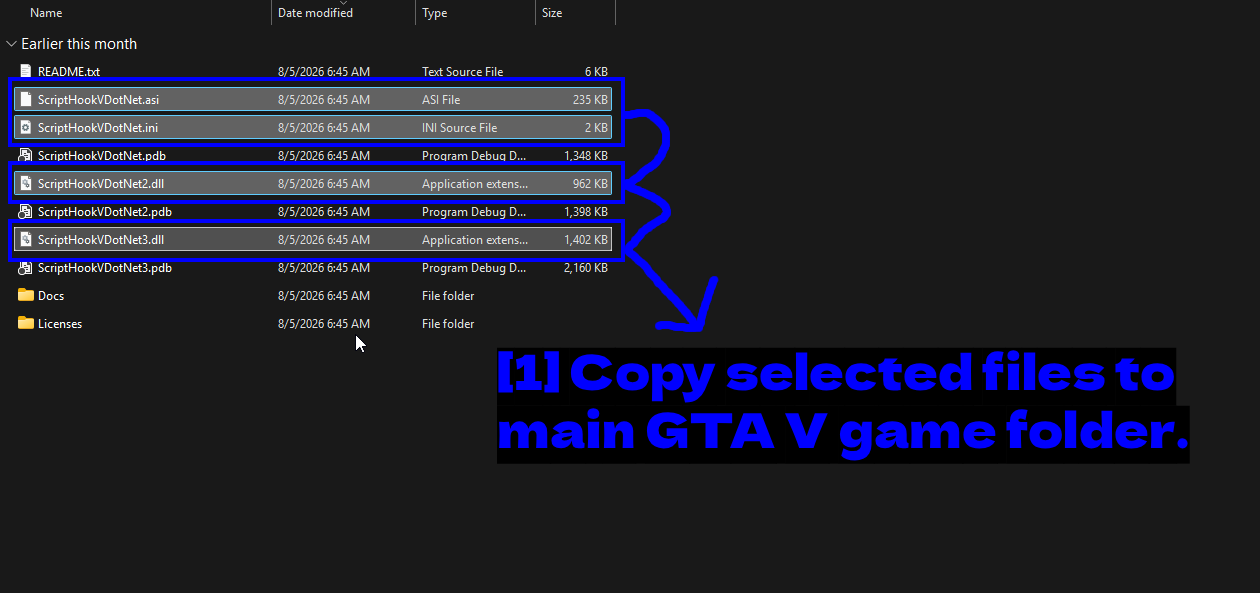
- Copiez les fichiers sélectionnés dans le dossier principal de GTA V.: Vous avez seulement besoin de
ScriptHookVDotNet.asi,ScriptHookVDotNet.ini,ScriptHookVDotNet2.dlletScriptHookVDotNet3.dll. Les fichiers.pdbsont des symboles de débogage et les dossiersDocs/Licensesne sont pas nécessaires.
Copiez-les dans la racine de votre dossier de jeu.
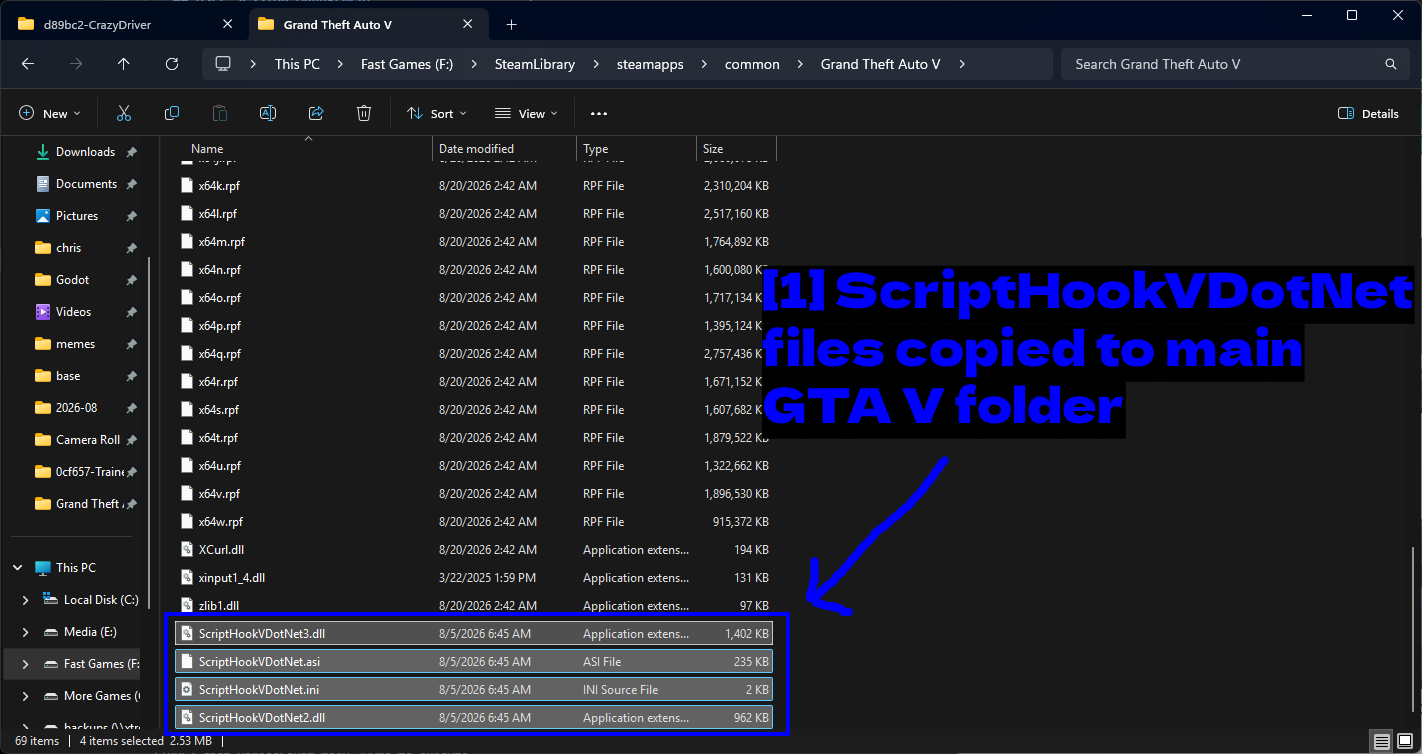
- Fichiers ScriptHookVDotNet copiés dans le dossier principal de GTA V: Les quatre fichiers se trouvent dans le dossier du jeu aux côtés de
ScriptHookV.dll.
NOTE - ScriptHookVDotNet2.dll et ScriptHookVDotNet3.dll sont deux versions d'API différentes. Les anciens mods ciblent la v2 et les plus récents la v3, donc gardez les deux - elles coexistent sans problème et retirer l'une d'elles cassera les mods qui en dépendent.
Lua Plugin For Script Hook V
Lua est un langage de programmation et de script puissant, et le Lua Plugin for Script Hook V permet aux utilisateurs de créer des mods en Lua. Ce n'est pas nécessaire pour les mods de ce guide, mais c'est encore assez courant pour que pas mal d'anciens mods s'y attendent.
Pour l'installer, suivez les étapes suivantes.
- Téléchargez le Lua Plugin ici.
- Extrayez le fichier téléchargé.
- Copiez le fichier
LUA.asiet le dossierscripts/dans votre dossier GTA V.
Vous remarquerez quelques plugins Lua dans scripts/addins/. C'est le dossier dans lequel les mods basés sur Lua sont installés. Vous pouvez supprimer les plugins Lua par défaut de ce dossier si vous ne comptez pas les utiliser.
Où télécharger des mods
Il y a deux endroits principaux où vous trouverez des mods pour GTA V.
- GTA5-Mods (5mods) - de loin le plus grand site de mods dédié à GTA V. La plupart des scripts, véhicules et trainers s'y trouvent.
- Nexus Mods - sélection plus réduite pour GTA V, mais c'est celui qui fonctionne avec Vortex.
- TMC - nous, mais tout nouveau !
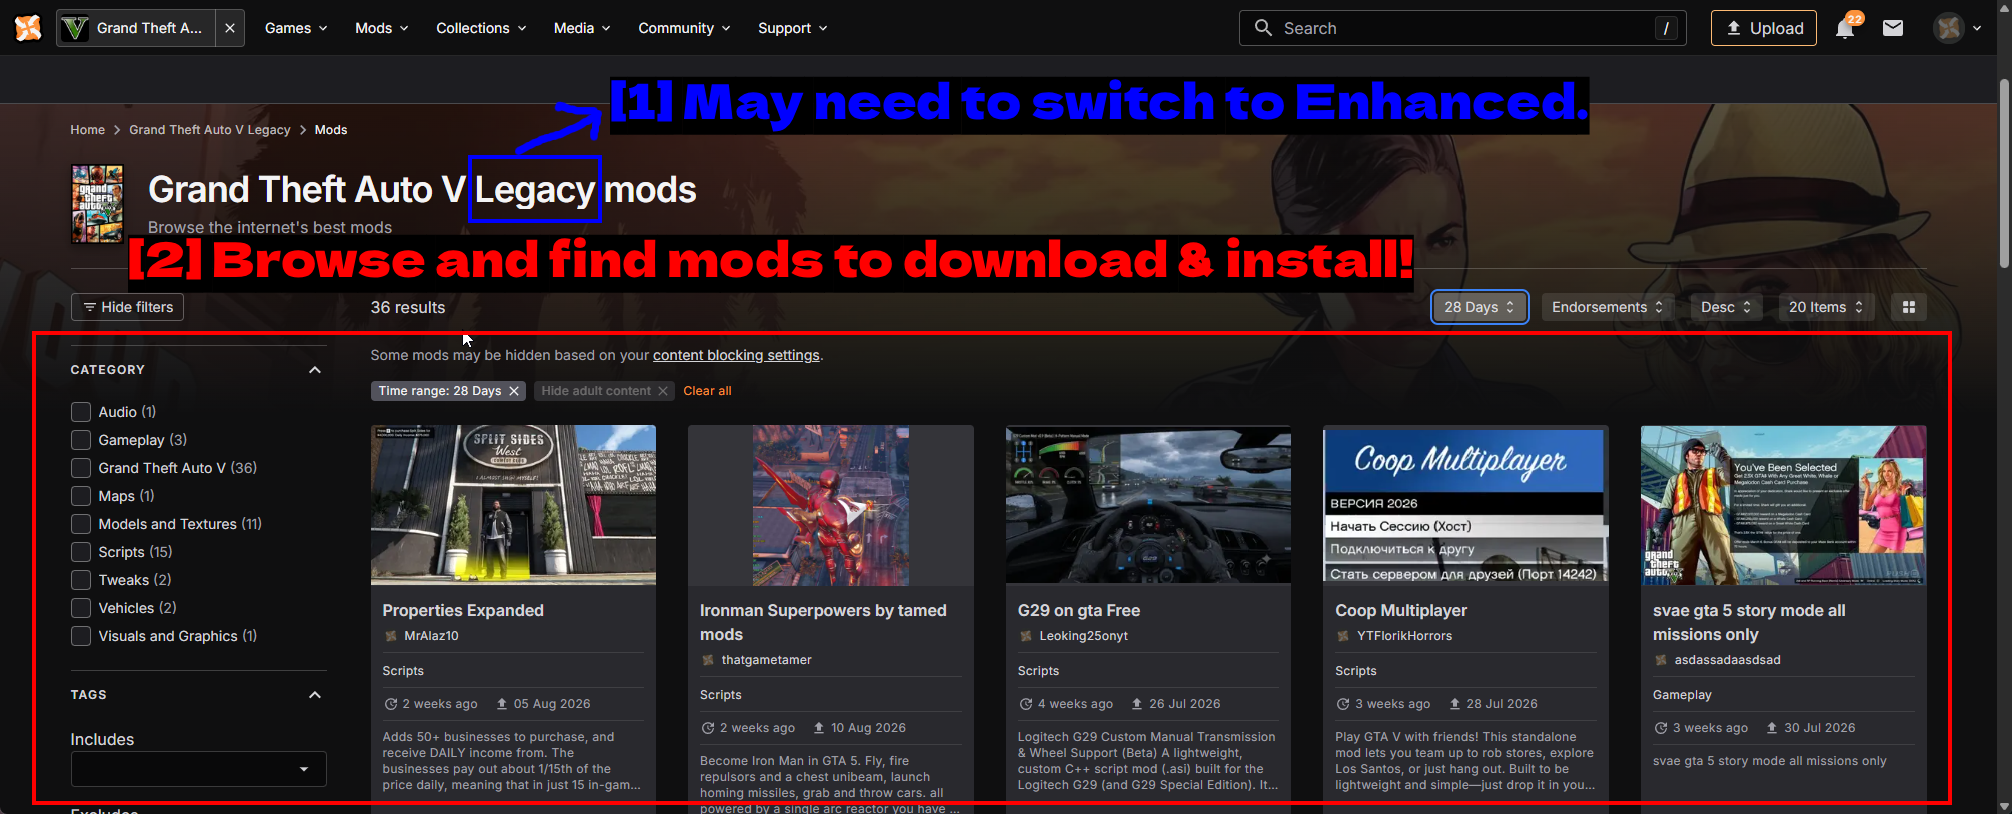
- Il se peut que vous deviez passer à Enhanced.: Notez le mot Legacy dans le titre de la page. Nexus divise GTA V en Grand Theft Auto V Legacy et la version Enhanced, et les mods ne sont pas interchangeables entre les deux. Si vous êtes sur Enhanced, changez de page.
- Parcourez et trouvez des mods à télécharger et installer !: Les filtres de catégories sur la gauche (Scripts, Vehicles, Models and Textures, Maps, etc.) sont le moyen le plus rapide de restreindre les résultats.
ASTUCE - Lisez toujours la description du mod et vérifiez les prérequis avant de télécharger. Presque tous les mods scriptés de GTA V nécessitent Script Hook V, beaucoup nécessitent aussi SHVDN, et « ça ne fonctionne pas » est presque toujours dû à une dépendance manquante.
Comment installer des mods
Il existe deux méthodes réalistes pour installer des mods dans GTA V - manuellement, ce que supposent la grande majorité des guides et des auteurs de mods, et via Vortex, qui ne fonctionne qu'avec les mods hébergés sur Nexus Mods.
La méthode manuelle est celle que vous utiliserez le plus souvent. 5mods ne s'intègre à aucun gestionnaire de mods, donc si le mod que vous voulez y est (et c'est généralement le cas), l'installation manuelle est votre seule option.
Les mods que nous installons
Pour rester concret, nous allons installer quelques mods réels plutôt que de parler dans l'abstrait.
Manuel
Nous installons le mod Crazy Drivers qui nécessite ScriptHookV (ainsi que les versions Nightly et DotNet) plus un mod de trainer séparé appelé Simple Trainer.
Crazy Drivers transforme tous les conducteurs PNJ de la ville en fous du volant, ce qui rend extrêmement évident le fait que le mod fonctionne. Simple Trainer est un menu de trainer polyvalent qui vous permet de faire apparaître des véhicules, changer la météo, vous téléporter, etc. - c'est l'outil que j'utilise pour vérifier concrètement si d'autres mods font quelque chose.
Vortex
Nous installons un simple changeur de champ de vision (FoV). C'est un petit mod hébergé sur Nexus Mods, ce qui en fait une bonne démonstration du workflow Vortex.
Manuellement (le plus courant)
Commençons par Simple Trainer. Rendez-vous sur sa page 5mods.
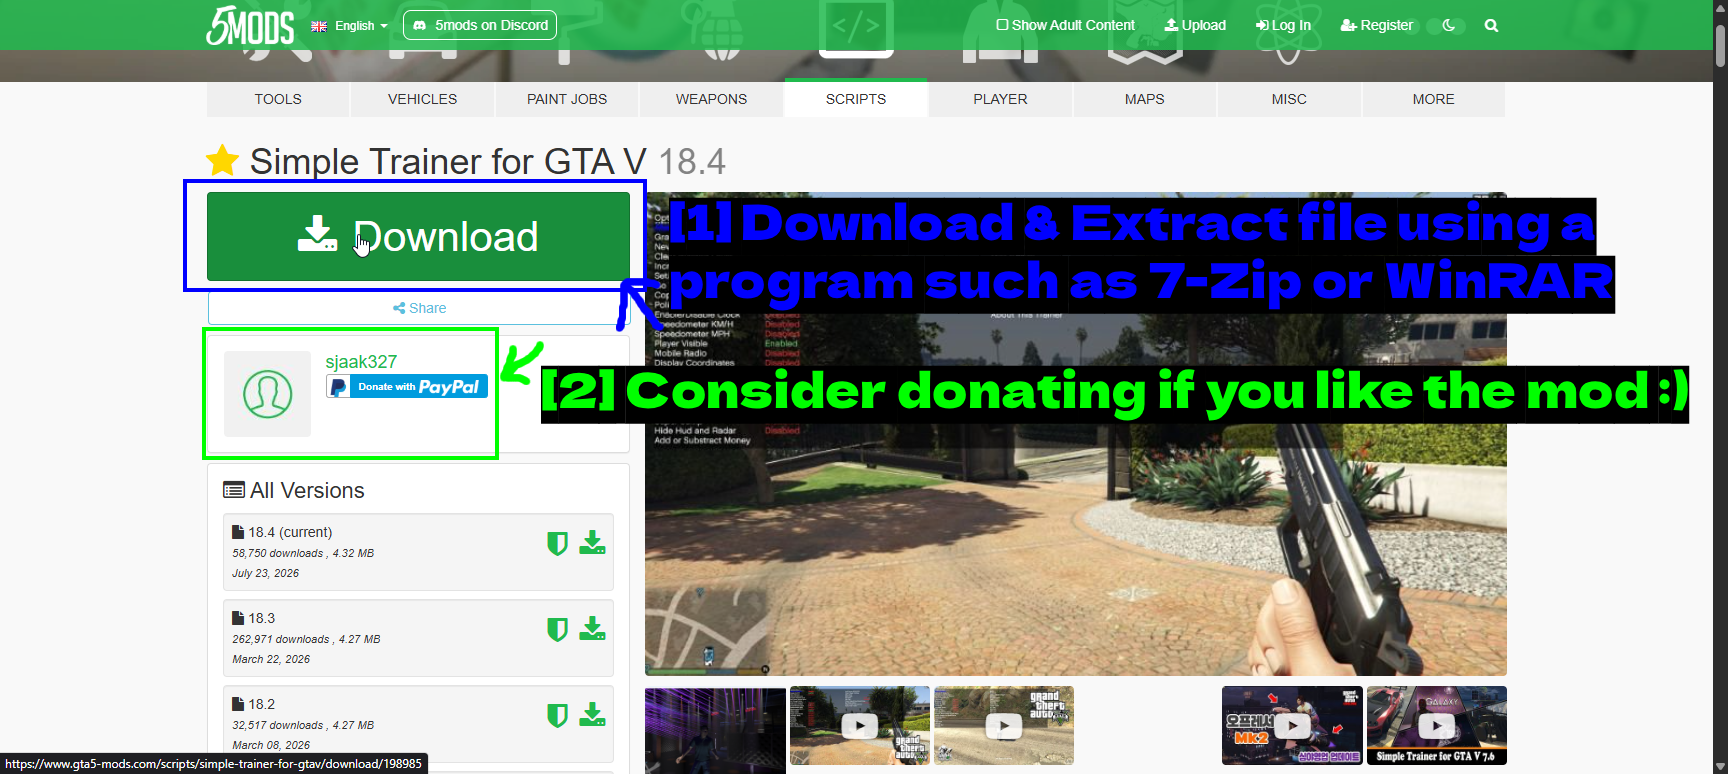
- Téléchargez & extrayez le fichier avec un programme comme 7-Zip ou WinRAR: Le gros bouton vert Download. La liste All Versions en dessous vous permet de récupérer une version plus ancienne si l'actuelle ne fonctionne pas bien avec votre version du jeu.
- Pensez à faire un don si vous aimez le mod :): La plupart des auteurs sur 5mods ont un lien de don sur leur profil. Les moddeurs font ça gratuitement, alors offrez-leur quelques euros si un mod devient un élément régulier de votre installation.
Extrayez l'archive et regardez ce qu'elle contient.
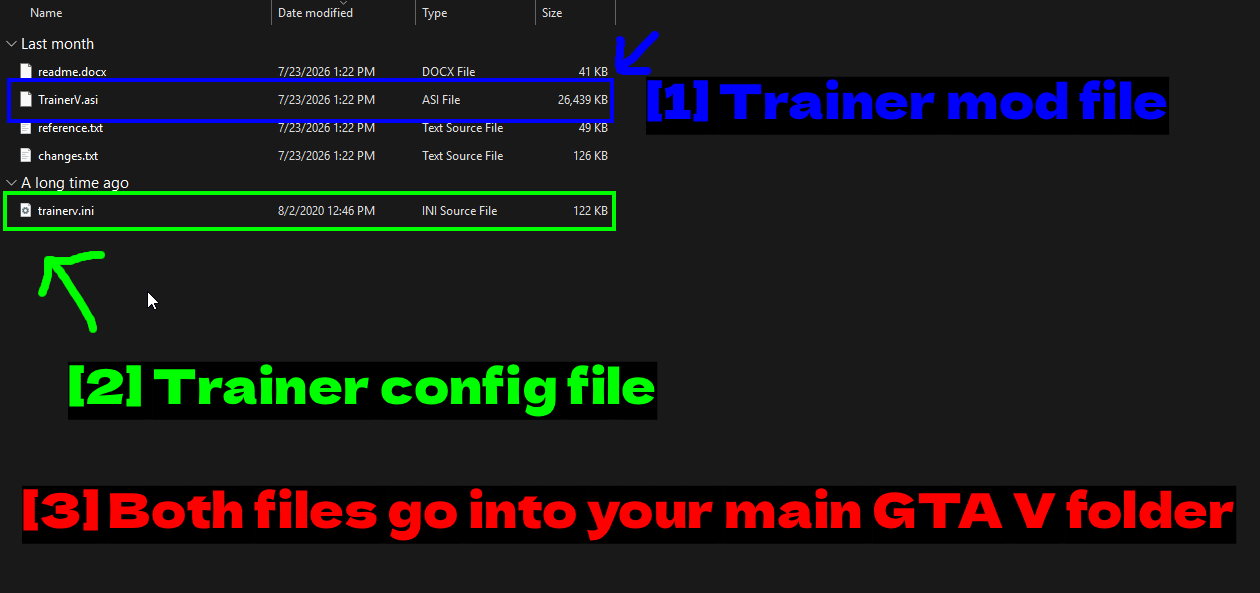
- Fichier du mod trainer:
TrainerV.asi- le plugin lui-même. Les fichiers ASI sont chargés par l'ASI loader que vous avez installé avec Script Hook V. - Fichier de configuration du trainer:
trainerv.ini- les paramètres et les raccourcis clavier. - Les deux fichiers vont dans votre dossier principal de GTA V: Pas dans un sous-dossier. Les plugins ASI se trouvent à la racine du dossier du jeu.
Copiez les deux fichiers dans votre dossier GTA V.
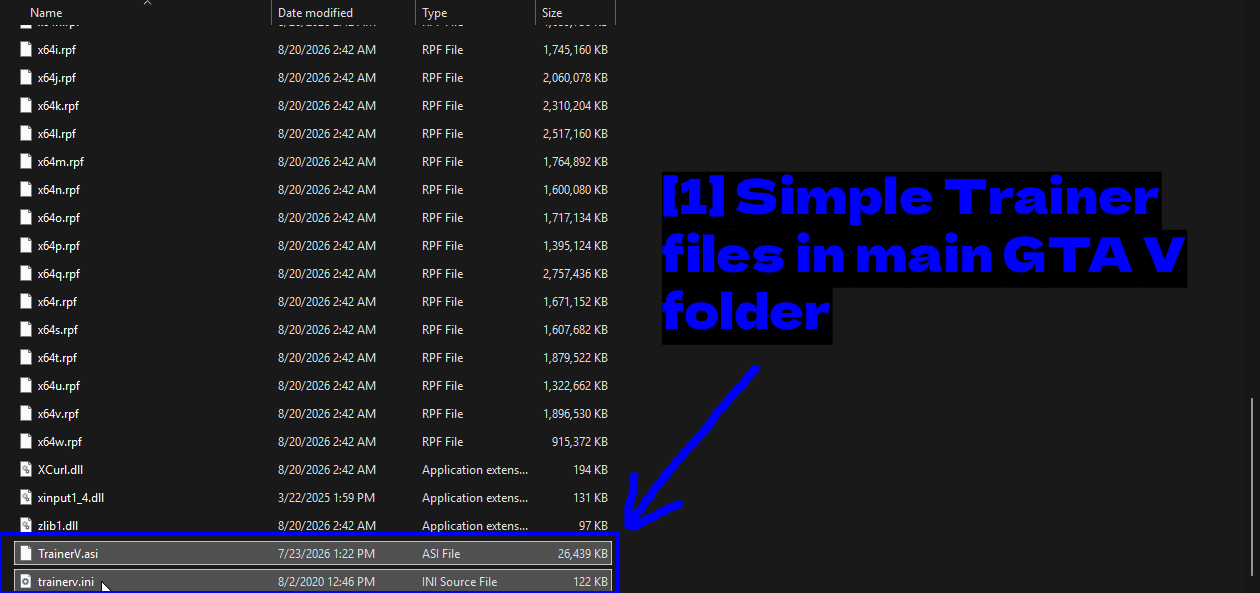
- Fichiers de Simple Trainer dans le dossier principal de GTA V:
TrainerV.asiettrainerv.iniplacés à côté des fichiers du jeu lui-même.
Les raccourcis clavier de Simple Trainer valent le coup d'œil avant de lancer le jeu, surtout si vous utilisez plusieurs mods.
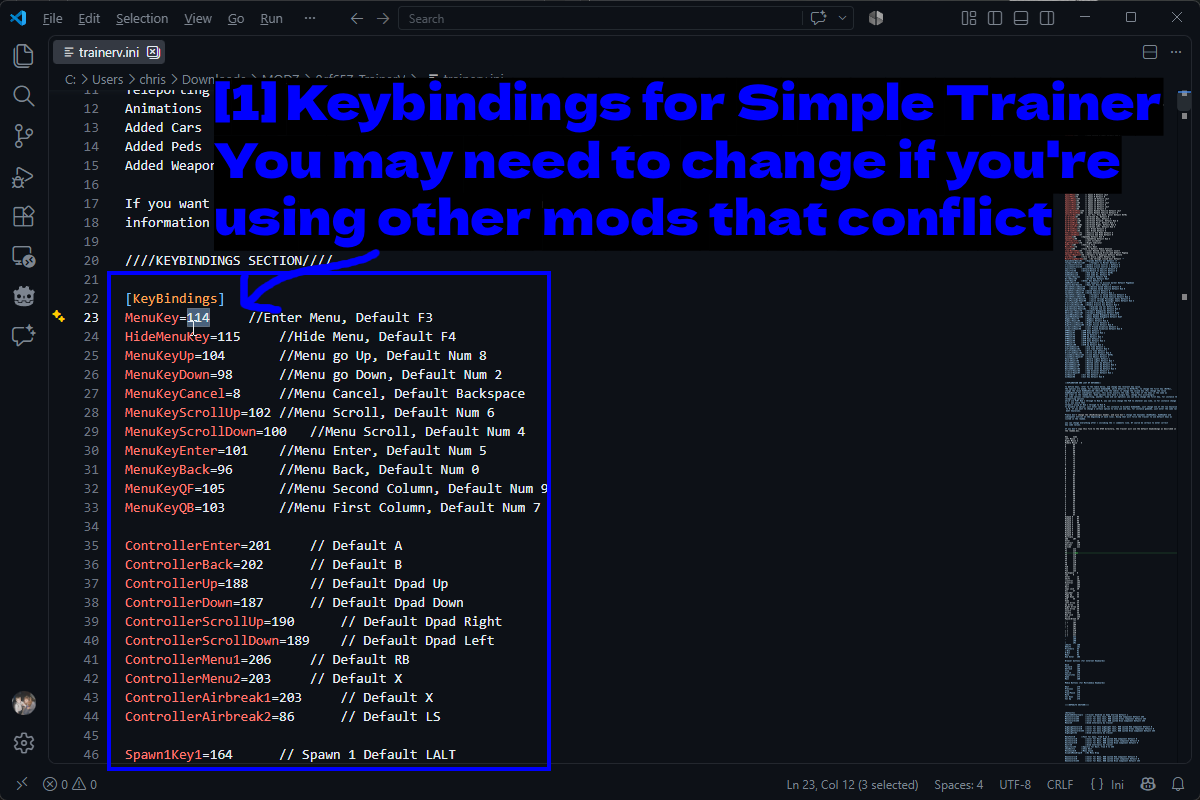
- Raccourcis clavier pour Simple Trainer. Vous devrez peut-être les changer si vous utilisez d'autres mods en conflit: Ouvrez
trainerv.inidans un éditeur de texte et allez à la section[KeyBindings]. Les valeurs par défaut sontF3pour ouvrir le menu etF4pour le masquer, le pavé numérique gérant la navigation. Chaque ligne a un commentaire indiquant la touche par défaut, donc en changer une est simple.
Passons maintenant à Crazy Drivers. Téléchargez-le depuis 5mods et extrayez-le de la même façon.
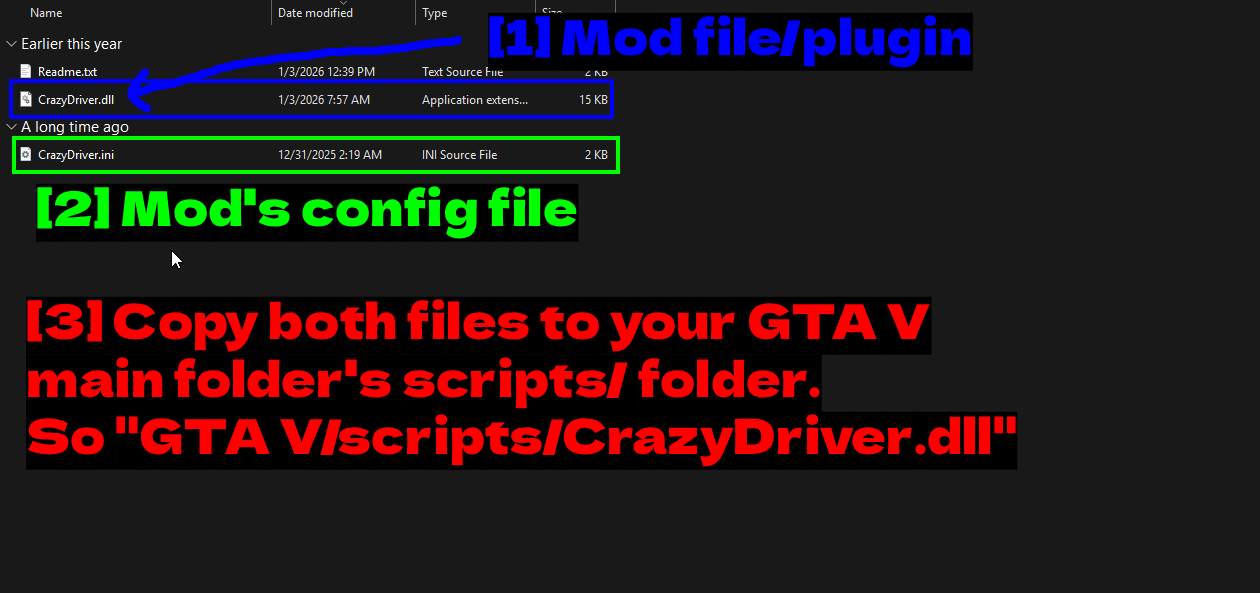
- Fichier/plugin du mod:
CrazyDriver.dll- un mod .NET, c'est pourquoi nous avons installé ScriptHookVDotNet plus tôt. - Fichier de configuration du mod:
CrazyDriver.inipour les paramètres du mod. - Copiez les deux fichiers dans le dossier scripts/ de votre dossier principal GTA V. Donc « GTA V/scripts/CrazyDriver.dll »: Voici la différence importante. Les plugins
.asivont à la racine du jeu, mais les mods .NET vont dans le dossierscripts. Créez-le s'il n'existe pas.
Cette distinction piège les gens en permanence, il est donc bon de la répéter.
- Les fichiers
.asi-> la racine de votre dossier GTA V. - Les mods .NET
.dll-> le dossierscriptsà l'intérieur de votre dossier GTA V.
Lancez le jeu et ouvrez la console SHVDN (la touche ~ par défaut) pour vérifier que le mod s'est bien chargé.
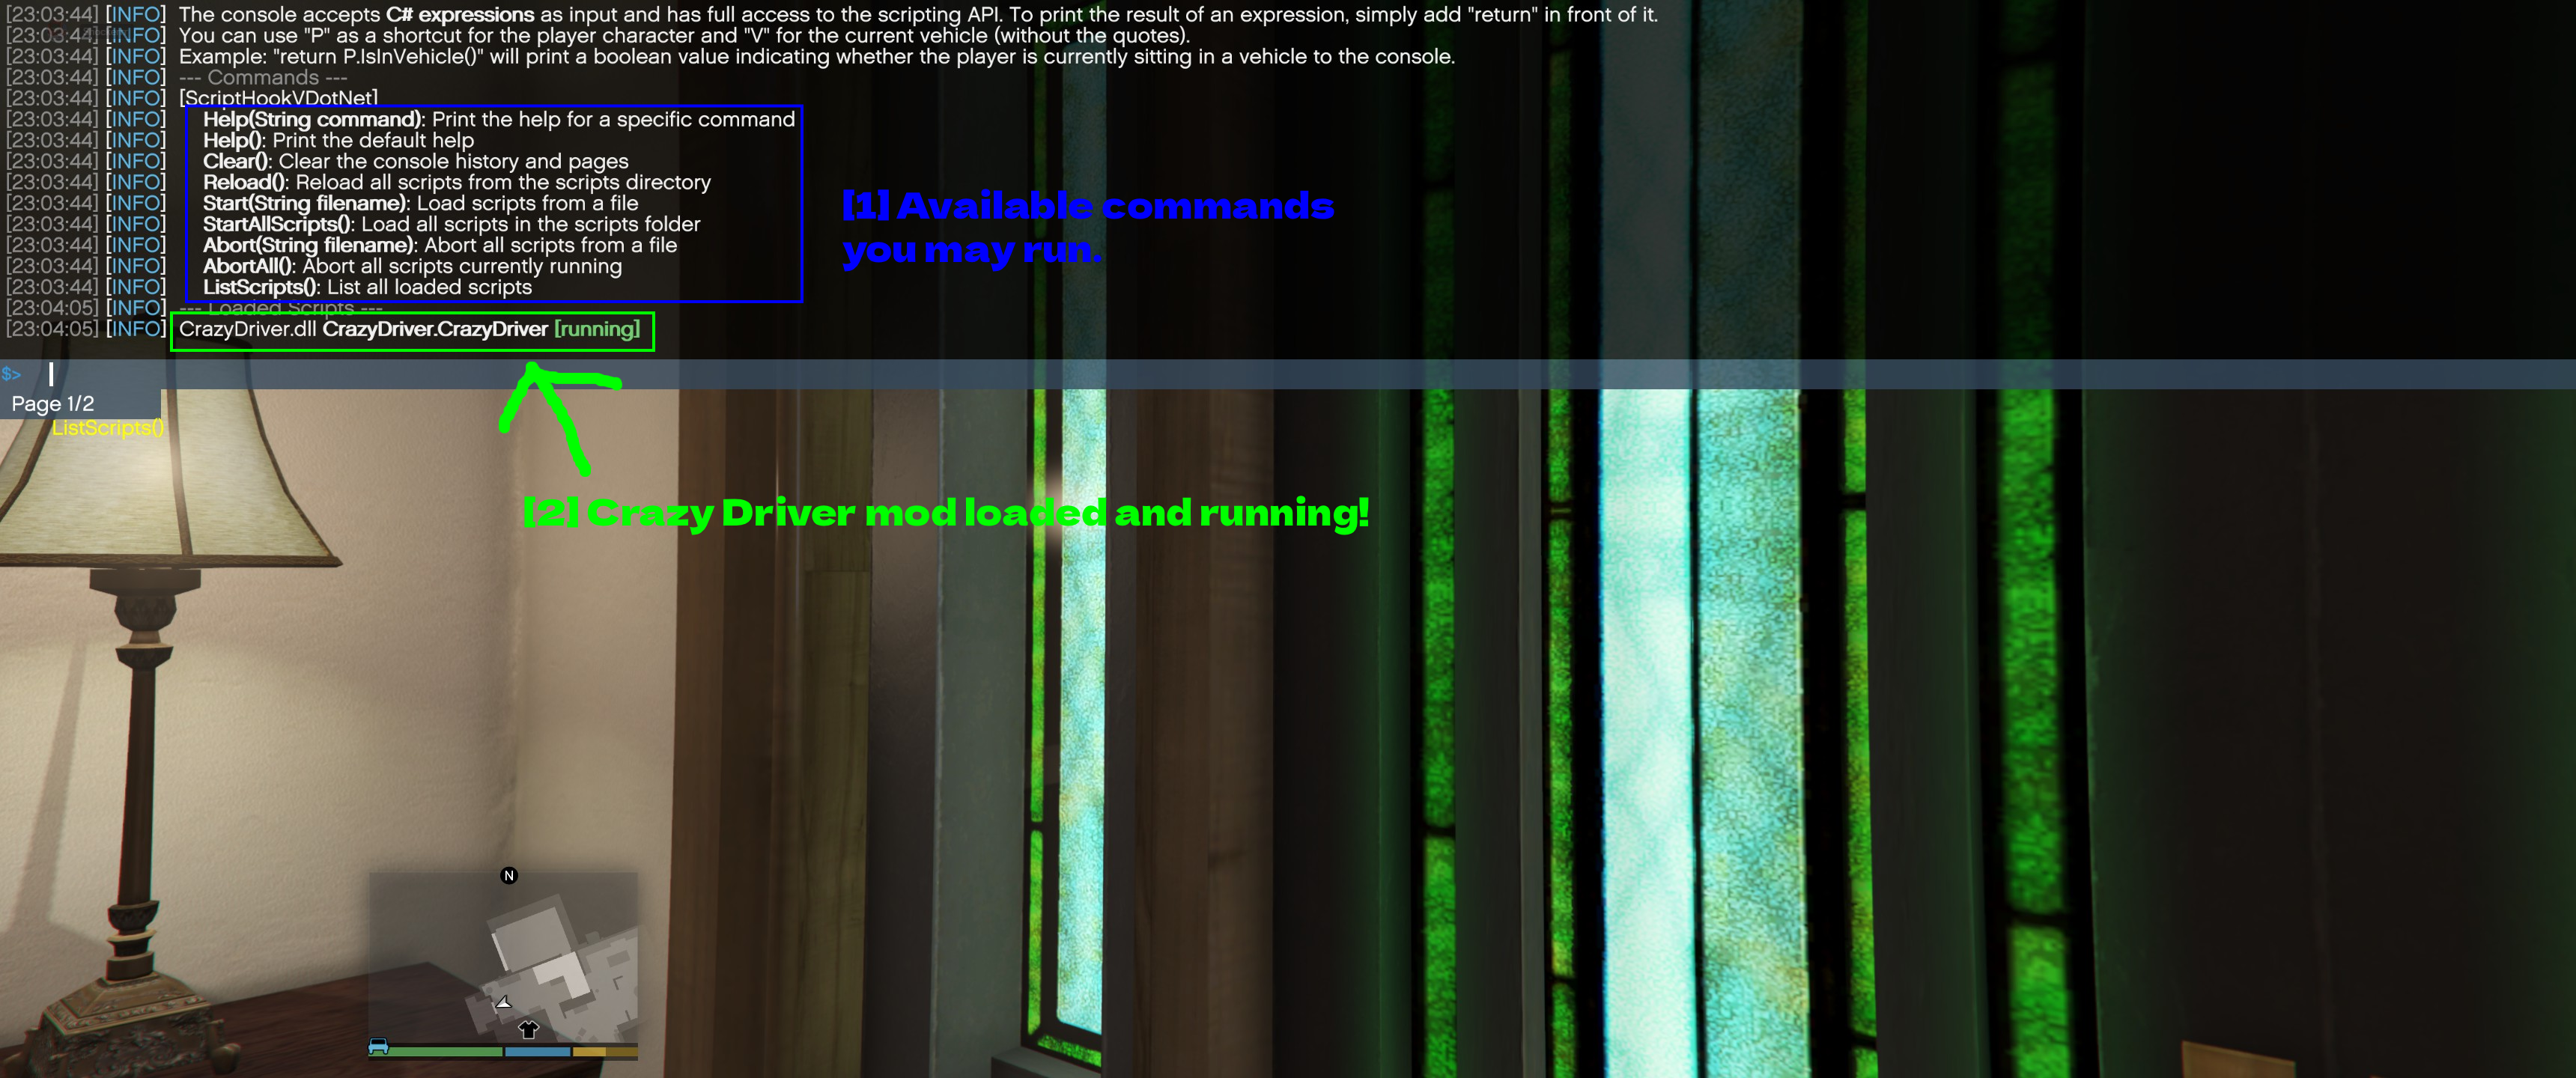
- Commandes disponibles que vous pouvez exécuter.: La console accepte des expressions C# et dispose de quelques commandes intégrées.
ListScripts()est celle qu'il vous faut. - Le mod Crazy Driver est chargé et fonctionne !:
CrazyDriver.dll CrazyDriver.CrazyDriver [running]- le mod a été trouvé et démarré. Si un mod n'apparaît pas dans cette liste, SHVDN ne l'a jamais chargé.
ASTUCE - Reload() dans cette même console recharge tous les scripts du dossier scripts sans redémarrer le jeu. C'est un gain de temps énorme quand vous testez des mods.
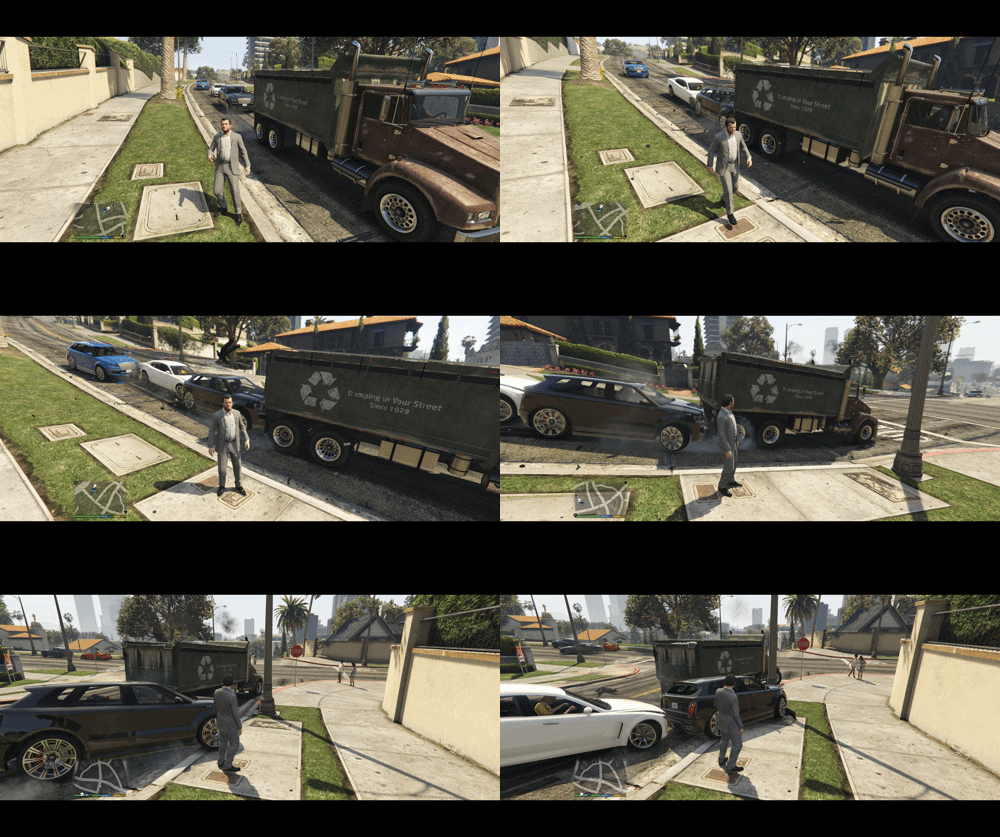
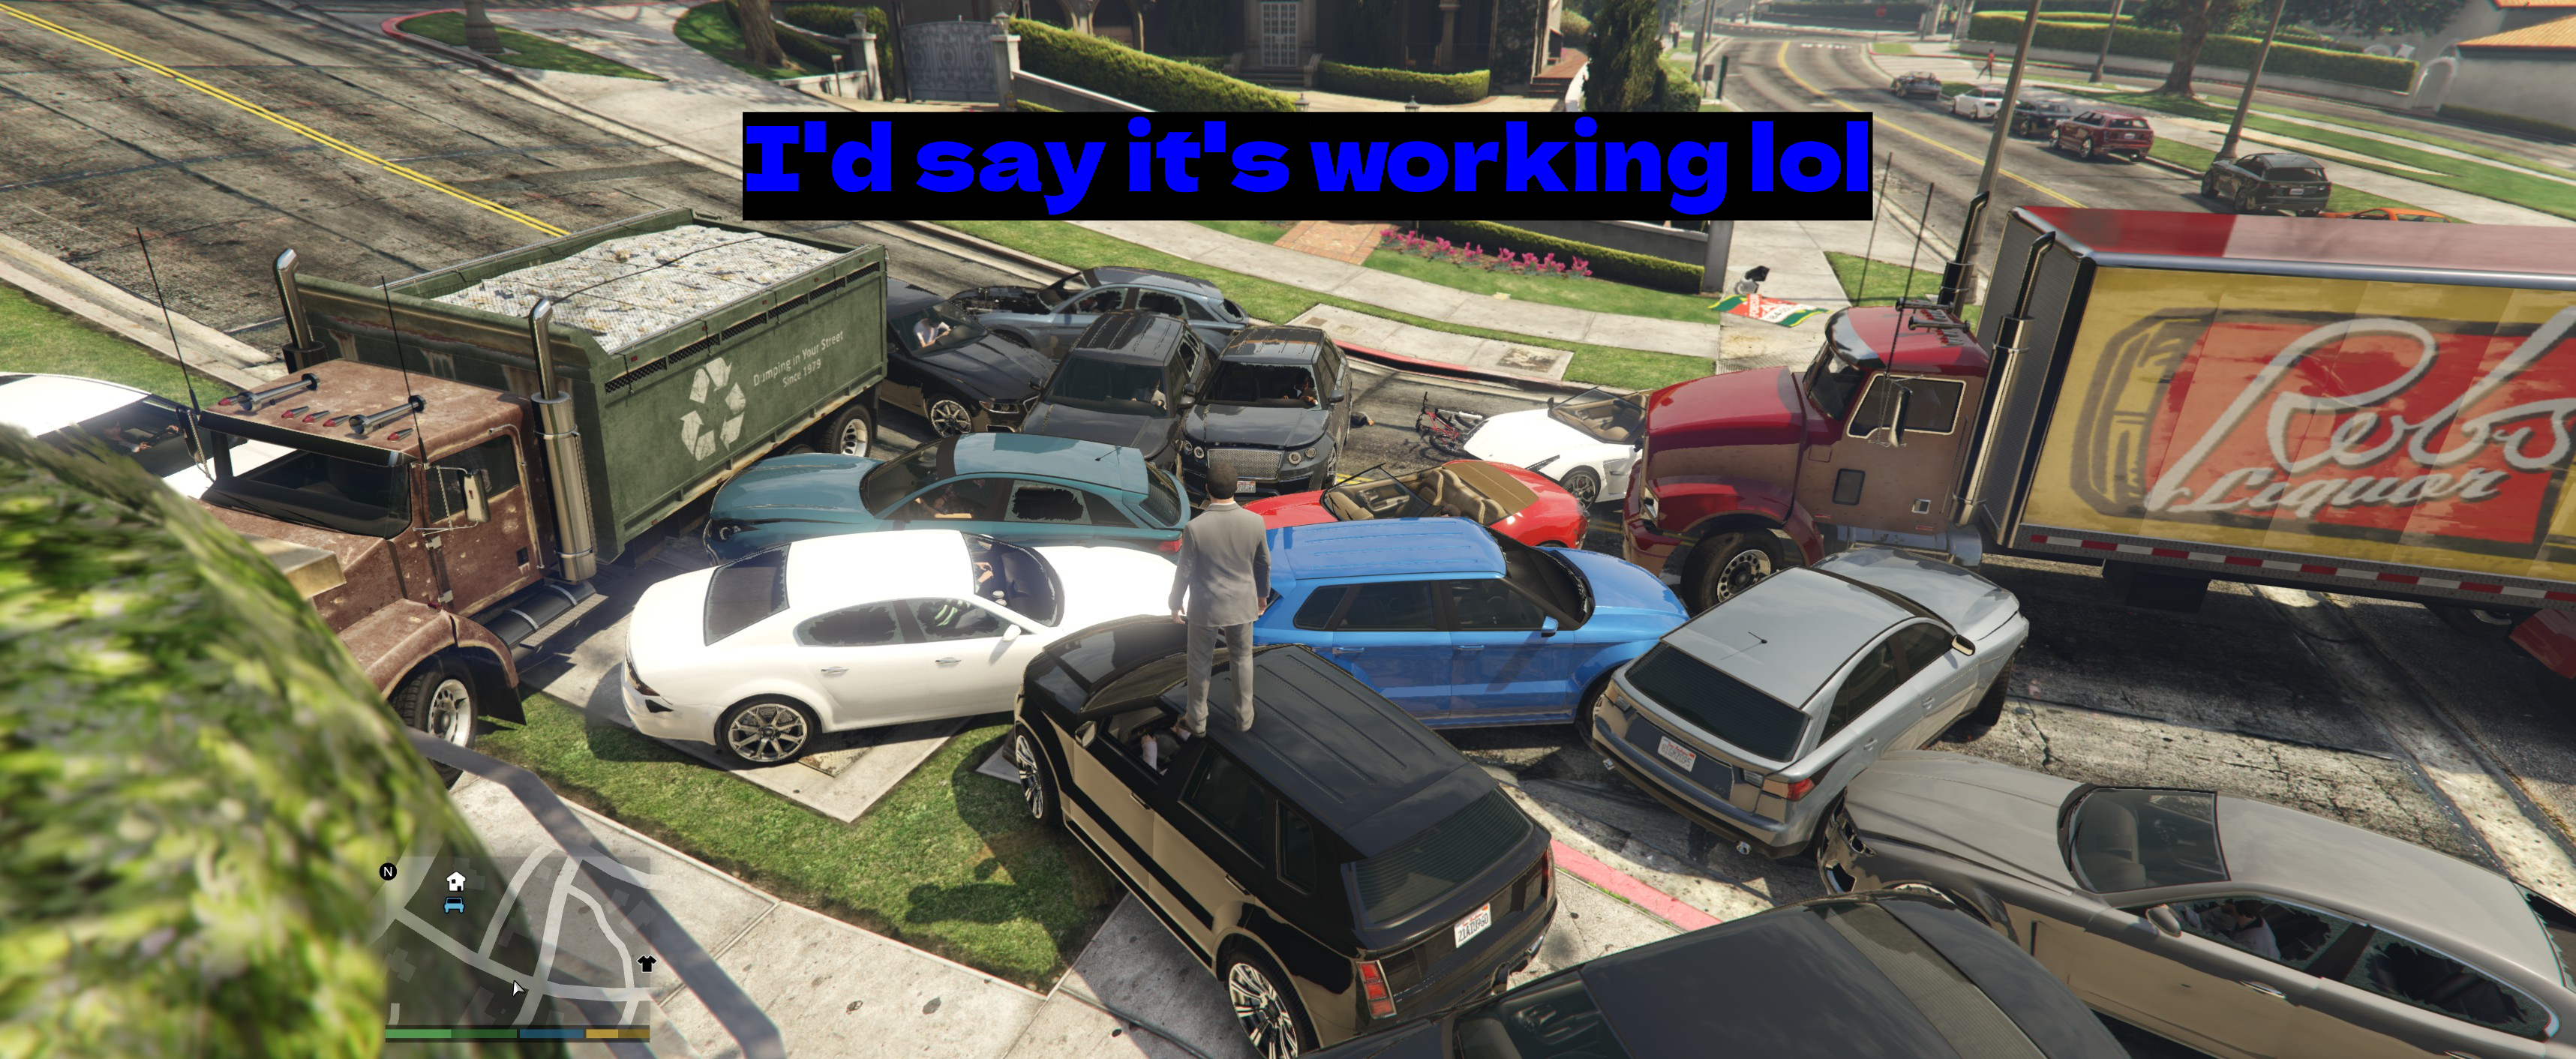
Je suis sorti et après une minute ou deux, je dirais que le mod fonctionne, lol :
Utiliser Vortex (gestionnaire de mods)
Vortex est le gestionnaire de mods officiel de Nexus Mods. Le support de GTA V provient d'une extension communautaire, et il ne fonctionne qu'avec les mods hébergés sur Nexus - ce qui, pour GTA V, représente un choix bien plus restreint que sur 5mods. Cela dit, c'est beaucoup plus pratique quand le mod que vous cherchez s'y trouve.
Nous avons deux guides dédiés à Vortex si vous ne l'avez pas encore configuré.
Tout d'abord, indiquez à Vortex de gérer GTA V.
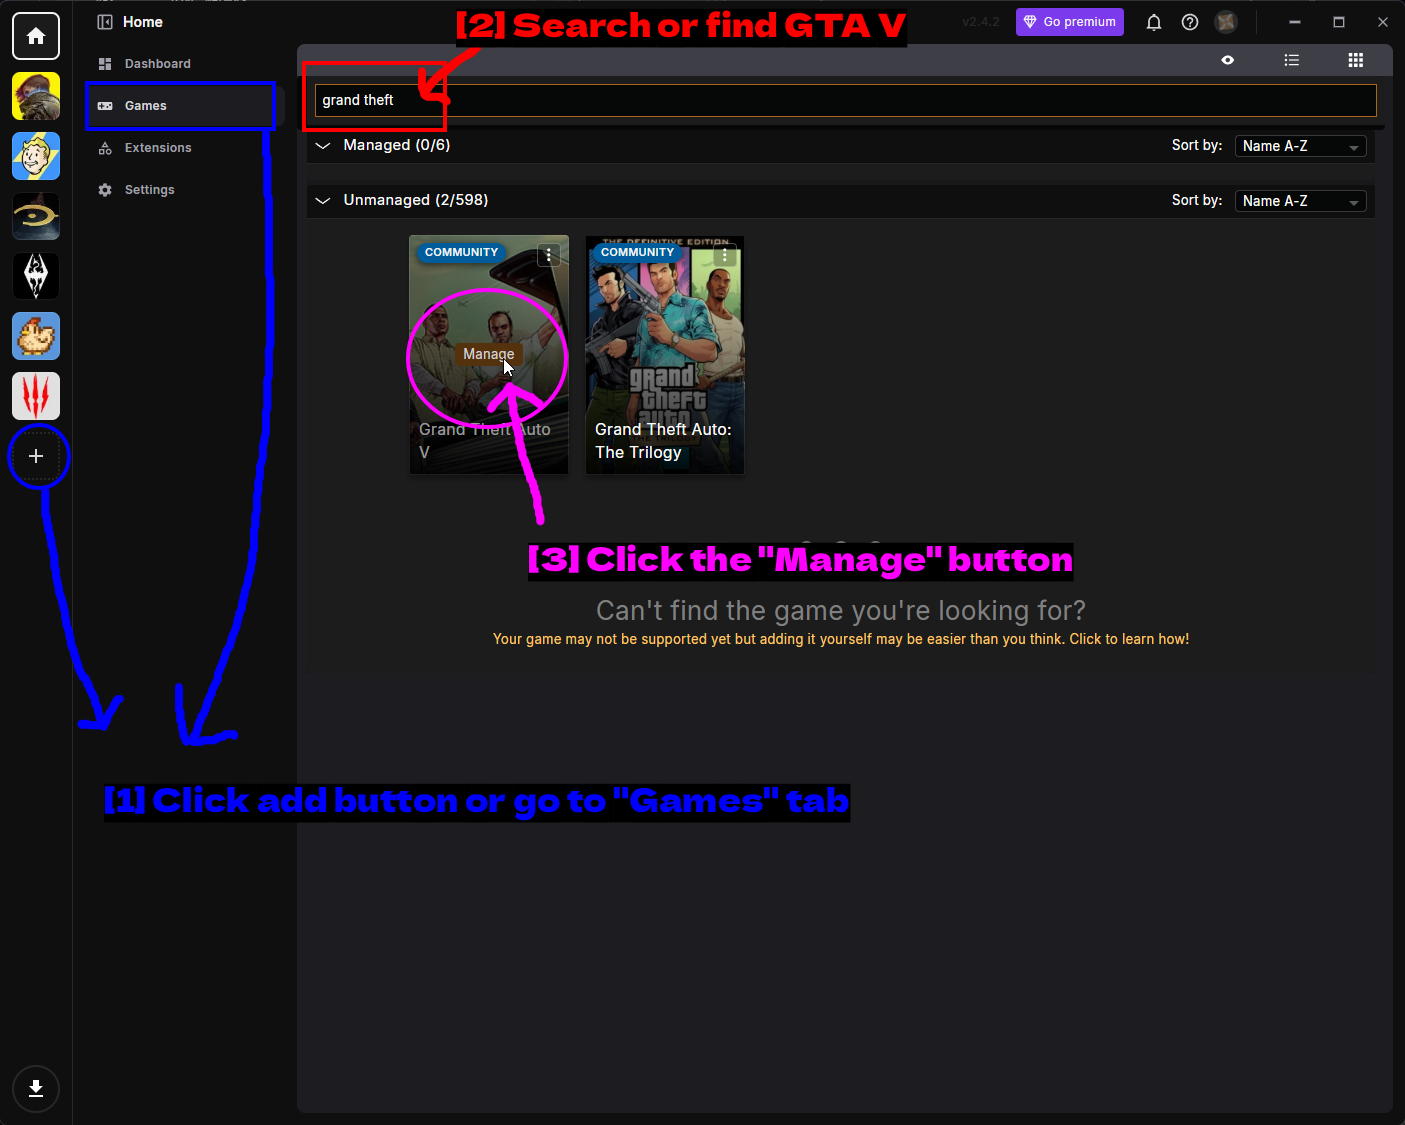
- Cliquez sur le bouton d'ajout ou allez dans l'onglet « Games » : Soit le bouton + dans la barre latérale, soit l'onglet Games.
- Recherchez ou trouvez GTA V : Tapez
grand theftdans la barre de recherche. - Cliquez sur le bouton « Manage » : Survolez la tuile Grand Theft Auto V et cliquez sur Manage. Notez qu'elle est marquée COMMUNITY, ce qui signifie que l'extension est maintenue par la communauté et non officielle. Ne la confondez pas avec Grand Theft Auto: The Trilogy juste à côté.
Vortex vous demandera sur quelle boutique vous avez acheté le jeu.
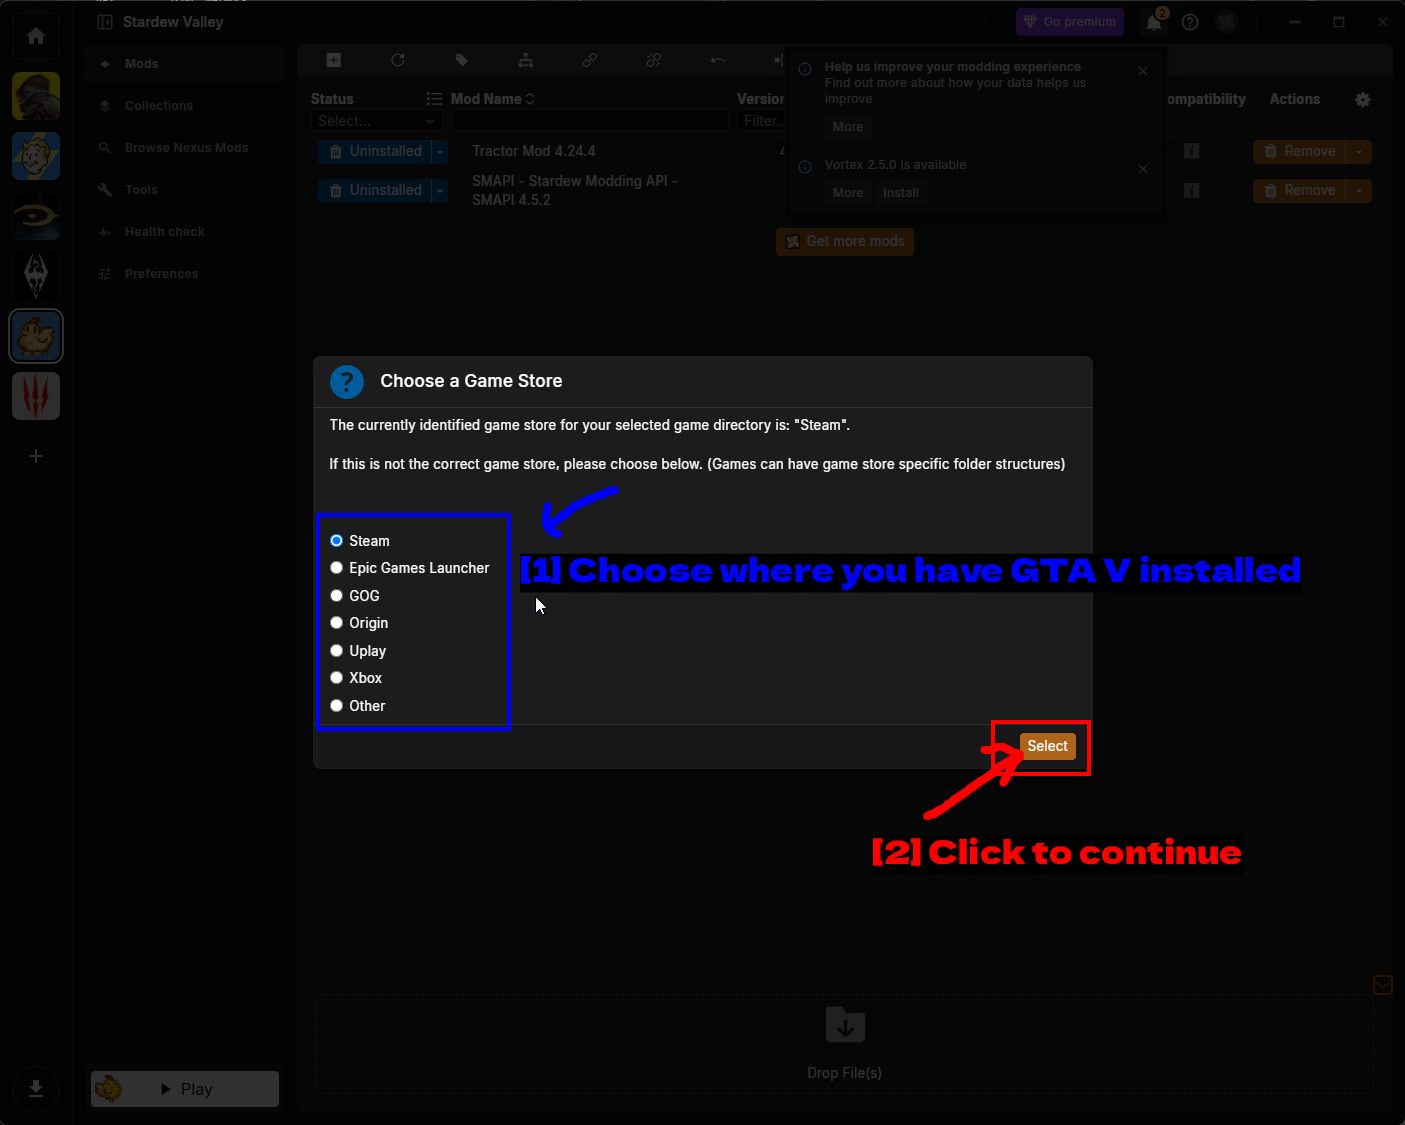
- Choisissez où vous avez installé GTA V : Steam, Epic Games Launcher, GOG, Origin, Uplay, Xbox, ou Autre. Vortex devine généralement correctement - il veut juste une confirmation, car la structure des dossiers diffère selon les boutiques.
- Cliquez pour continuer : Cliquez sur Select.
Si Vortex ne trouve pas l'installation tout seul, vous obtiendrez ceci à la place.
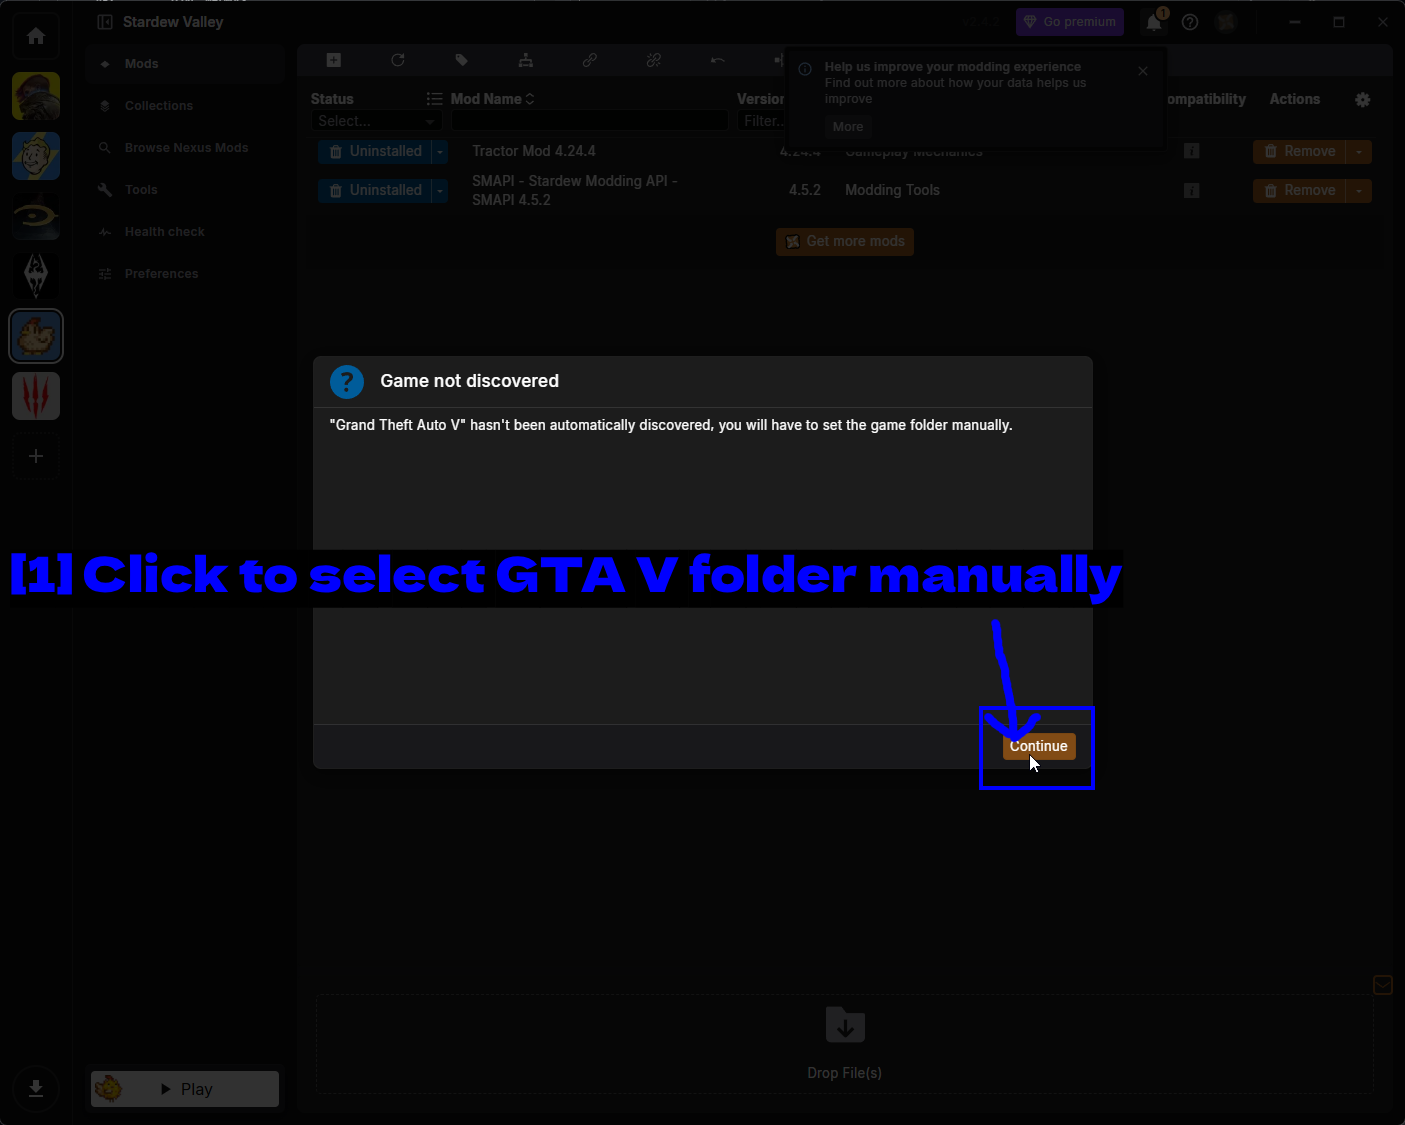
- Cliquez pour sélectionner le dossier GTA V manuellement : Cliquez sur Continue et indiquez à Vortex le dossier contenant
GTA5.exe.
Vous pourriez aussi rencontrer cet avertissement une fois que le jeu est géré.
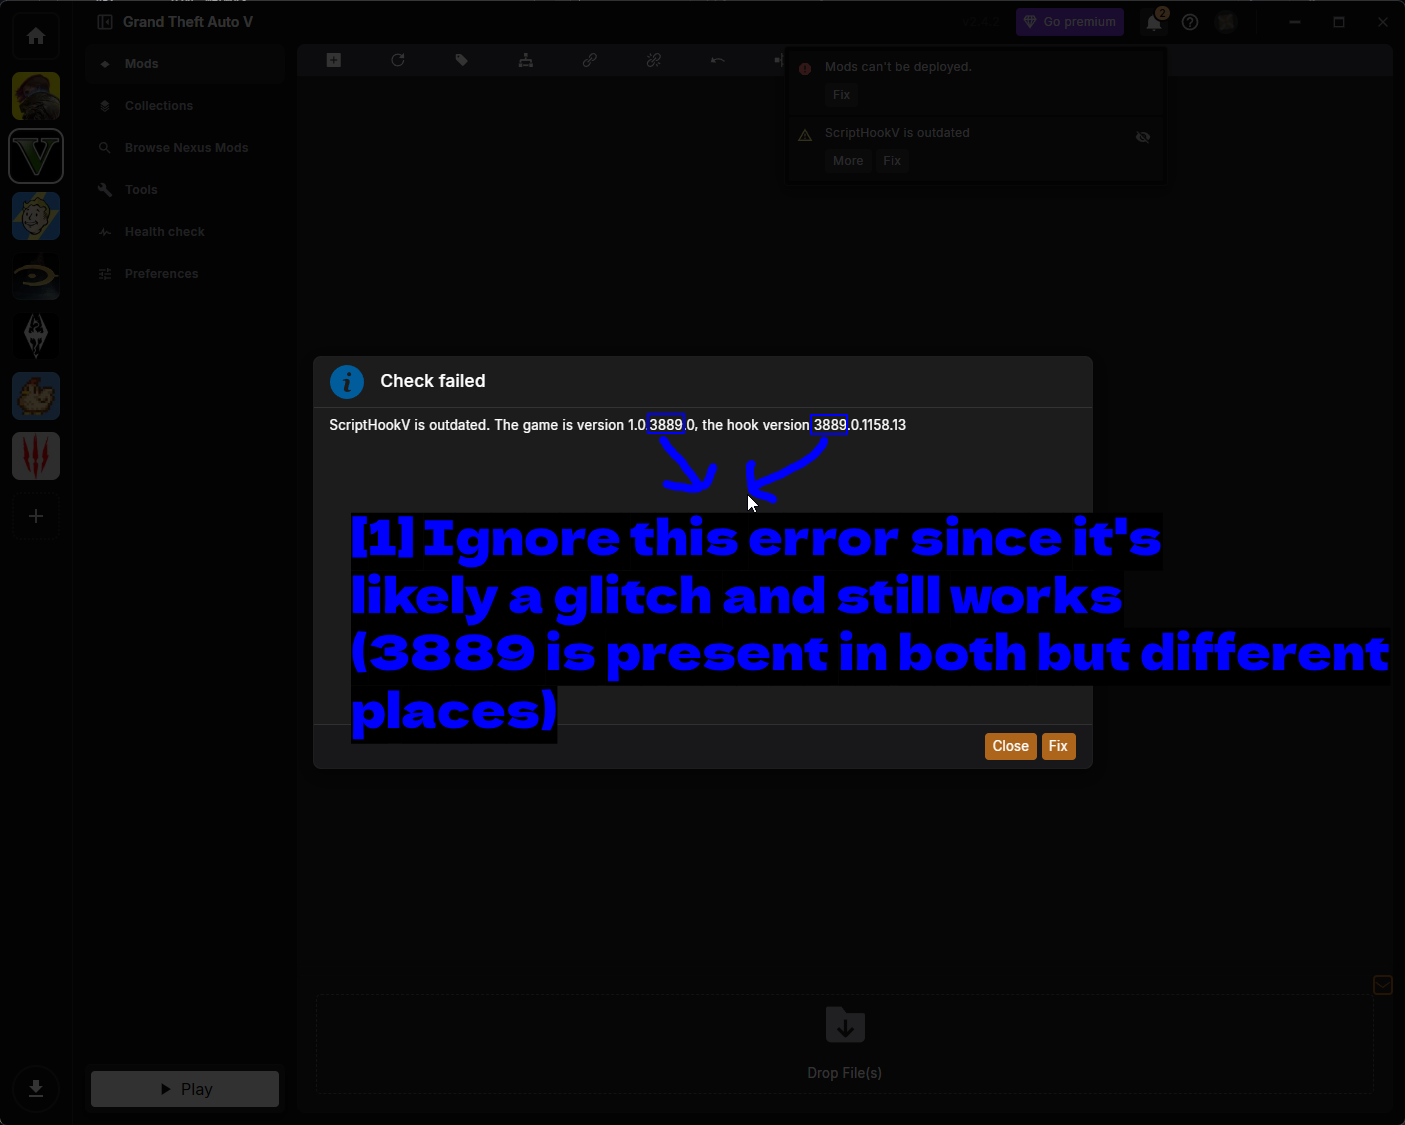
- Ignorez cette erreur car il s'agit probablement d'un bug et ça fonctionne quand même (3889 est présent dans les deux mais à des endroits différents) : Vortex affirme que
ScriptHookV is outdated. The game is version 1.0.3889.0, the hook version 3889.0.1158.13. Les deux nombres contiennent3889, juste à des positions différentes, donc la vérification de version compare mal les valeurs. Les mods ont fonctionné parfaitement chez moi malgré tout. Cliquez sur Close plutôt que sur Fix.
Maintenant, récupérez un mod. Rendez-vous sur une page de mod sur Nexus Mods.
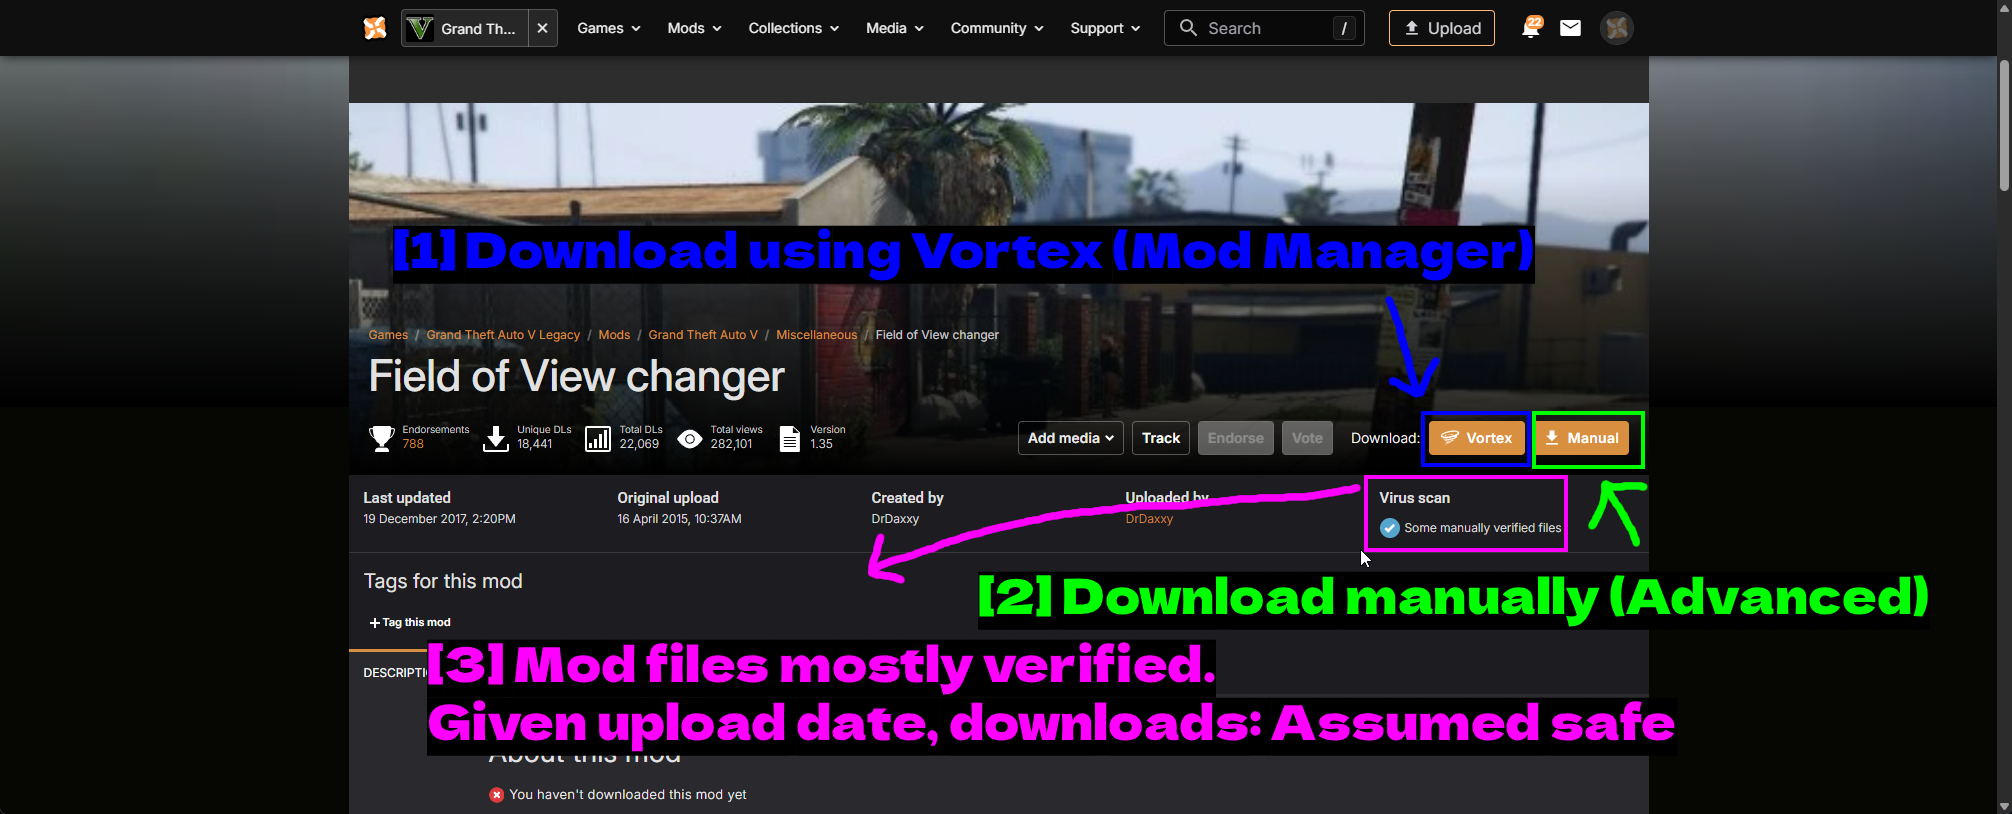
- Télécharger avec Vortex (gestionnaire de mods) : Le bouton orange Vortex transmet directement le téléchargement à l'application.
- Télécharger manuellement (Avancé) : Manual télécharge via votre navigateur à la place, si vous préférez l'installer vous-même.
- Fichiers du mod majoritairement vérifiés. Compte tenu de la date de mise en ligne, téléchargements : Considéré comme sûr : La case Virus scan. Celle-ci indique Some manually verified files plutôt qu'un passage automatique propre, mais vu la date de mise en ligne et le nombre de téléchargements, c'est suffisamment sûr. Cela vaut toujours le coup d'y jeter un œil.
Si vous choisissez Manual, Nexus vous proposera un choix de vitesses de téléchargement.
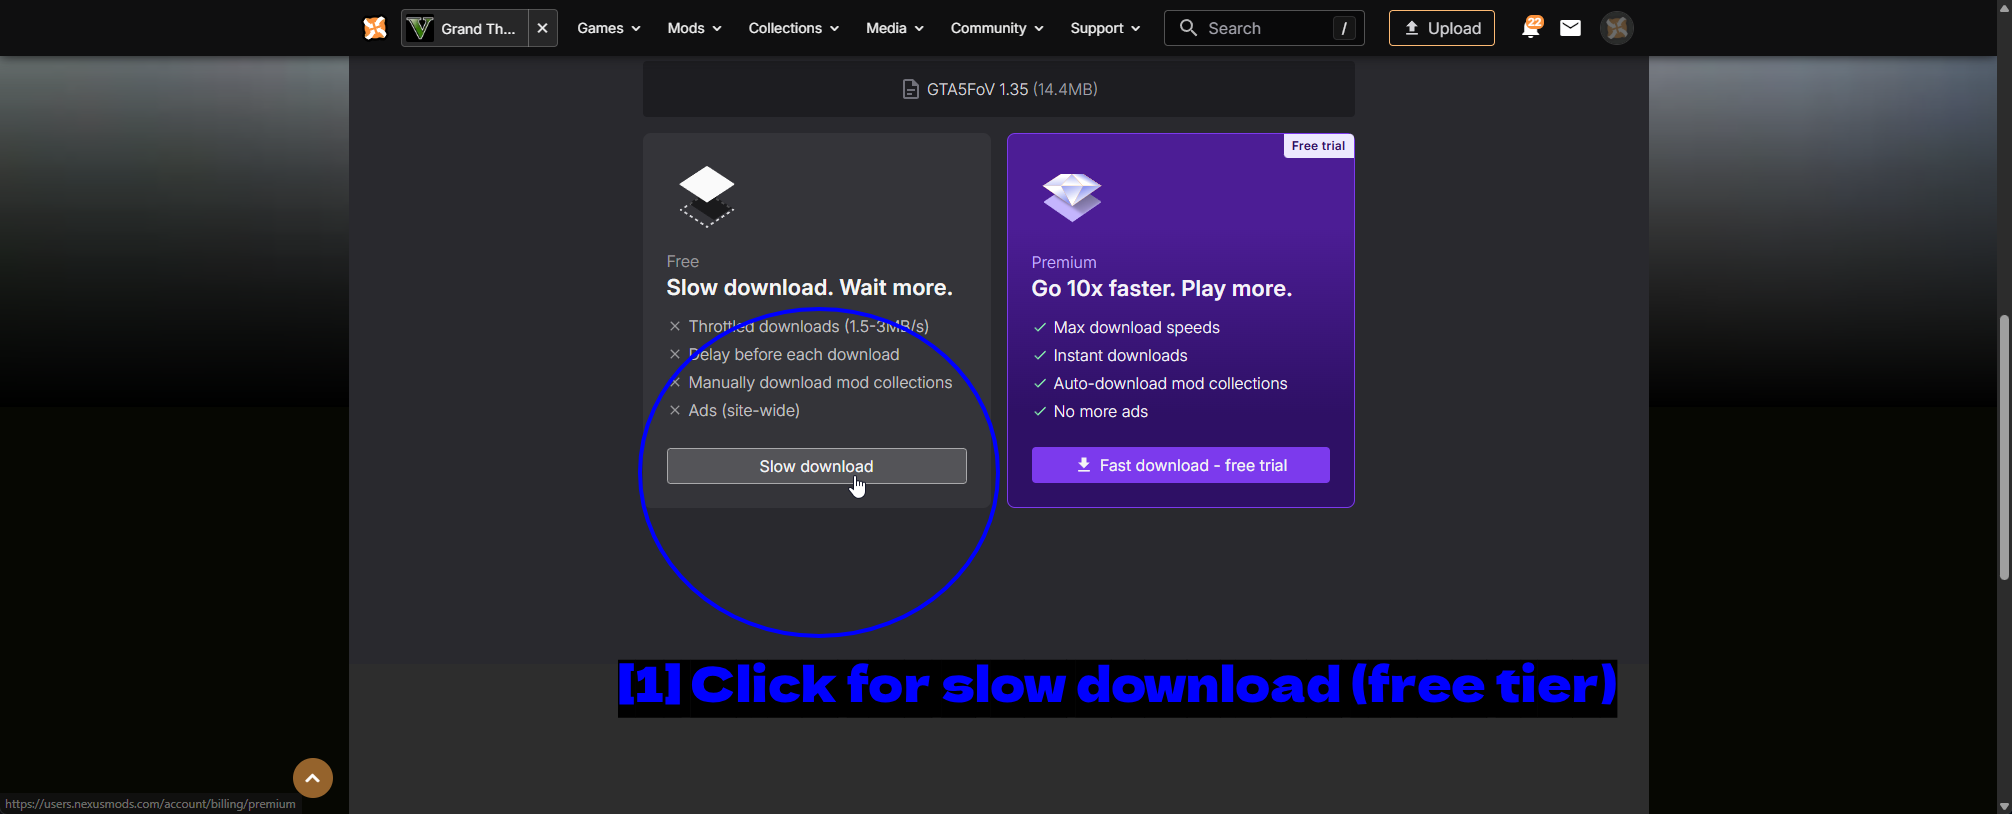
- Cliquez pour un téléchargement lent (compte gratuit) : Les comptes gratuits ont des vitesses limitées et un court délai avant chaque téléchargement. C'est normal. Premium supprime l'attente, mais le compte gratuit fonctionne très bien pour un mod occasionnel.
Une fois installé, le mod apparaît sur la page Mods, qui est aussi votre hub pour tout ce que Vortex propose.
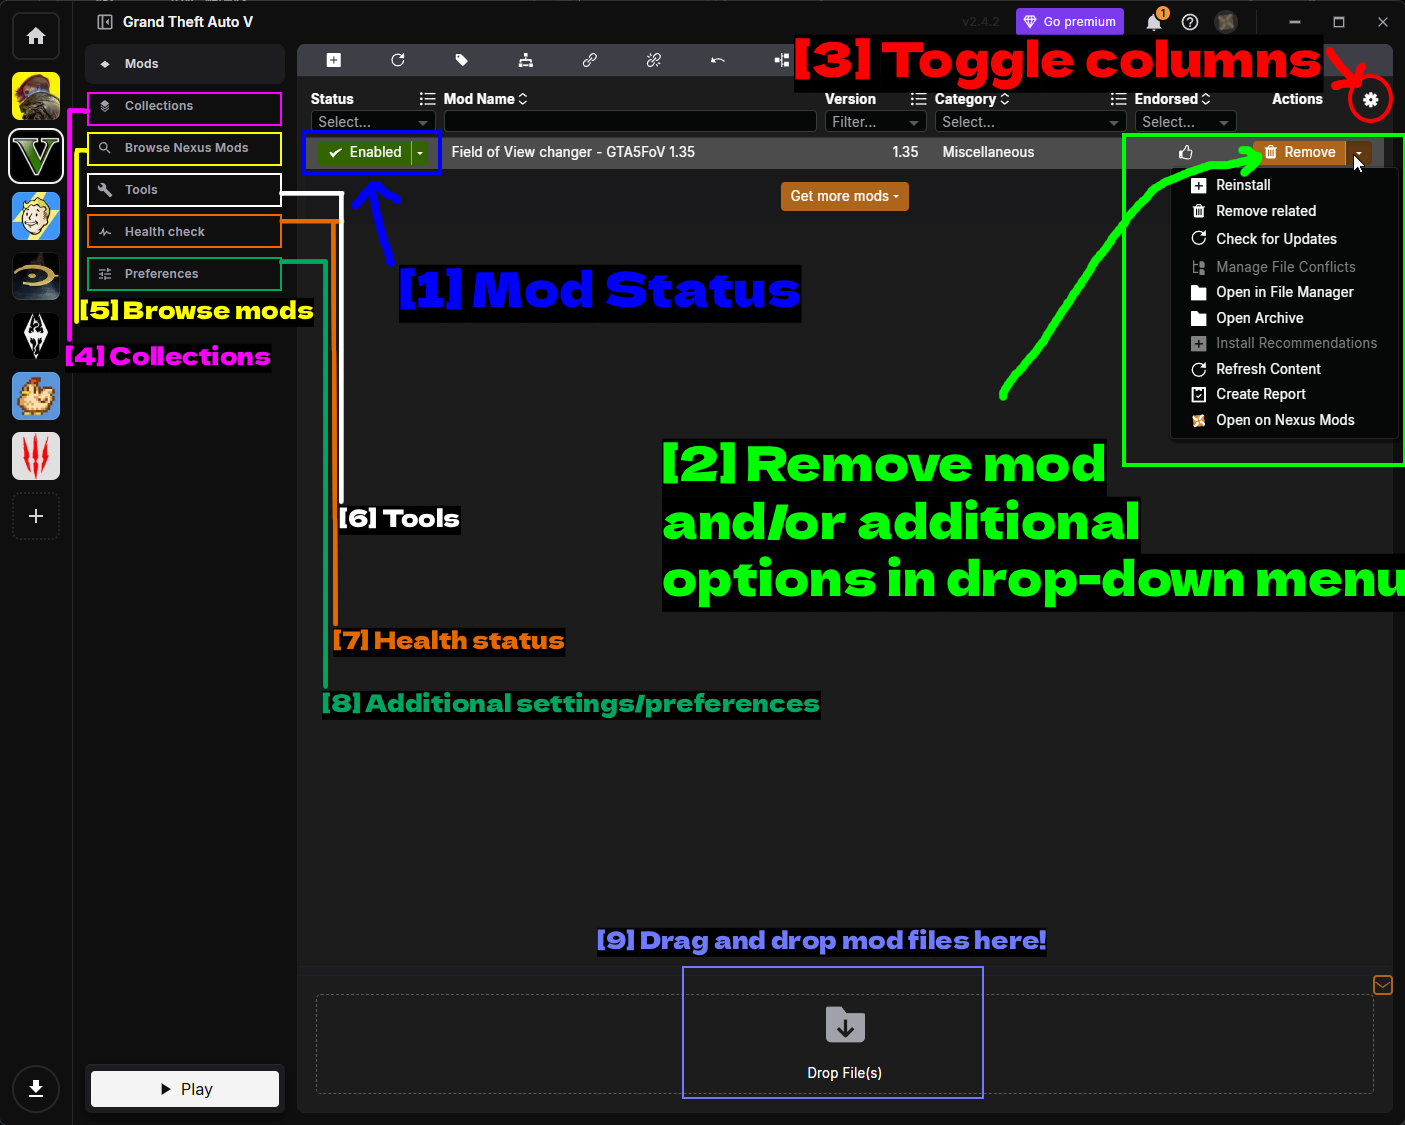
- Statut du mod : Le menu déroulant Status - activer, désactiver ou désinstaller un mod.
- Supprimer le mod et/ou options supplémentaires dans le menu déroulant : Remove désinstalle, et la flèche ouvre le menu d'actions complet (Reinstall, Check for Updates, Manage File Conflicts, Open in File Manager, Open Archive, Refresh Content, Create Report, et Open on Nexus Mods).
- Basculer les colonnes : L'icône engrenage permet de choisir les colonnes affichées.
- Collections : Gérer les collections installées.
- Parcourir les mods : Parcourir Nexus Mods depuis l'application.
- Outils : Programmes externes et options de lancement.
- État de santé : Les vérifications de Vortex sur votre configuration.
- Paramètres/préférences supplémentaires : Préférences spécifiques à GTA V.
- Glissez-déposez les fichiers de mod ici ! : Vous pouvez déposer une archive téléchargée manuellement directement sur cette zone et Vortex l'installera.
Le menu déroulant Status vous propose trois états.
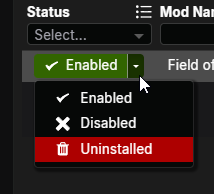
- Enabled - le mod est actif et déployé dans votre jeu.
- Disabled - installé dans Vortex mais non déployé. Le moyen le plus rapide de déterminer quel mod pose problème.
- Uninstalled - supprime les fichiers mais conserve l'archive téléchargée.
Les Collections sont des groupes de mods sélectionnés publiés par d'autres utilisateurs, installables en une seule fois.
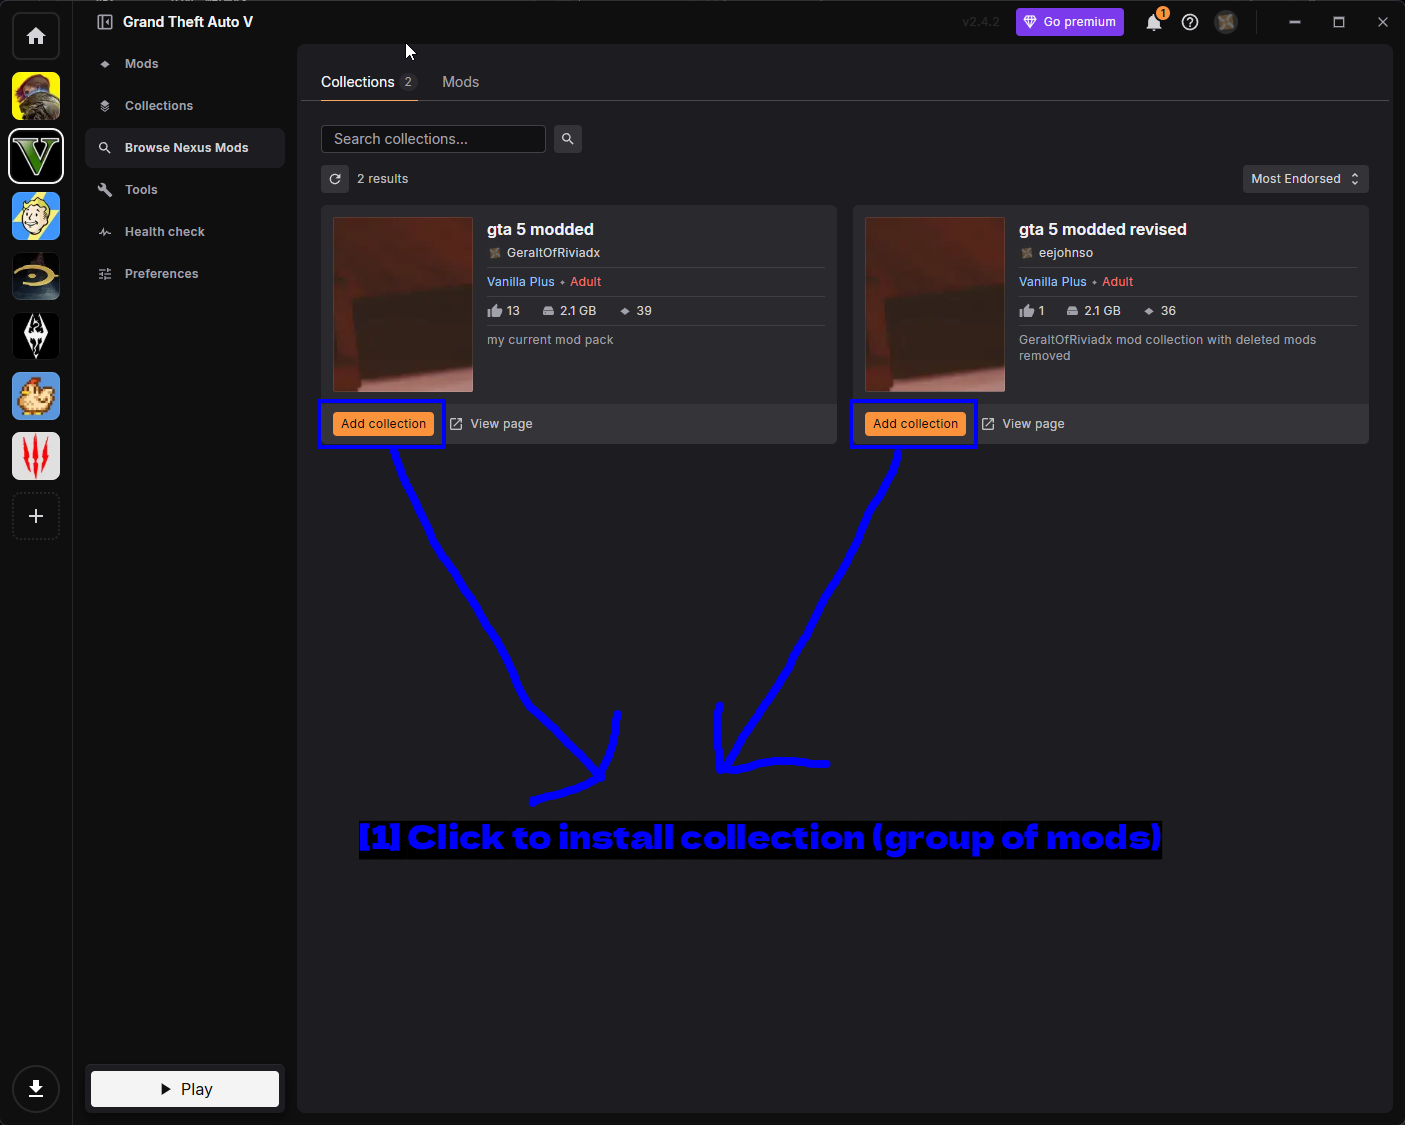
- Cliquez pour installer une collection (groupe de mods) : Add collection installe tout ce qu'elle contient. Pratique si vous voulez une refonte complète sans avoir à chercher 40 mods individuels, même si vous faites confiance à son créateur pour avoir testé la combinaison.
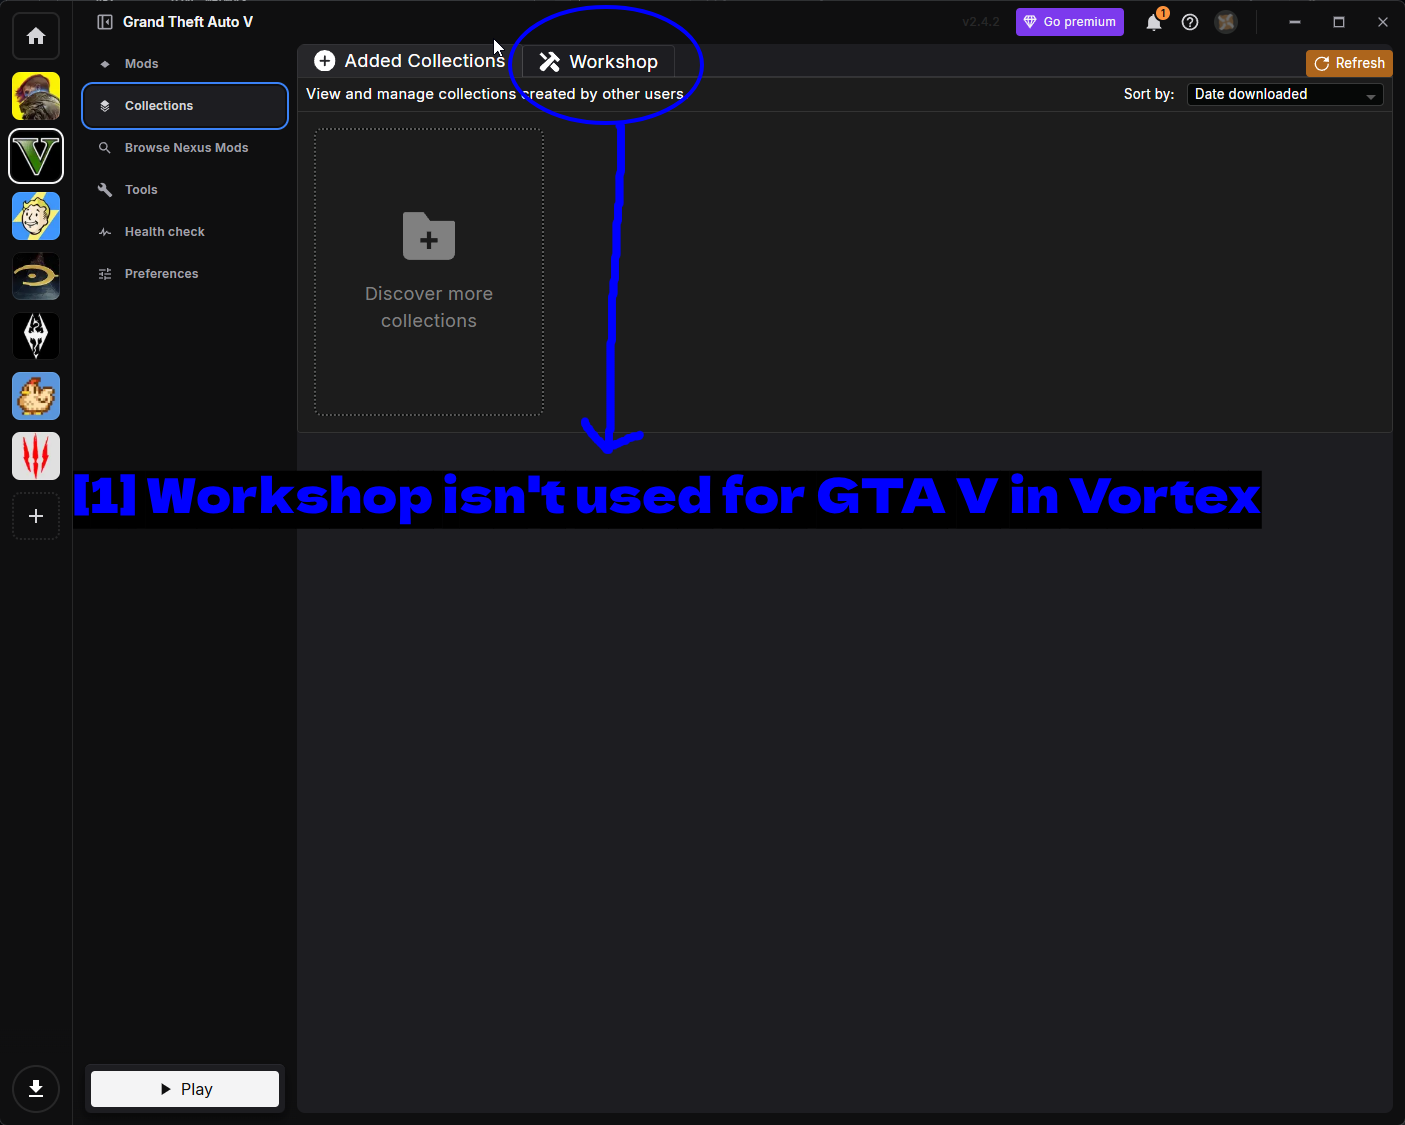
- Workshop n'est pas utilisé pour GTA V dans Vortex : L'onglet Workshop est celui où vous créeriez et publieriez vos propres collections. Il n'est pas utilisé pour GTA V, donc vous pouvez l'ignorer - Added Collections et Discover more collections sont les onglets qui comptent.
La page Tools liste les programmes externes qui s'exécutent en parallèle du jeu.
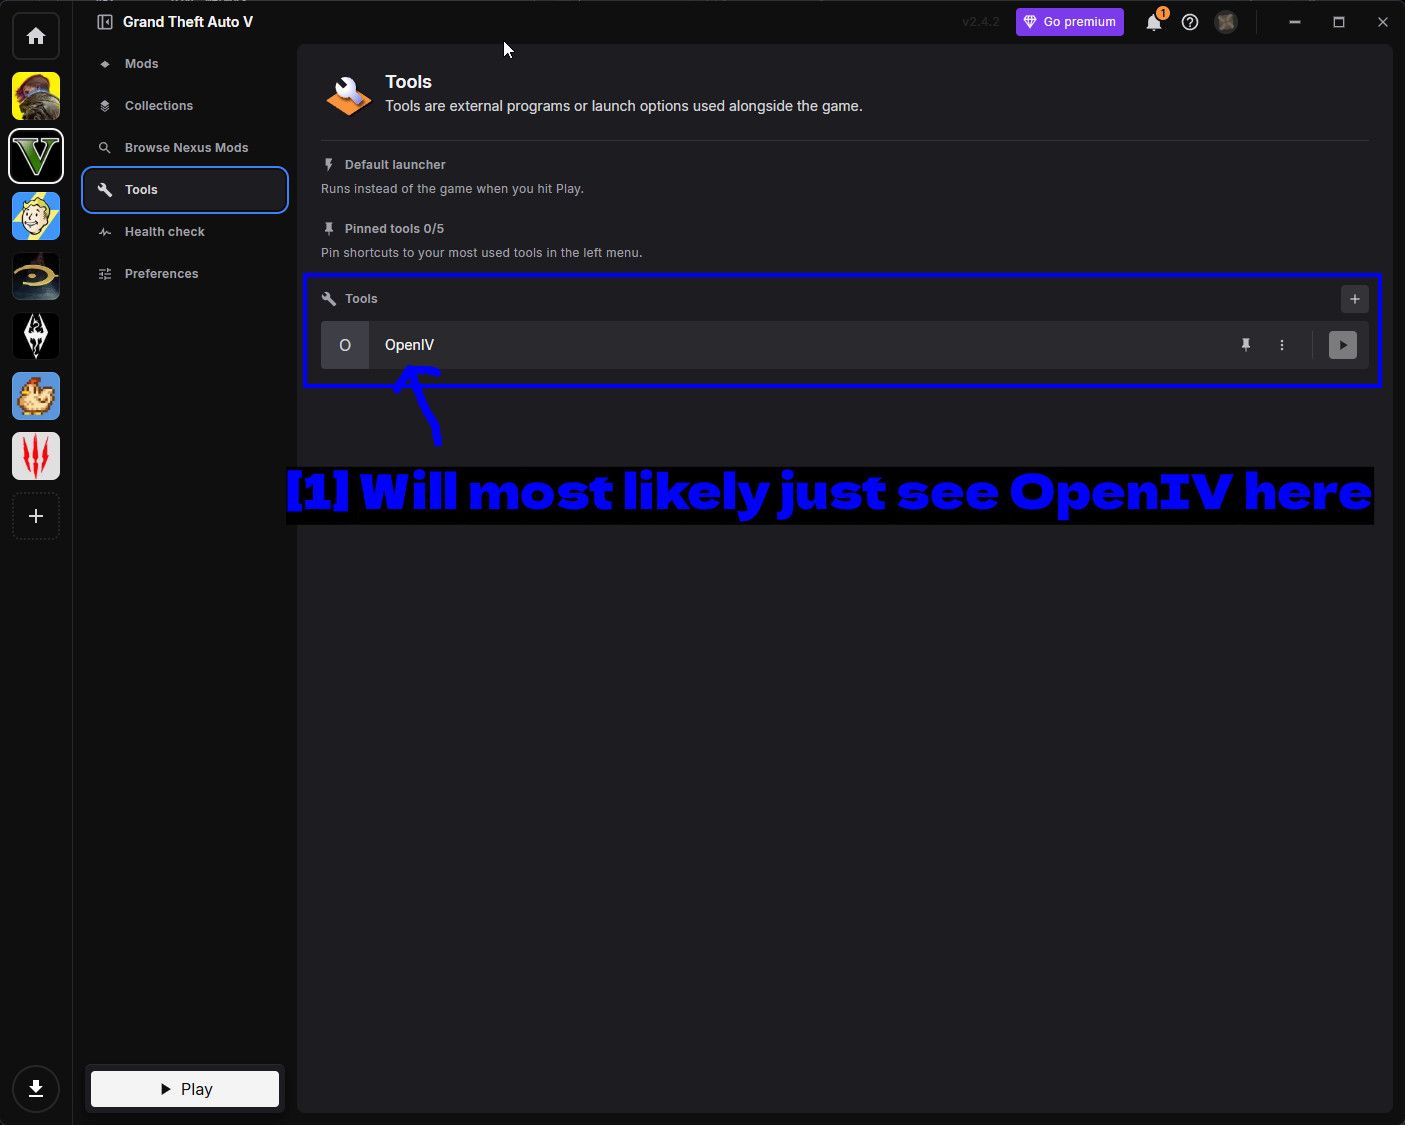
- Vous verrez très probablement juste OpenIV ici : OpenIV est le seul outil que l'extension GTA V configure par défaut. Vous pouvez ajouter le vôtre avec le bouton +, et en épingler jusqu'à cinq dans le menu de gauche.
Preferences contient les paramètres spécifiques à GTA V.
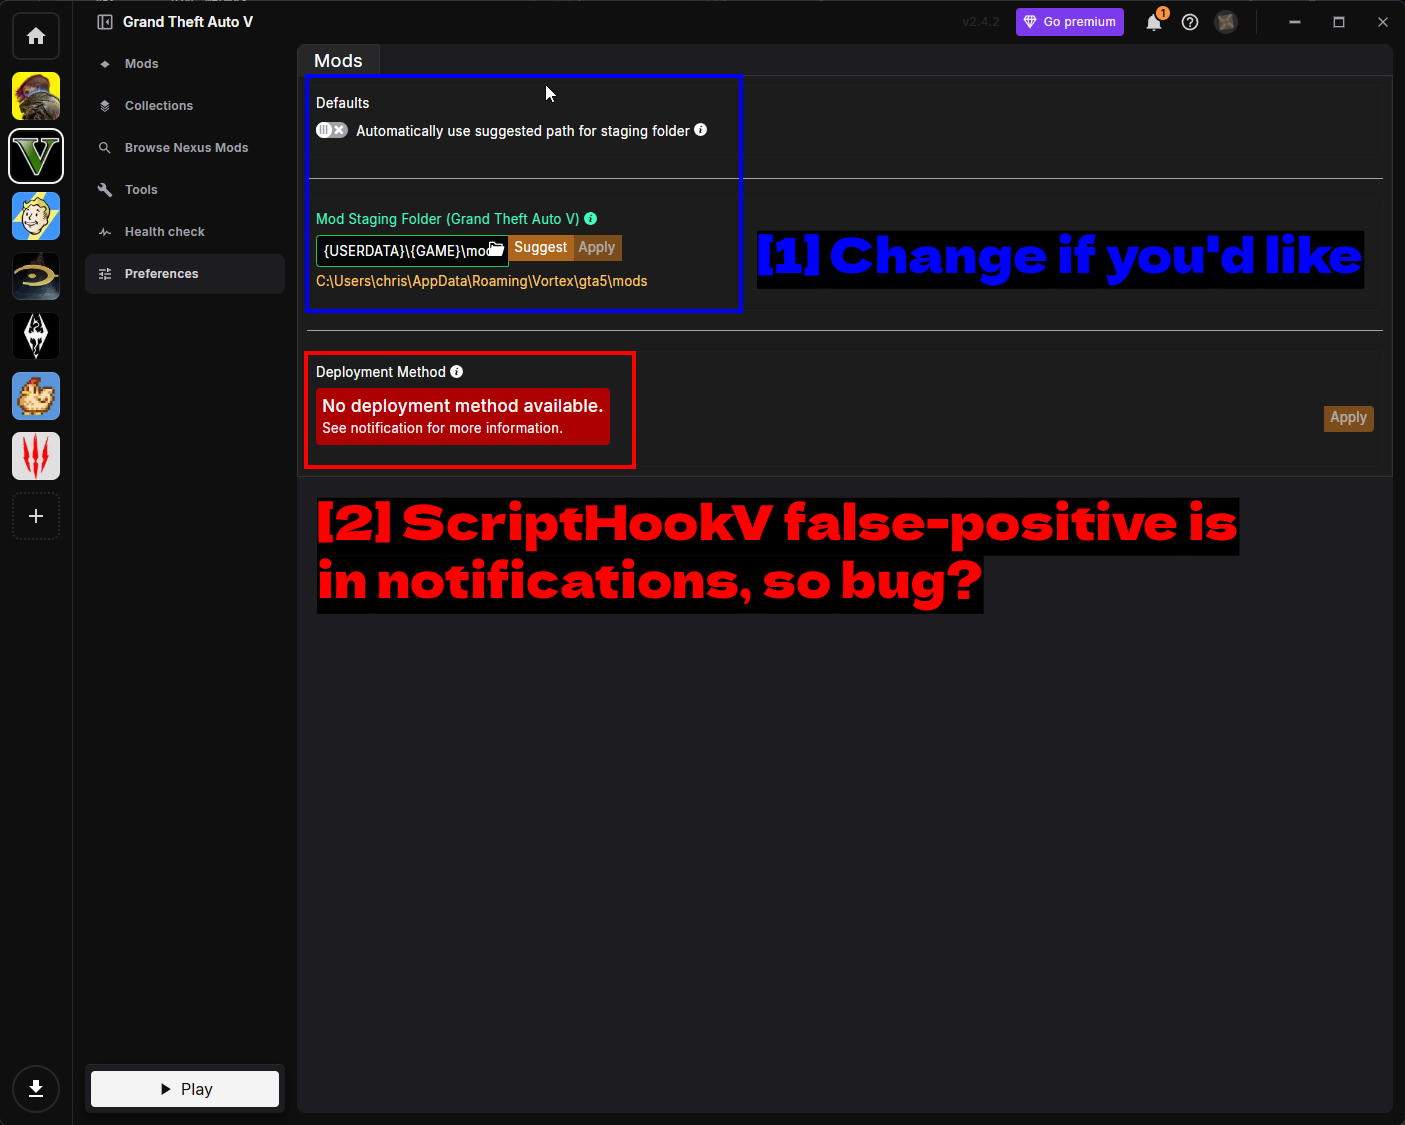
- Changez si vous le souhaitez : Le Mod Staging Folder est l'endroit où Vortex conserve les mods avant de les déployer. Cela doit se trouver sur le même disque que votre installation du jeu.
- Le faux positif de ScriptHookV est dans les notifications, alors bug ? : No deployment method available apparaissant ici semble être lié à cette même vérification de version ScriptHookV erronée. Les mods se sont quand même déployés et ont fonctionné pour moi, donc cela ressemble davantage à un bug de l'extension qu'à un vrai problème.
Enfin, la page Health check examine votre configuration.
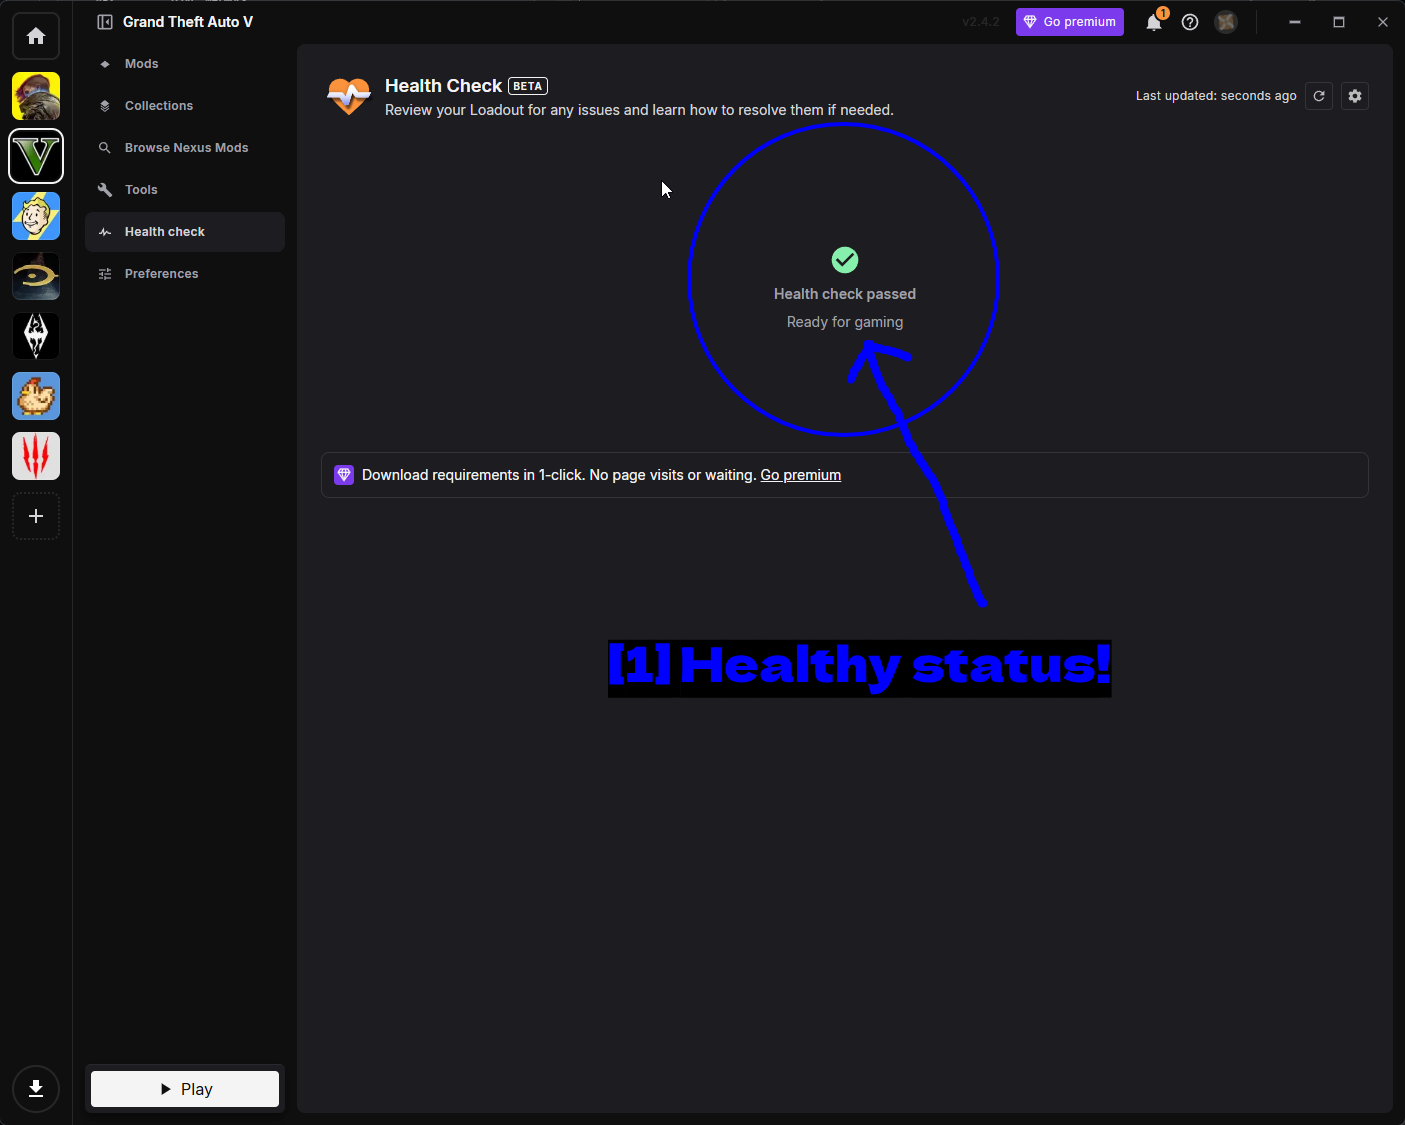
- Statut sain ! : Un Health check passed en vert signifie que Vortex est content. Si quelque chose ne va vraiment pas, ce sera expliqué ici, ce qui est un meilleur premier réflexe que de fouiller dans les logs.
Autres outils
GTA V Mod Manager de 5mods
GTA V Mod Manager est un gestionnaire de mods communautaire conçu spécifiquement pour GTA V, ce qui en fait une alternative correcte à Vortex étant donné le nombre de mods GTA V qui n'existent que sur 5mods.
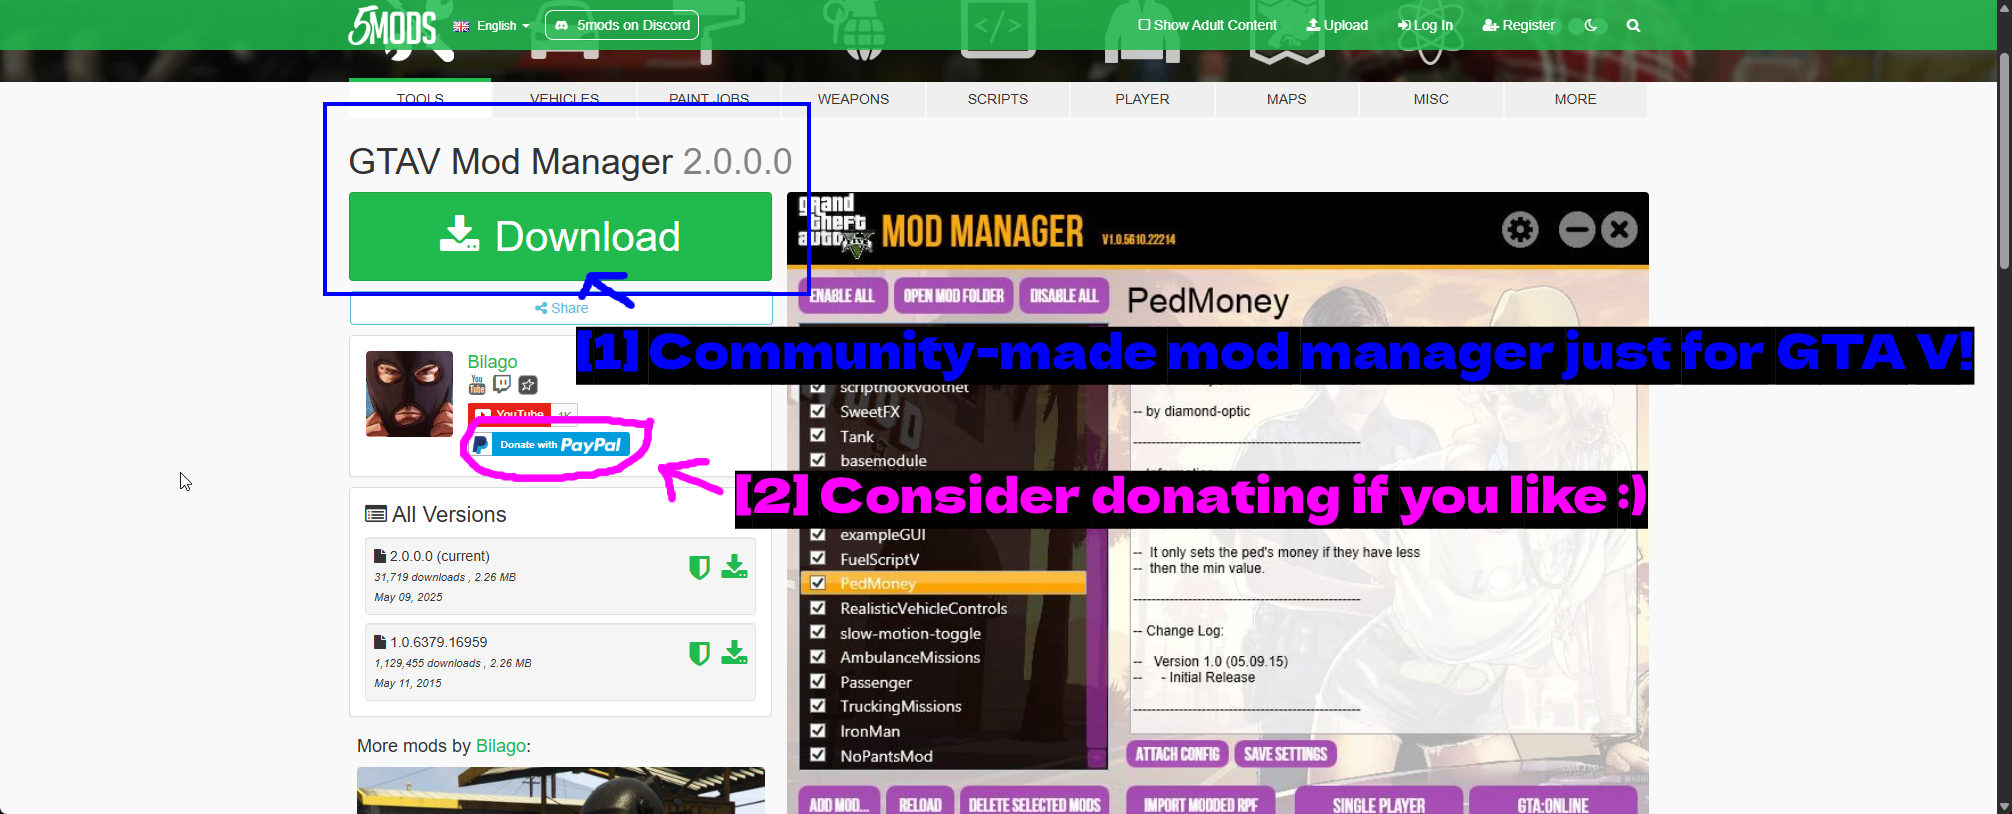
- Un gestionnaire de mods communautaire rien que pour GTA V ! : Téléchargez-le depuis la page 5mods. L'aperçu montre l'interface - une liste de mods installés avec des boutons Enable All, Disable All, et Open Mod Folder, plus Import Modded RPF et des boutons de lancement séparés Single Player / GTA:Online.
- Pensez à faire un don si vous aimez :) : L'auteur, Bilago, a un lien de don si vous trouvez l'outil utile.
Après avoir téléchargé et extrait, exécutez l'exécutable. Vous devrez accepter un accord et spécifier votre dossier GTA V s'il ne détecte pas le chemin automatiquement. Il peut fonctionner sous Wine sur Linux, mais je n'ai pas testé cela personnellement.
ATTENTION - Ne faites pas tourner deux gestionnaires de mods sur la même installation. Choisissez Vortex ou GTA V Mod Manager et tenez-vous-y.
OpenIV
OpenIV est un outil d'un genre complètement différent. Plutôt que de gérer des mods, il vous permet d'ouvrir et de modifier les fichiers d'archives du jeu lui-même - les fichiers .rpf qui contiennent les modèles, textures, audio et configuration de GTA V. C'est ce dont vous avez besoin pour les mods de véhicules, les remplacements de textures, les modifications de map, et parfois les scripts.
C'est aussi l'outil qui crée le dossier mods, qui est la façon la plus sûre de modder GTA V. Au lieu de modifier les vraies archives du jeu, vous modifiez des copies à l'intérieur de mods\ et le plugin ASI redirige le jeu pour qu'il charge celles-ci. Si vous cassez quelque chose, il suffit de supprimer la copie.
Comment installer OpenIV
Rendez-vous sur openiv.com.
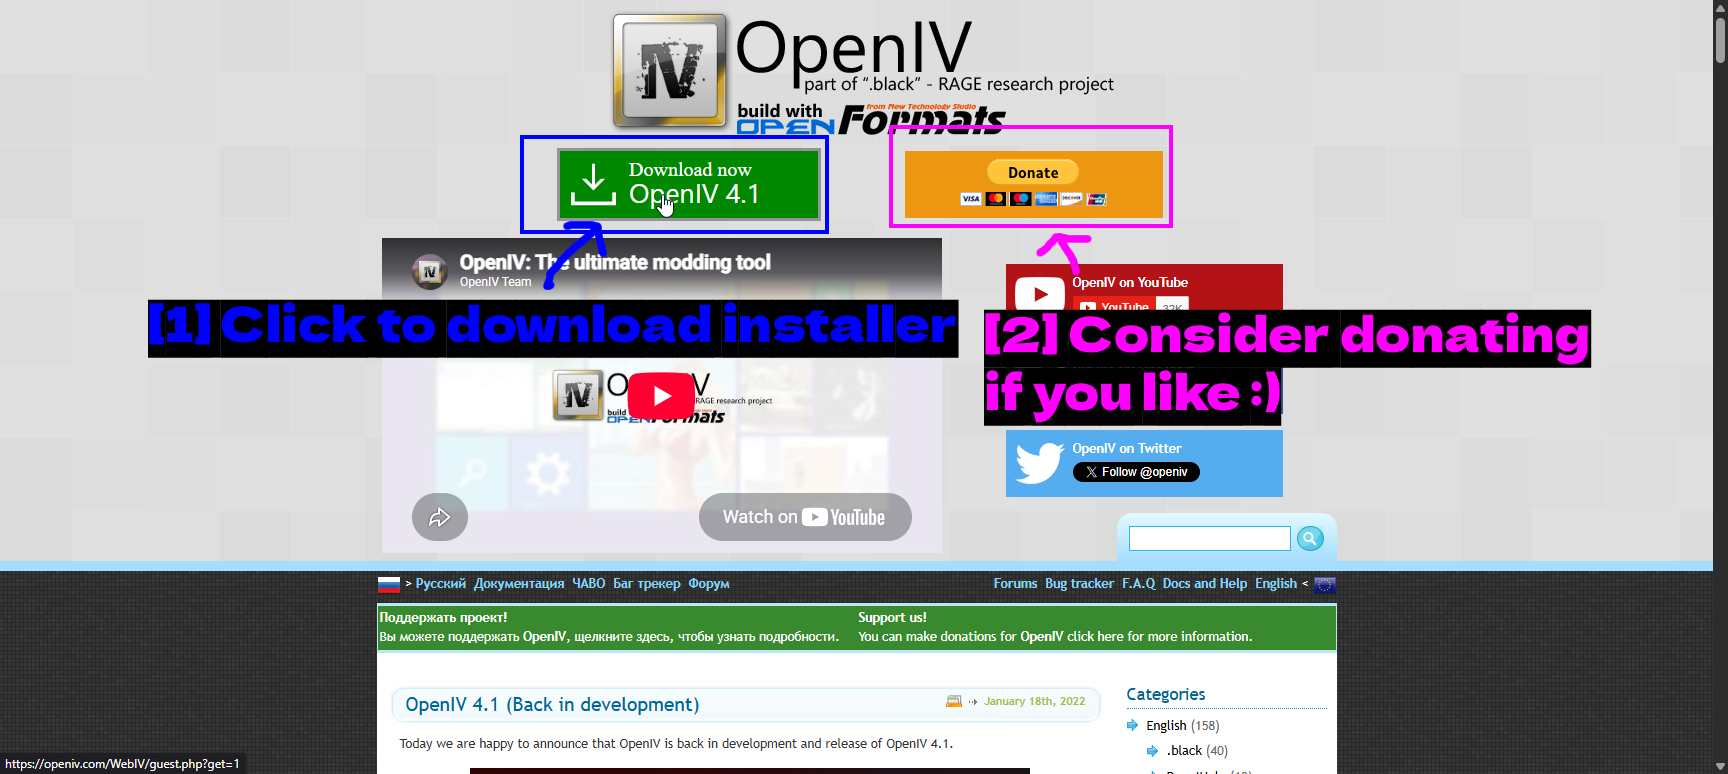
- Cliquez pour télécharger l'installateur : Le grand bouton vert Download now.
- Pensez à faire un don si vous aimez :) : OpenIV est maintenu depuis bien plus d'une décennie, donc il y a un bouton de don si vous voulez le soutenir.
Exécutez l'installateur.
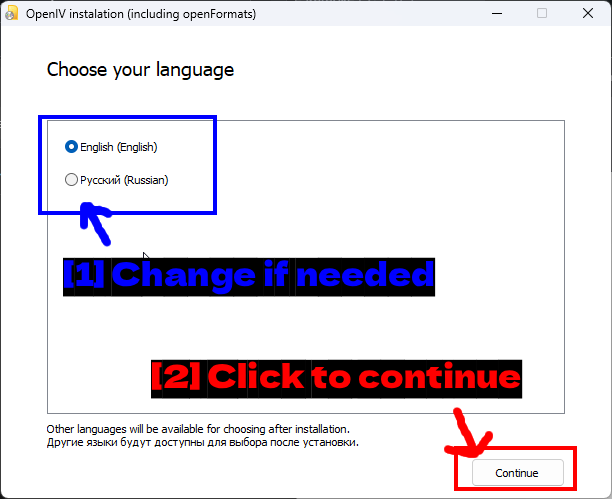
- Changez si nécessaire : Anglais ou Russe. D'autres langues deviennent disponibles après l'installation.
- Cliquez pour continuer : Cliquez sur Continue.
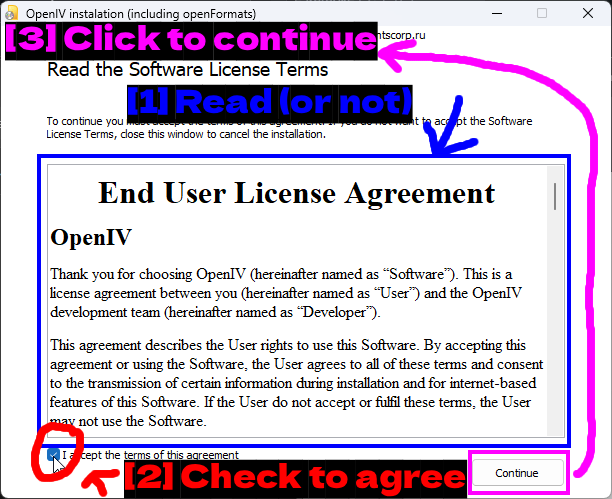
- Lisez (ou pas) : Le contrat de licence utilisateur final.
- Cochez pour accepter : Cochez I accept the terms of this agreement.
- Cliquez pour continuer : Cliquez sur Continue.
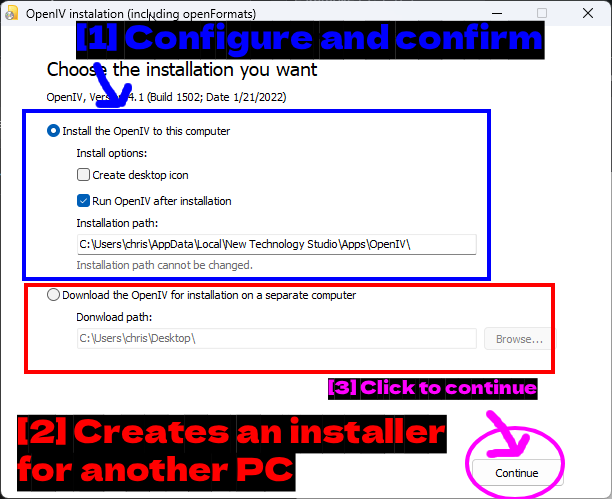
- Configurez et confirmez : Install the OpenIV to this computer est ce que vous voulez. Laissez Run OpenIV after installation coché. Le chemin d'installation ne peut pas être changé.
- Crée un installateur pour un autre PC : La seconde option télécharge simplement un installateur hors ligne pour le déplacer sur une autre machine.
- Cliquez pour continuer : Cliquez sur Continue.
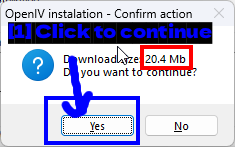
- Cliquez pour continuer : C'est un petit téléchargement (environ 20 Mo), donc cliquez sur Yes.
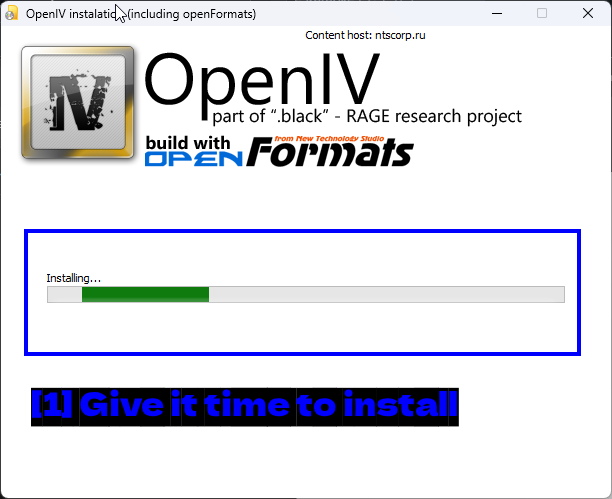
- Laissez le temps à l'installation : Cela ne devrait pas prendre longtemps.
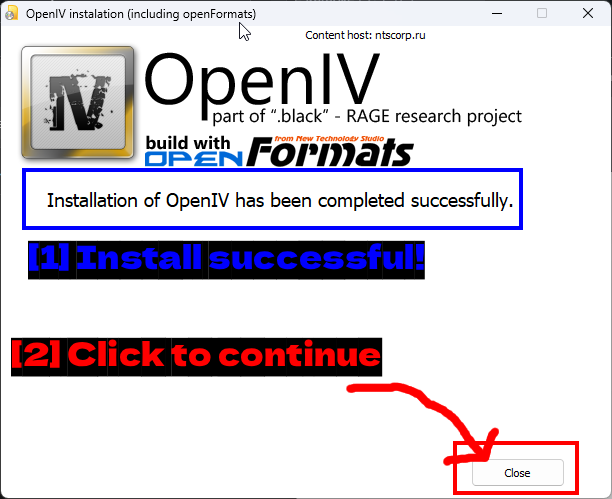
- Installation réussie ! : L'installation est terminée.
- Cliquez pour continuer : Cliquez sur Close.
Pour commencer
Au premier lancement, OpenIV demande avec quel jeu et quelle plateforme vous travaillez.
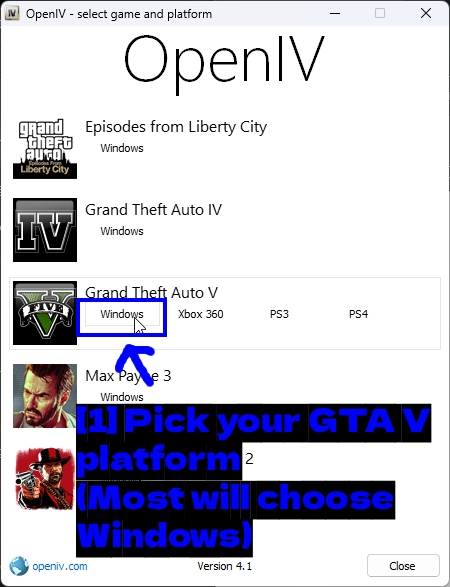
- Choisissez votre plateforme GTA V (la plupart choisiront Windows) : Cliquez sur Windows sur la ligne Grand Theft Auto V. OpenIV prend aussi en charge GTA IV, Episodes from Liberty City, Max Payne 3, et Red Dead Redemption 2.
Ensuite, il a besoin de savoir où le jeu est installé.
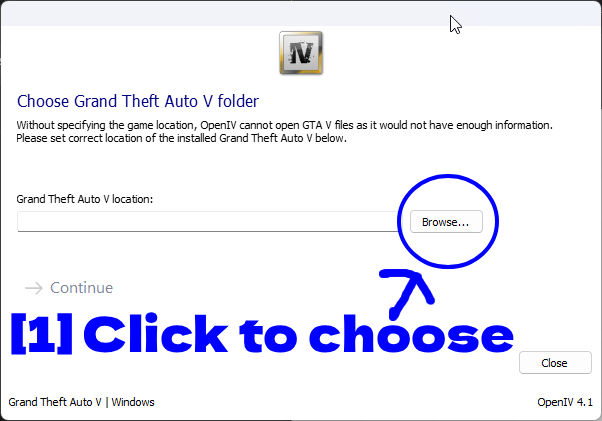
- Cliquez pour choisir : Cliquez sur Browse....
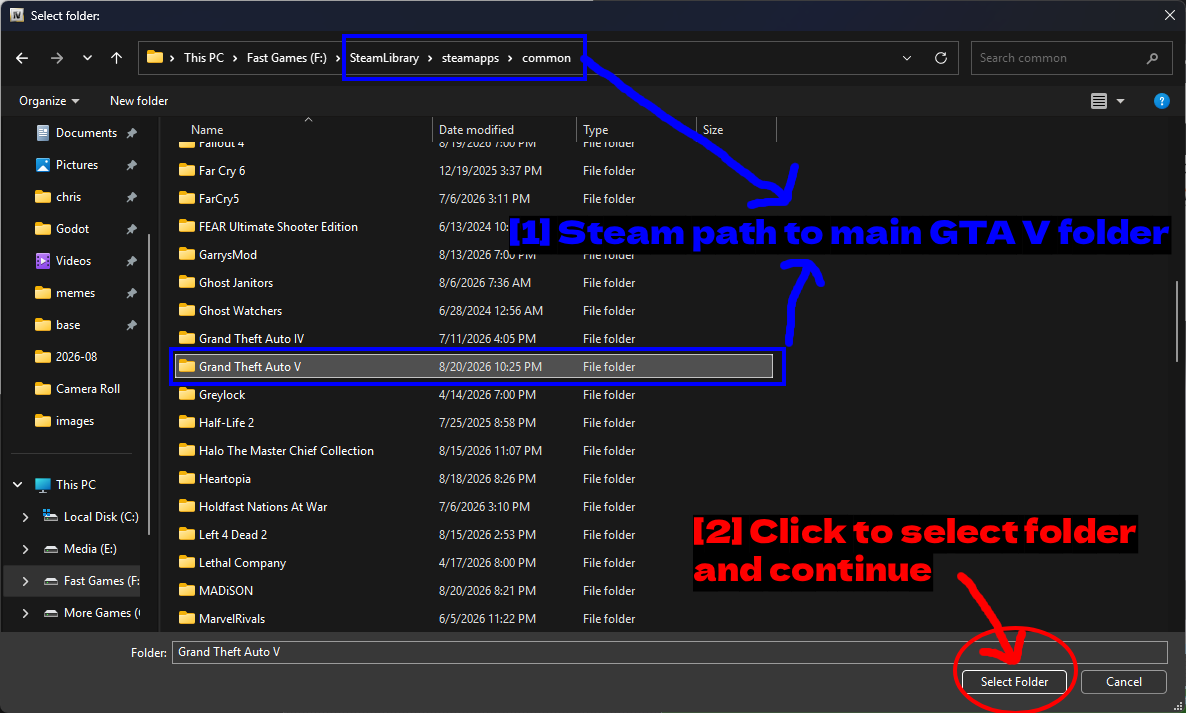
- Chemin Steam vers le dossier principal de GTA V : Naviguez jusqu'à
SteamLibrary\steamapps\common\Grand Theft Auto V(ou où que se trouve le vôtre). - Cliquez pour sélectionner le dossier et continuer : Cliquez sur Select Folder.
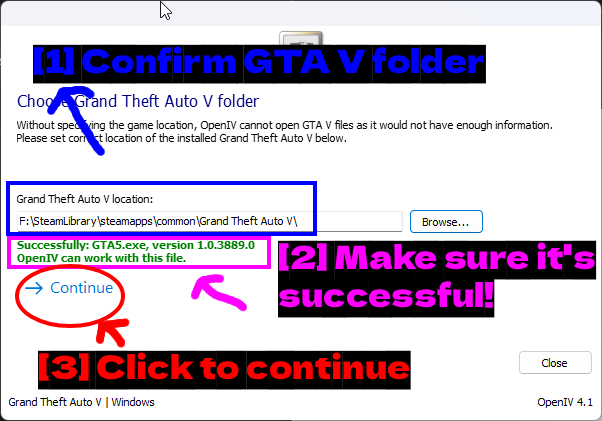
- Confirmez le dossier GTA V : Le chemin devrait maintenant être rempli.
- Assurez-vous que c'est réussi ! : Vous voulez voir le message vert
Successfully: GTA5.exe, version 1.0.3889.0 / OpenIV can work with this file.. Si vous obtenez une erreur ici, vous avez sélectionné le mauvais dossier. - Cliquez pour continuer : Cliquez sur Continue.
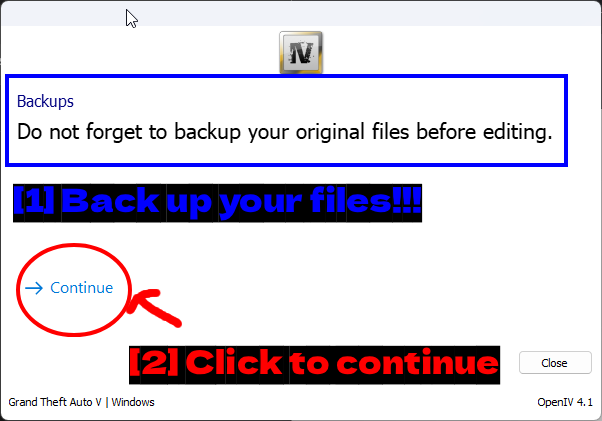
- Sauvegardez vos fichiers !!! : OpenIV vous rappelle de faire une sauvegarde avant de modifier quoi que ce soit, et il a raison. Modifier les archives est l'action la plus destructrice de tout ce guide.
- Cliquez pour continuer : Cliquez sur Continue.
OpenIV s'ouvre en lecture seule par défaut. Pour modifier quoi que ce soit, vous devez activer le mode édition.
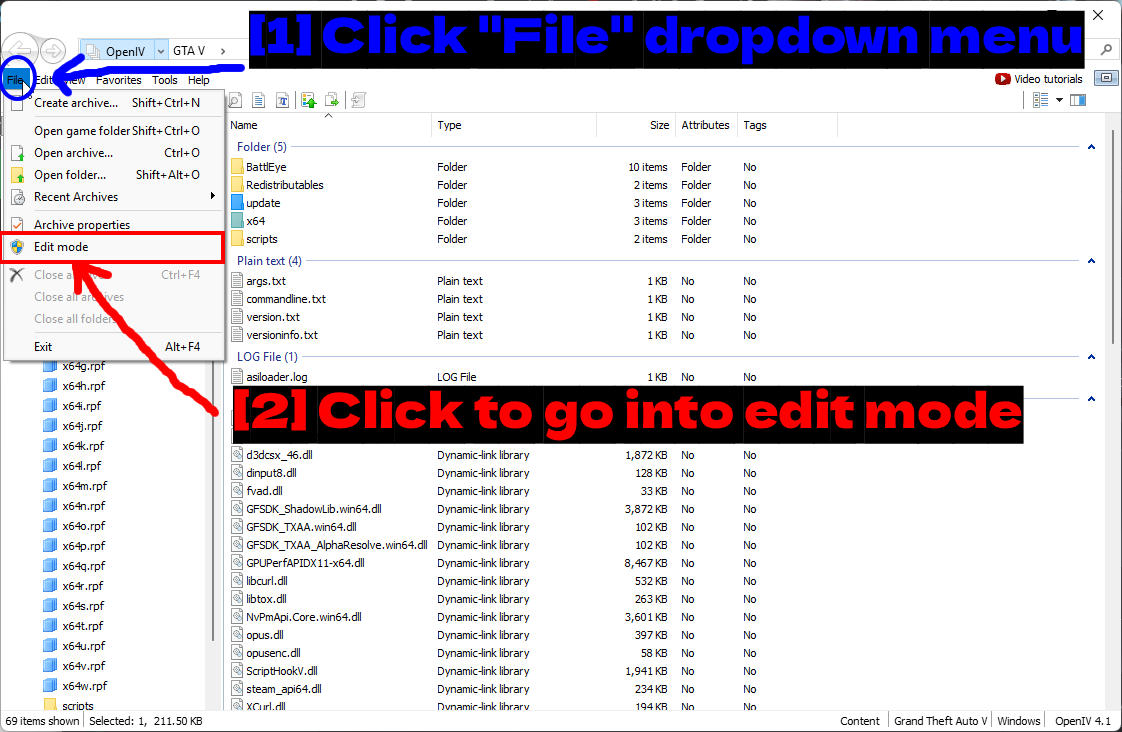
- Cliquez sur le menu déroulant "File" : Ouvrez le menu File.
- Cliquez pour passer en mode édition : Cliquez sur Edit mode.
Maintenant, l'habitude la plus importante à prendre dans OpenIV.
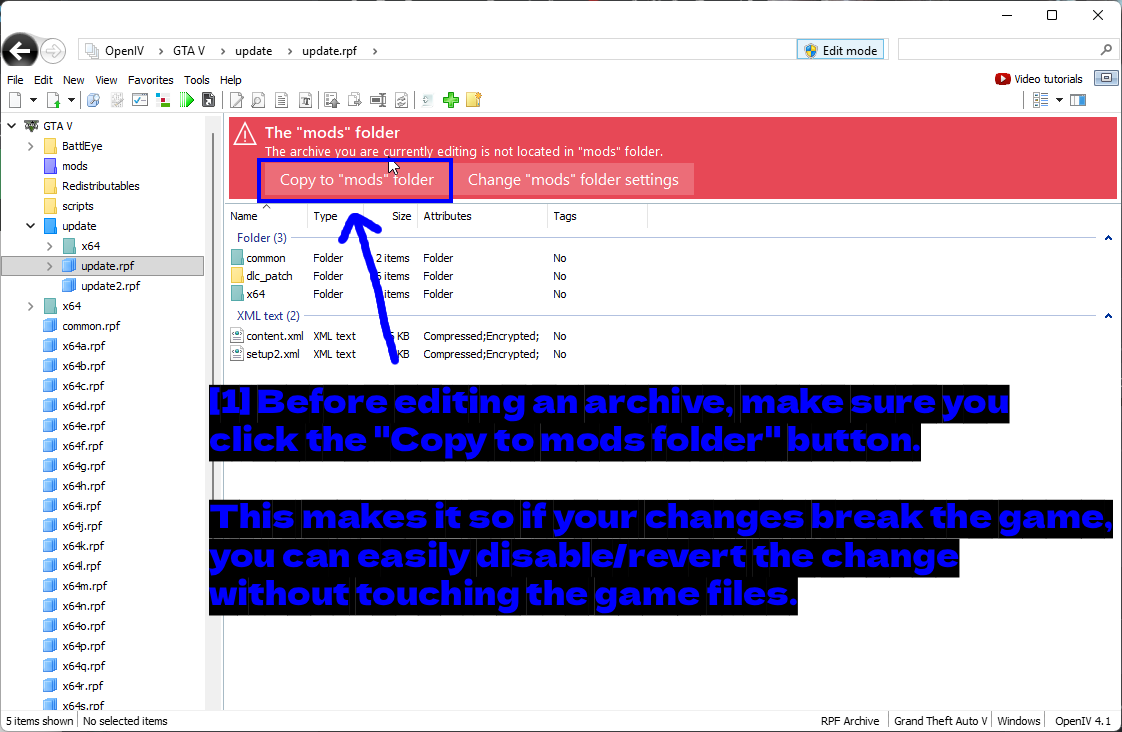
- Avant de modifier une archive, assurez-vous de cliquer sur le bouton "Copy to mods folder". Cela permet, si vos modifications cassent le jeu, de facilement désactiver/annuler le changement sans toucher aux fichiers du jeu. : Lorsque vous ouvrez une archive qui n'est pas dans
mods\, OpenIV affiche une bannière rouge. Cliquez toujours sur Copy to "mods" folder avant de faire des modifications.
Faites-le absolument chaque fois. Modifier directement les archives réelles signifie qu'une mauvaise modification force une vérification complète des fichiers du jeu, tandis qu'une modification à l'intérieur de mods\ peut être annulée en supprimant simplement un fichier.
ASI Loader
Pour que tout cela fonctionne, le jeu a besoin de l'ASI Loader et du plugin OpenIV.ASI installés. OpenIV peut gérer les deux.
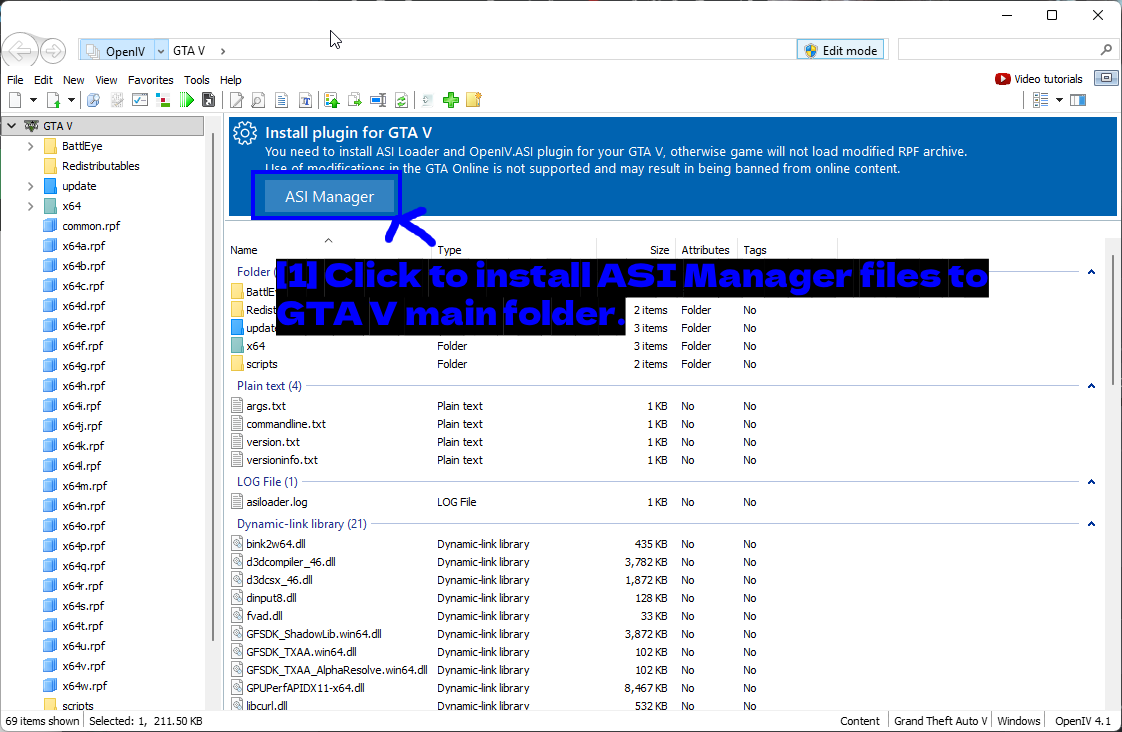
- Cliquez pour installer les fichiers ASI Manager dans le dossier principal de GTA V. : OpenIV affiche une bannière Install plugin for GTA V avec un bouton ASI Manager. Cliquez sur celui-ci.
La première fois que vous l'ouvrez, OpenIV propose de créer le dossier mods.
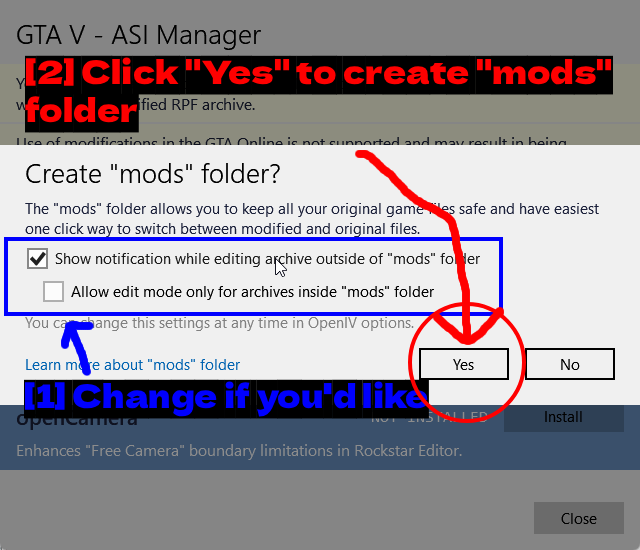
- Changez si vous le souhaitez : Deux options - Show notification while editing archive outside of "mods" folder (laissez cette option activée, c'est la bannière rouge mentionnée plus tôt) et Allow edit mode only for archives inside "mods" folder (activer cette option est une bonne sécurité si vous craignez de modifier le mauvais élément).
- Cliquez sur "Yes" pour créer le dossier "mods" : Cliquez sur Yes.
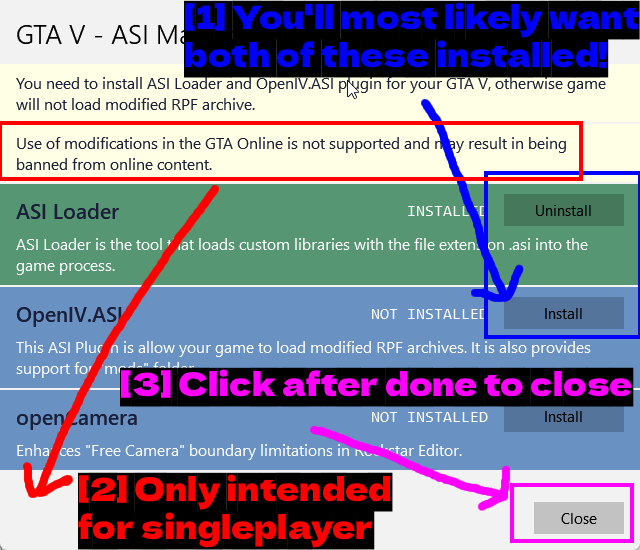
- Vous voudrez probablement installer ces deux éléments ! : ASI Loader charge les plugins
.asidans le processus du jeu, et OpenIV.ASI est ce qui permet au jeu de lire les archives modifiées depuis le dossiermods. Vous avez besoin des deux. - Réservé uniquement au solo : OpenIV avertit que l'utilisation de modifications dans GTA Online n'est pas supportée et peut entraîner un bannissement. Prenez cela au sérieux.
- Cliquez une fois terminé pour fermer : Cliquez sur Close une fois les deux installés.
NOTE - openCamera est également listé ici. Il ne fait qu'étendre les limites de la caméra libre du Rockstar Editor et est entièrement optionnel.
Notes
- Nous ne sommes pas affiliés à Rockstar Games, Alexander Blade, l'équipe OpenIV, ou Nexus Mods. Ce guide a été rédigé de manière indépendante.
- Tout ce qui est mentionné ici était exact au moment de la rédaction. GTA V, Script Hook V et les différents plugins sont mis à jour régulièrement, donc certaines captures d'écran peuvent devenir obsolètes.
- Réservez les mods au solo uniquement. Rockstar bannit pour les sessions GTA Online modifiées et il n'y a pas d'appel sur lequel compter.
- Ajoutez les mods quelques-uns à la fois. Quand quelque chose casse, vous saurez vraiment ce qui en est la cause.
- Si vous prévoyez de basculer régulièrement entre une installation moddée et vanilla, il est utile de garder une copie de vos fichiers non modifiés quelque part pour pouvoir les remettre rapidement.
Legacy vs Enhanced
Ce guide couvre l'édition legacy de GTA V. En mars 2025, Rockstar a sorti GTA V Enhanced comme une installation complètement séparée sur PC, et je n'avais que Legacy installé au moment de la rédaction, donc tout ce qui précède a été fait sur Legacy.
J'espérais que les deux versions seraient suffisamment proches pour qu'un seul jeu d'instructions couvre les deux. Elles sont beaucoup plus proches qu'au lancement, mais elles ne sont pas identiques. La structure générale est identique - vous avez toujours besoin d'un ASI loader et de Script Hook V, les fichiers .asi vont toujours dans la racine du jeu, les mods .NET vont toujours dans scripts\, et vous voulez toujours un dossier mods plutôt que de modifier les archives réelles. Ce qui change, c'est que chaque outil est une build différente, et les mods eux-mêmes ne sont pas interchangeables.
Voici ce qui diffère au moment de la rédaction.
- Script Hook V - la version officielle prend désormais en charge Enhanced (une mise à jour de compatibilité a eu lieu en mars 2026 ciblant la build Enhanced
1.0.1013.17). Même outil, téléchargement différent. Vous ne pouvez pas réutiliser celui de Legacy. - ScriptHookVDotNet - vous voudrez utiliser le fork ScriptHookVDotNetEnhanced plutôt que les builds nightly utilisées plus haut. Il fonctionne comme remplacement direct pour les deux éditions, et les scripts conçus pour Legacy tournent généralement tels quels, sauf s'ils reposent sur leurs propres schémas mémoire.
- OpenIV.asi ne fonctionne pas du tout sur Enhanced. Il a été remplacé par OpenRPF, qui effectue la même redirection vers le dossier
mods. L'installation diffère légèrement puisque vous devez créermods\update\et copier vous-mêmeupdate.rpfainsi que le dossierx64. - Les mods d'assets ne sont pas compatibles entre les deux versions. Les fichiers Legacy (gen8) feront planter Enhanced (gen9). Les véhicules, cartes et textures doivent être construits pour Enhanced ou convertis avec CodeWalker, ce qui exclut une grande partie de ce qui est actuellement disponible sur 5mods.
- FiveM ne prend pas en charge Enhanced, ce qui explique en grande partie pourquoi beaucoup de gens sont revenus à Legacy.
Les simples remplacements de textures, vêtements et sons passent souvent sans grand souci. Les presets ENB et les mods de script nécessitent généralement une mise à jour spécifique à Enhanced.
NOTE - Je n'ai testé aucun de ces points moi-même puisque je n'ai que Legacy d'installé, donc considérez les numéros de version comme approximatifs. Le modding sur Enhanced a évolué rapidement et continue d'évoluer, alors vérifiez la page de chaque outil avant d'installer quoi que ce soit.
Si vous devez choisir entre les deux uniquement pour le modding, Legacy reste le choix le plus sûr. C'est ce que la grande majorité des mods ciblent et l'outillage bénéficie de plus d'une décennie d'historique. Enhanced est la version la plus belle si vous jouez surtout en vanilla.
Touches Virtuelles
Lorsque vous modifiez les touches assignées dans les trainers ou autres mods, vous devrez utiliser des codes de touches virtuelles plutôt que le nom de la touche elle-même. Ce sont les numéros que Windows utilise pour identifier chaque touche de votre clavier, et c'est ce qu'attendent les fichiers de configuration.
Simple Trainer en est un bon exemple concret.
- Raccourcis clavier pour Simple Trainer. Vous devrez peut-être les modifier si vous utilisez d'autres mods en conflit : Regardez la section
[KeyBindings].MenuKey=114est ce qui ouvre le menu, et le commentaire à côté vous indique que114correspond à F3. Si vous vouliez ouvrir le menu avec F5 à la place, vous chercheriez F5 dans le tableau ci-dessous et changeriez la ligne enMenuKey=116.
La plupart des auteurs de mods ont la gentillesse de laisser des commentaires comme ceux-ci dans leurs fichiers de configuration, mais beaucoup ne le font pas, d'où l'utilité de la liste complète.
Voici la liste complète des codes. Vous pouvez également la retrouver sur le site gta-modding.
Cliquez pour développer
| Code | Touche |
|---|---|
1 |
Bouton gauche de la souris |
2 |
Bouton droit de la souris |
3 |
Traitement Control-break |
4 |
Bouton du milieu de la souris |
8 |
Retour arrière |
9 |
Tabulation |
12 |
Effacer |
13 |
Entrée |
16 |
Maj |
17 |
Ctrl |
18 |
Alt |
19 |
Pause |
20 |
Verr. Maj |
27 |
Échap |
32 |
Barre d'espace |
33 |
Page précédente |
34 |
Page suivante |
35 |
Fin |
36 |
Origine |
37 |
Flèche gauche |
38 |
Flèche haut |
39 |
Flèche droite |
40 |
Flèche bas |
41 |
Sélection |
42 |
Impression |
43 |
Exécuter |
44 |
Impr. écran |
45 |
Inser |
46 |
Suppr |
47 |
Aide |
48 |
0 |
49 |
1 |
50 |
2 |
51 |
3 |
52 |
4 |
53 |
5 |
54 |
6 |
55 |
7 |
56 |
8 |
57 |
9 |
65 |
A |
66 |
B |
67 |
C |
68 |
D |
69 |
E |
70 |
F |
71 |
G |
72 |
H |
73 |
I |
74 |
J |
75 |
K |
76 |
L |
77 |
M |
78 |
N |
79 |
O |
80 |
P |
81 |
Q |
82 |
R |
83 |
S |
84 |
T |
85 |
U |
86 |
V |
87 |
W |
88 |
X |
89 |
Y |
90 |
Z |
96 |
Pavé numérique 0 |
97 |
Pavé numérique 1 |
98 |
Pavé numérique 2 |
99 |
Pavé numérique 3 |
100 |
Pavé numérique 4 |
101 |
Pavé numérique 5 |
102 |
Pavé numérique 6 |
103 |
Pavé numérique 7 |
104 |
Pavé numérique 8 |
105 |
Pavé numérique 9 |
106 |
Multiplication pavé numérique (*) |
107 |
Addition pavé numérique (+) |
108 |
Séparateur pavé numérique |
109 |
Soustraction pavé numérique (-) |
110 |
Point décimal pavé numérique (.) |
111 |
Division pavé numérique (/) |
112 |
F1 |
113 |
F2 |
114 |
F3 |
115 |
F4 |
116 |
F5 |
117 |
F6 |
118 |
F7 |
119 |
F8 |
120 |
F9 |
121 |
F10 |
122 |
F11 |
123 |
F12 |
144 |
Verr. Num |
145 |
Arrêt défil. |
160 |
Maj gauche |
161 |
Maj droite |
162 |
Ctrl gauche |
163 |
Ctrl droite |
Dépannage
- Les mods ont cessé de fonctionner après une mise à jour du jeu. C'est l'état normal des choses sur GTA V. Script Hook V est lié à une version précise du jeu, il vous faudra donc une build mise à jour (ou nightly) avant que tout fonctionne à nouveau.
- Le jeu plante au démarrage. Retirez les fichiers
.asietscripts\*.dllajoutés le plus récemment, puis remettez-les un par un.asiloader.logdans votre dossier de jeu vous indiquera souvent quel plugin a échoué. - Un mod .NET ne fait rien. Ouvrez la console SHVDN et exécutez
ListScripts(). S'il n'apparaît pas dans la liste, vérifiez que le.dllse trouve bien dansscripts\et non à la racine du jeu, et queScriptHookVDotNet2.dlletScriptHookVDotNet3.dllsont bien présents tous les deux. - Un mod .asi ne fait rien. Vérifiez que le fichier se trouve à la racine du jeu (pas dans
scripts\) et que vous avez bien un ASI loader (dinput8.dll) installé. Un vieux loaderdsound.dllqui traîne à côté causera aussi des problèmes. - BattlEye continue de se lancer. Voir les étapes d'installation nightly plus haut - soit vous retirez
GTA5_BE.exe, soit vous ajoutez-nobattleyeaux arguments de lancement via le Rockstar Games Launcher. - Vortex dit que ScriptHookV est obsolète alors qu'il ne l'est pas. Comparez les deux numéros de version affichés. S'ils contiennent tous les deux le même numéro de build mais à des positions différentes, il s'agit du faux positif décrit plus haut et vous pouvez l'ignorer.
- Les touches d'un trainer ne fonctionnent pas. Deux mods se disputent probablement le même raccourci. Modifiez le fichier
.inidu trainer et changez-les.
Conclusion
Et voilà, c'est à peu près tout ! Vous devriez maintenant avoir Script Hook V et ses plugins installés, quelques mods qui fonctionnent, et une idée assez claire de quand utiliser l'installation manuelle plutôt qu'un mod manager.
En résumé - installez Script Hook V en premier, ajoutez ScriptHookVDotNet si certains de vos mods sont basés sur .NET, retenez que les fichiers .asi vont à la racine du jeu tandis que les mods .NET en .dll vont dans scripts\, et utilisez le dossier mods d'OpenIV chaque fois que vous modifiez les archives du jeu.
Si vous avez des questions ou des retours concernant ce guide, merci de répondre à son sujet sur le forum ici ! Ce guide sera retravaillé et amélioré au fil du temps.
Rejoignez notre serveur Discord !